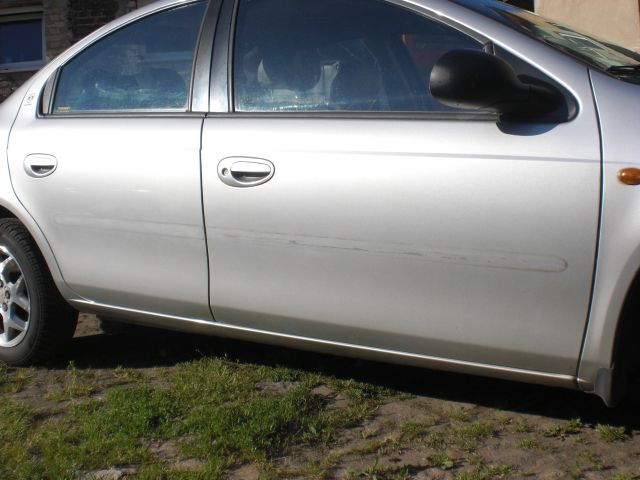
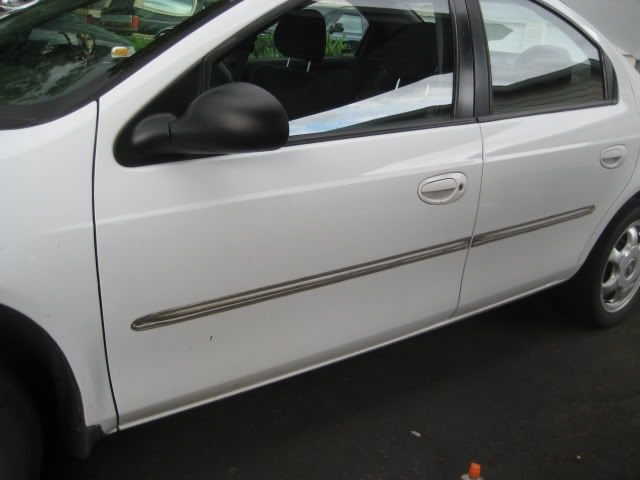
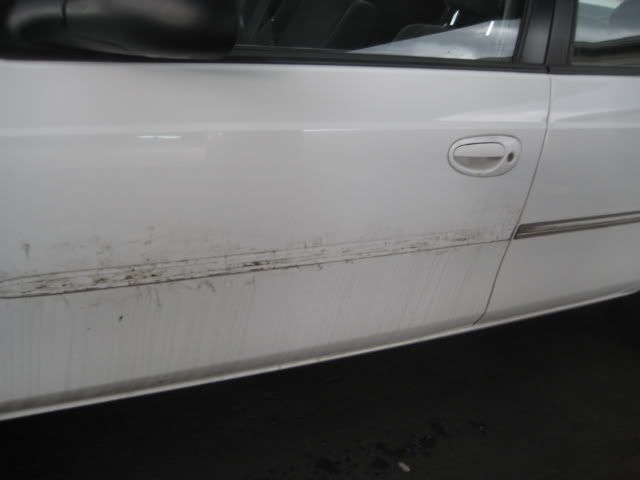
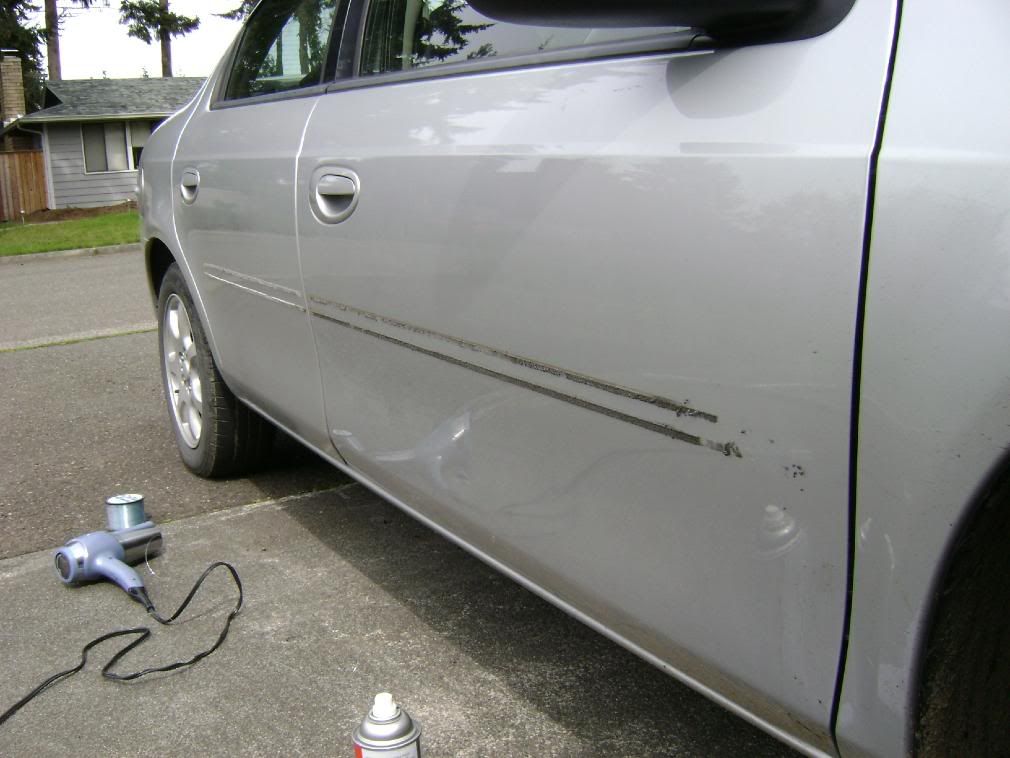
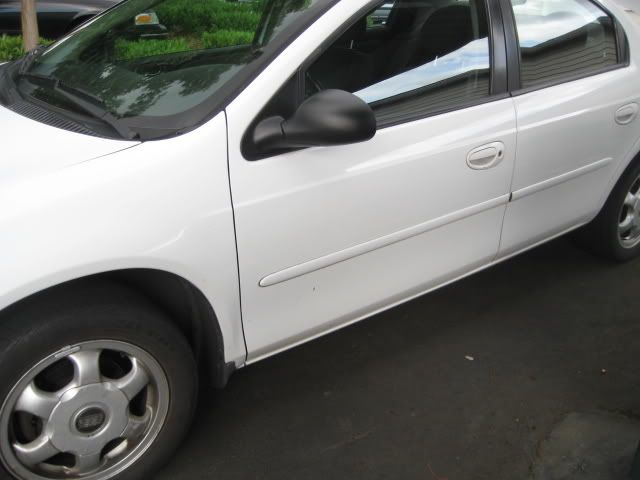
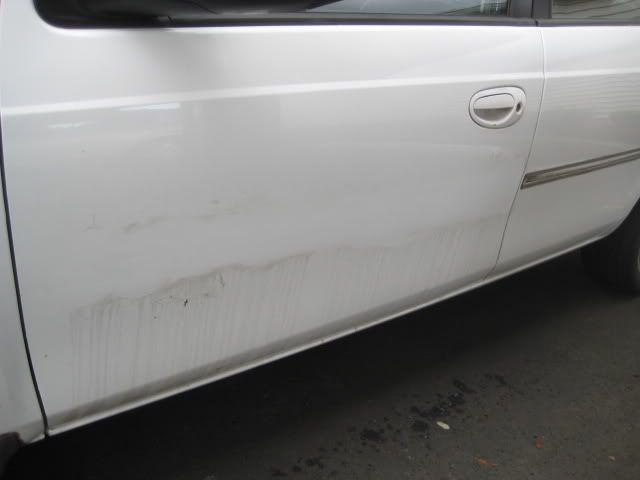
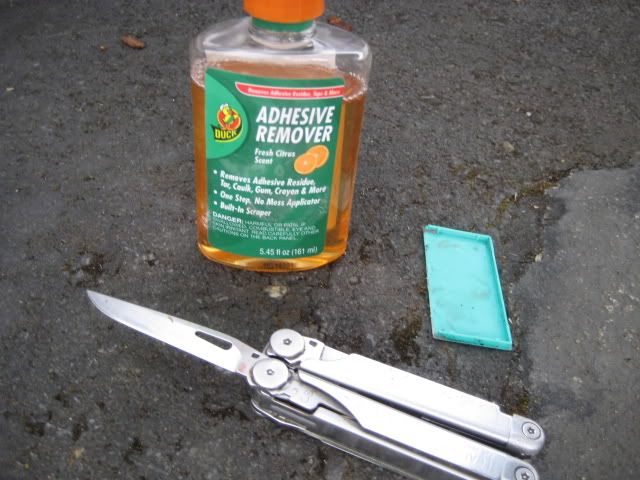
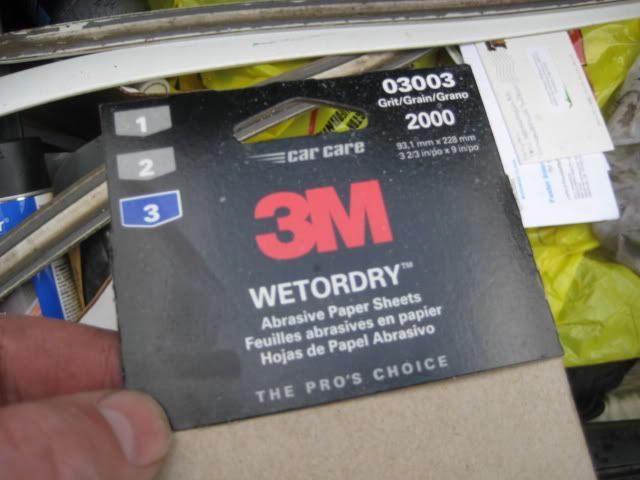
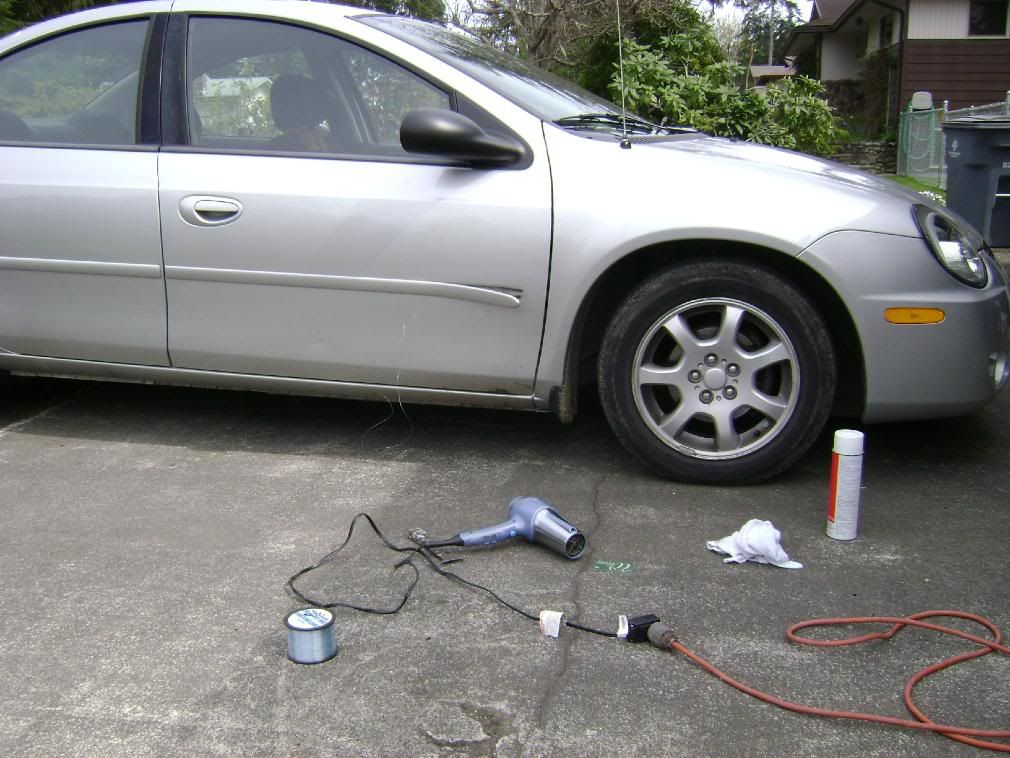
How-To: Remove Door Moldings

Post Reply
User avatar
Nutmeg
2GN Member
Posts: 1524
Joined: Wed May 16, 2007 7:14 pm
Location: Washington

How-To: Remove Door Moldings

Post by Nutmeg » Mon May 05, 2008 10:41 pm

So you don't like that ugly strip along the side of your car? Well then, you can take them off, for free! Here is a before and after to show the difference.

Before:
Image
After:
Image

Materials needed:
-A hair dryer or similar heat source
-Fishing line (You can also use an old credit card, but the fishing line works like a charm
-General purpose adhesive remover ( I used 3M)
-A rag or cloth you don't mind to ruin
-About 1-2 hours of your time

All materials can be seen here:
Image

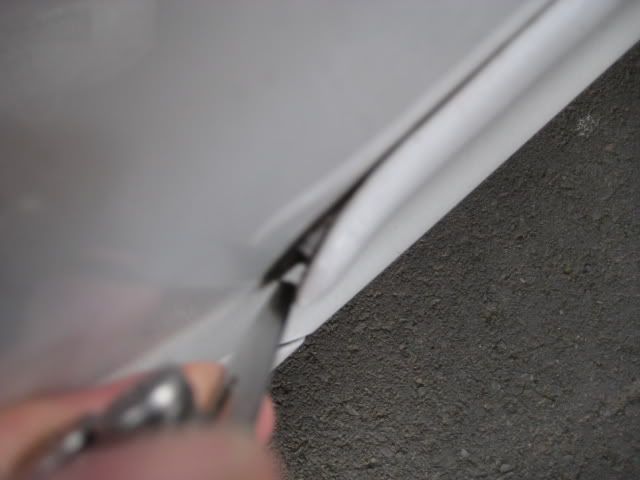
1. Start at the front of the car, using the hair dryer to heat up the adhesive and molding.

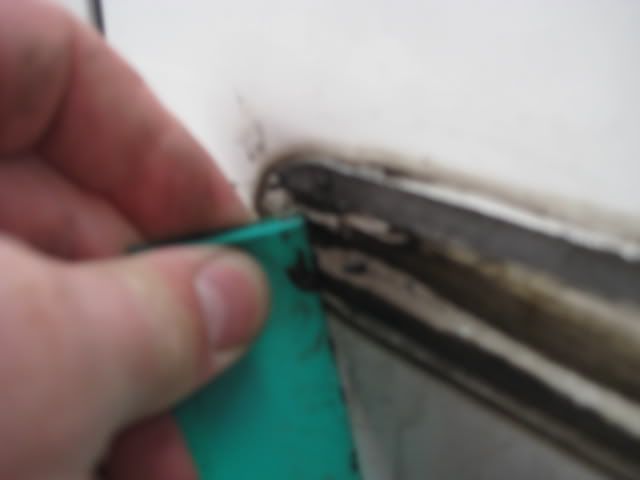
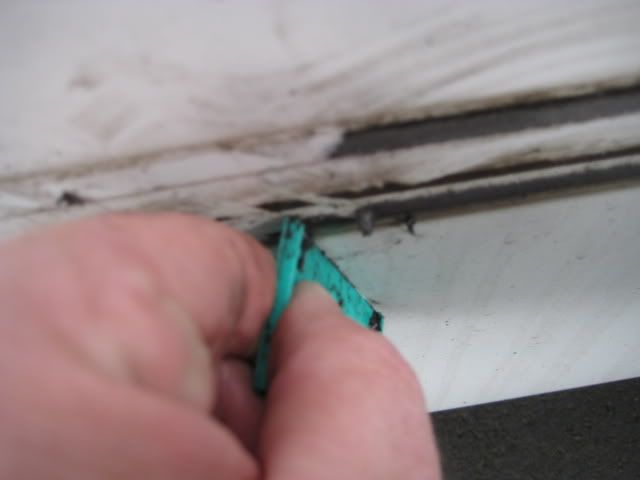
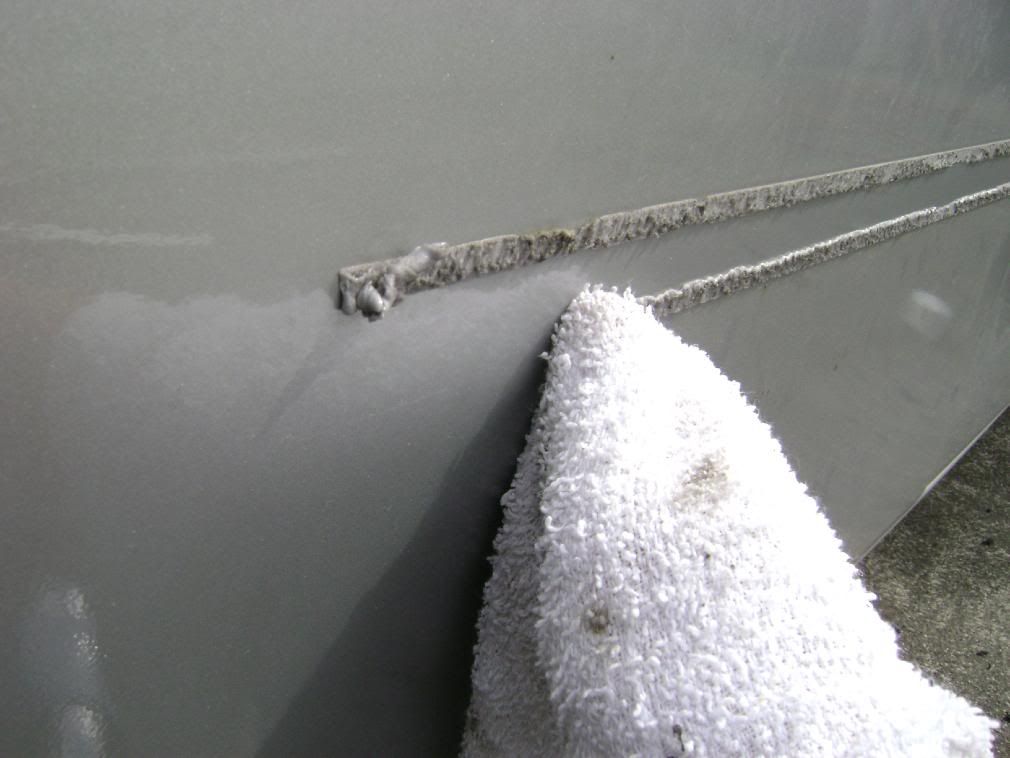
2. Take the fishing line, slide it under the molding, as seen below, and slide it up and down working your way back. Remember to continually use the hair dryer to apply heat as you go.
Image

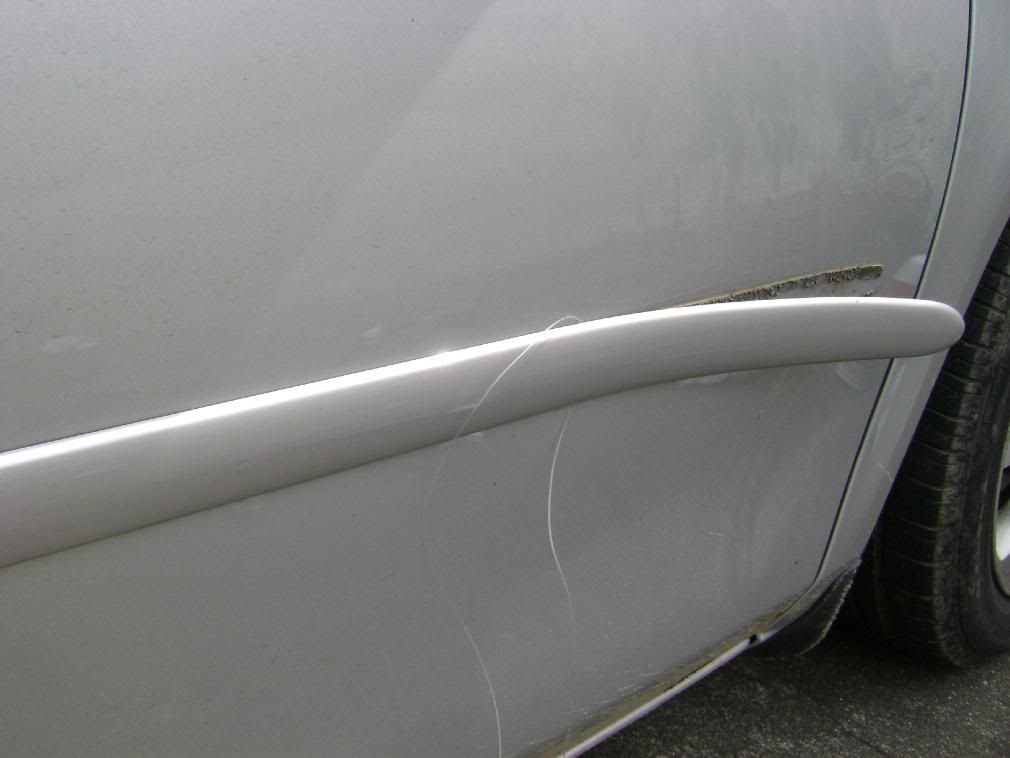
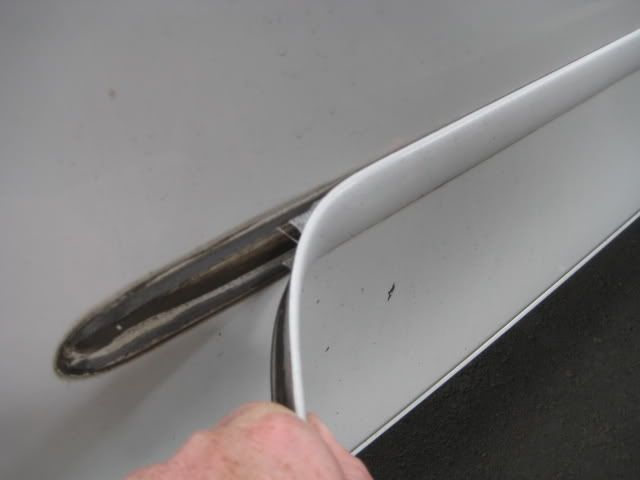
3. Repeat on back door.

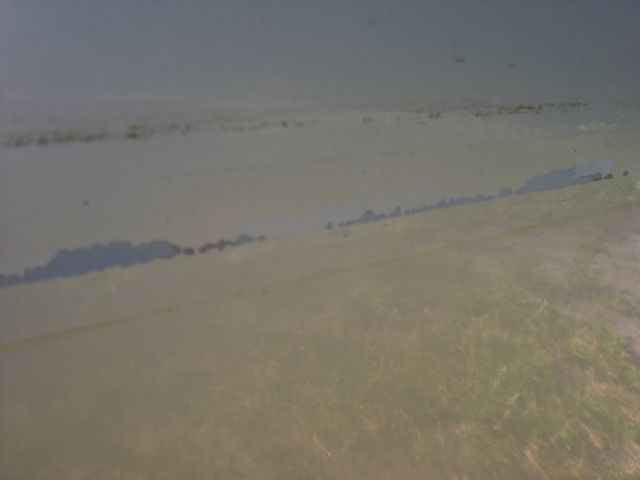
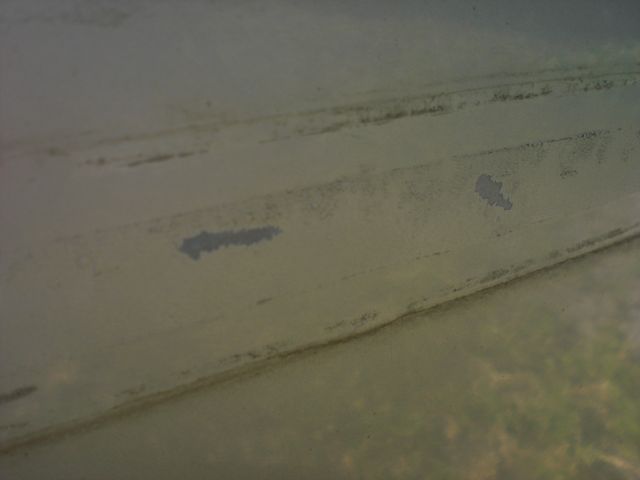
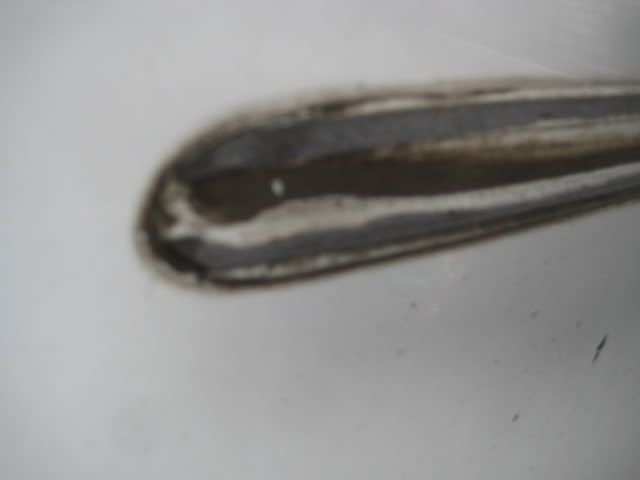
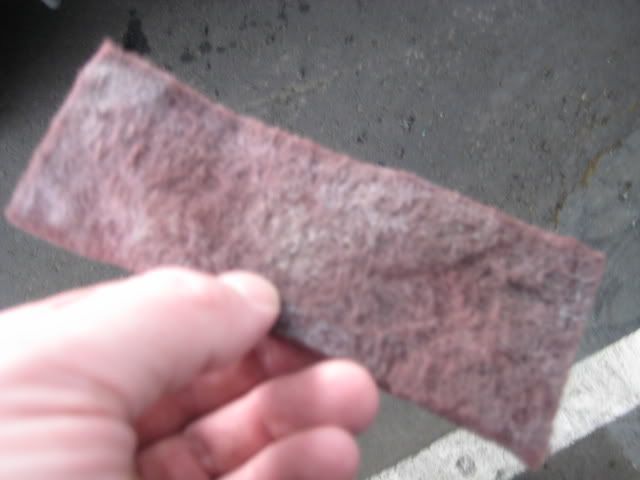
4. You'll most likely have these long strips of glue left on the doors afterwards. So grab your adhesive remover and cloth and get to work. Spray the adhesive remover on the spot you're working on, take the cloth, and rub it to get it off. I found that if you take your thumb in the cloth and rub the glue back it will roll right off for you.
Image
Image

5. If you have light lines in the place of your molding, a good detailing should clear that up for the most part. Otherwise, it will fade in time.

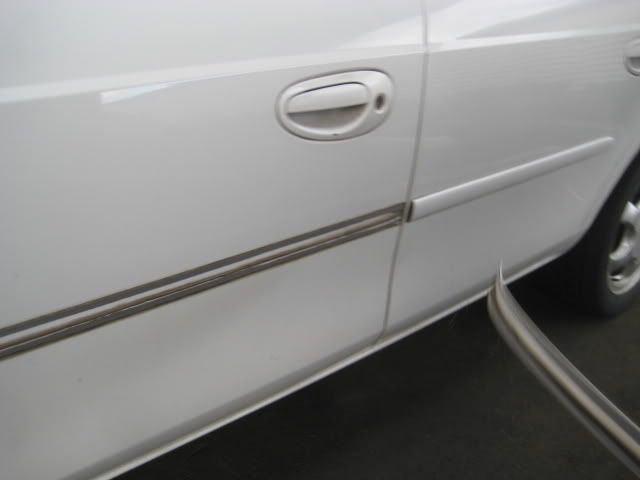
That's it! The finished product:
Image

It's pretty simple, just take your time and it will look great! :thumbup:
Image

occasional demons
Junior Admin
Posts: 20306
Joined: Thu May 03, 2007 12:14 pm
Location: Ashland Ohio

Post by occasional demons » Tue May 06, 2008 8:29 am

Definately gives it a different look. Altho I have to admit I never really noticed them on mine, I guess they don't bug me enough! It's amazing how the little things have an effect on apperance. They removed all the "Dodge" and "Neon" emblems when mine was painted, and I had to figure out why it looked so different! :tardbang:
Bill
Olha Koba, a psychologist in Kyiv, said that “anger and hate in this situation is a normal reaction and important to validate.” But it is important to channel it into something useful, she said, such as making incendiary bombs out of empty bottles.
2000 Neon MTX swap with '02 R/T PCM
1999 neon coupe 2.4 swap
2021 Forester

User avatar
SYRYS04
2GN Member
Posts: 69
Joined: Mon May 05, 2008 5:20 am
Location: WHERE IM AT
Contact:

Post by SYRYS04 » Mon Jun 02, 2008 3:30 am

I got a 04 Neon, so if I take off my moldings "now" I won't have a faded paint line goin across the sides of my car? meaning the paint won't be a different color like a "tan line" on a female fresh off the beach... I want to do it and I got time and all that but I don't want no tan line on the side of my boo...
THE TRUTH HURTS
LOVE IS PAIN
SO REGARDLESS OF WHAT I'M DOIN
I'M BREAKIN YOUR HEART

-SYRYS-

User avatar
[DJ]Tomski
2GN Member
Posts: 729
Joined: Mon Feb 13, 2006 2:10 pm
Location: IL

Post by [DJ]Tomski » Mon Jun 02, 2008 7:07 am

it depends on the condition of your paint. if your car is out in the sun all the time then it will be more noticeable than a car that has been garaged most of its life.
Image
j0n wrote:I recently discovered that I was modifying a neon and came to my senses...
:rofl:

DoubtedNeon
2GN Member
Posts: 1483
Joined: Mon Jun 16, 2008 5:28 pm
Location: Larsen, Wisconsin, 54947

Post by DoubtedNeon » Tue Jun 17, 2008 11:57 am

i have a red one...and ya it was a rental...and im putting vinyls on it...good idea to take those off or bad? they are black on my red car
Image
Swordfish2Cowboy wrote:They left a pry bar? Well get the prints like they do on CSI, and track those fuckers down. Then cap them.
grindpunk16 wrote: You and about 2 dozen other folks want that cover. It came with the car, and it's all mine.. :twisted: :bootyshake: \:D/

User avatar
Swordfish2Cowboy
2009 Silver Contributor
Posts: 2693
Joined: Sat Aug 25, 2007 7:06 am
Location: Sandusky, Ohio

Post by Swordfish2Cowboy » Wed Jun 18, 2008 12:16 am

Wow I've never seen that before. I thought everything was color-matched on the 2003+ at least.
ImageImage
:mopar: :runaway:

DoubtedNeon
2GN Member
Posts: 1483
Joined: Mon Jun 16, 2008 5:28 pm
Location: Larsen, Wisconsin, 54947

Post by DoubtedNeon » Wed Jun 18, 2008 12:57 am

ya strange i know...looked the same way lol...but anyway i got them off car looks sweet! im going with the lip kit for sure...i hope it looks good...ima run down college ave (show off area of downtown for cars) and i hope i impress other cars...maybe?
Image
Swordfish2Cowboy wrote:They left a pry bar? Well get the prints like they do on CSI, and track those fuckers down. Then cap them.
grindpunk16 wrote: You and about 2 dozen other folks want that cover. It came with the car, and it's all mine.. :twisted: :bootyshake: \:D/

ebomb
2GN Member
Posts: 27
Joined: Wed Sep 19, 2007 8:41 pm
Location: NEW JERSEY

Post by ebomb » Wed Nov 19, 2008 6:28 pm

Shaving the moldings definitely makes it look clean. But won't the hair drier do anything to the paint?
nvscreations.com

User avatar
Swordfish2Cowboy
2009 Silver Contributor
Posts: 2693
Joined: Sat Aug 25, 2007 7:06 am
Location: Sandusky, Ohio

Post by Swordfish2Cowboy » Mon Nov 24, 2008 7:20 pm

ebomb wrote:Shaving the moldings definitely makes it look clean. But won't the hair drier do anything to the paint?
Hair drier? No.
ImageImage
:mopar: :runaway:

User avatar
sxmania
2GN Member
Posts: 279
Joined: Sun Jun 08, 2008 3:41 pm
Location: Ontario CANADA

Post by sxmania » Wed Nov 26, 2008 12:44 am

when i pulled mine off a few yrs back there were little rust blobs under the moldings, plus they had written the part numbers in orange marker on the back side that had transfered to the car paint. scrubbing and sun bleach made both problems go away. :)

User avatar
2005.Neon.SXT
2GN Member
Posts: 2177
Joined: Mon Feb 04, 2008 2:16 am
Location: Raleigh, NC

Post by 2005.Neon.SXT » Wed Nov 26, 2008 12:58 am

He's probably got the SE trim, although his garage says SXT... only the SE's had the black side moldings and the black door handles. Also, if you look at his garage he's got the gauge cluster with no tach. I do believe all SXT's had the other kind with tach and speedometer.

Or maybe I'm just flat out wrong and I'll start walking away now...
Last edited by 2005.Neon.SXT on Fri Jul 09, 2010 7:20 am, edited 1 time in total.
Image
Progress Log --- Life & Work > Car... :(

Sykora
2GN Member
Posts: 1272
Joined: Sat Aug 30, 2008 10:14 pm
Location: Dallas Texas

Post by Sykora » Sun Dec 28, 2008 9:17 pm

When I took mine off- I was actually able to take two of them off without using any kind of heat or WD-40. I used that on the first two and found that getting rid of the sealant underneath was way easier without getting it wet and it didn't damage the paint underneath.

The only problems I had however were due to the fact that the dealership that had my car before I bought it painted two doors and painted over the moldings that were already in place leaving a slightly visable paint difference. They still look fine to me :)
-Eric
Image

Therman2020
2GN Member
Posts: 43
Joined: Wed Apr 14, 2010 9:21 pm
Location: Council Bluffs IA

Post by Therman2020 » Fri Jul 09, 2010 3:42 am

Awesome i plan to do this soon to my 05 sxt i think it makes a world of difference to the body but that's me

User avatar
2005.Neon.SXT
2GN Member
Posts: 2177
Joined: Mon Feb 04, 2008 2:16 am
Location: Raleigh, NC

Post by 2005.Neon.SXT » Fri Jul 09, 2010 7:20 am

Sykora wrote:When I took mine off- I was actually able to take two of them off without using any kind of heat or WD-40. I used that on the first two and found that getting rid of the sealant underneath was way easier without getting it wet and it didn't damage the paint underneath.
I had the same results. One side, I used my heat gun and it made taking the adhesive residue sucha pain in the ass. The other side, I just slid my credit card underneath and pealed the molding off. The adhesive on that side was SO much easier to take off.

Mine had very, VERY tiny bubbles, but you can't even see them unless you literally get inches away from my door. I've had them off for nearly a year and no issues with the paint.
Image
Progress Log --- Life & Work > Car... :(

User avatar
gtxtreme19
2010 Silver Contributor
Posts: 2061
Joined: Tue Jan 26, 2010 3:02 pm
Location: 43554 NW ohio

Post by gtxtreme19 » Fri Jul 09, 2010 8:36 am

I used a spatula, it gave me a good handle to grab on to and made it oh So much easier
-Mike
Midnight_Rider wrote:
Skitlz wrote:Gramps, get a GPS.
Gramps Prefers Streetmaps. :D

C1DoG
2GN Member
Posts: 1455
Joined: Thu Sep 09, 2010 11:50 am
Location: Pensacola, FL
Contact:

Post by C1DoG » Thu Dec 09, 2010 1:00 pm

I did this this morning using the plastic squeegie I got with my window sticker. slid it underneath the molding and it was off in no time. And just used good ole fashioned elbow grease getting the leftover residue off. I like the clean look of it and now that that is done..... :D
Drove my neon until it was killed in a flood.
Image

User avatar
Gnuserup
2GN Member
Posts: 661
Joined: Sun Jun 28, 2009 3:06 pm
Location: Germany

Post by Gnuserup » Thu Dec 09, 2010 3:05 pm

This year I removed my moldings using a hot air drier.
They went off very easy, but the result was shocking...

Image

Image

Image

Image

On both frontdoors the painting ripped off and I found a lot
off tiny bubbles. At the reardoors there were only a few tiny bubbles.
Some other Neonbuddies here who did it had similar problems, but not all.We thought, it maybe depends on the colour and the age
of your car.
Btw. the SE here was sold without the moldings.

User avatar
Haganracing
2GN Member
Posts: 4169
Joined: Tue Jan 30, 2007 11:23 pm
Location: Mount Airy, Maryland
Contact:

Post by Haganracing » Thu Dec 09, 2010 6:27 pm

You could get a bodyshop to blend the doors where the paint came off.. Shouldn't cost too much.
occasional demons wrote:So maybe a FuzzyDanteHagan sammich might just beat a FuzzyHagan. :-k
Danteneon wrote:My advice is to fight those urges and enjoy the fact that you have both X and Y chromosomes. And an SRT. And your hand. You don't need a girl.

User avatar
Gnuserup
2GN Member
Posts: 661
Joined: Sun Jun 28, 2009 3:06 pm
Location: Germany

Post by Gnuserup » Fri Dec 10, 2010 12:59 am

Haganracing wrote:You could get a bodyshop to blend the doors where the paint came off.. Shouldn't cost too much.
The one I have been asking for wanted a minimum of 200 € each door :banghead:

So I decided to put primer on it and then the orange vinyl...

That One Guy . . .
n00b
Posts: 15
Joined: Sun Dec 12, 2010 11:28 am
Location: North Olmsted, Ohio

Post by That One Guy . . . » Sat Feb 19, 2011 3:59 pm

I just did this on my car, and the car does look better from a distance, but the paint did peel on me at least a little on all four doors. That, and my blow dryer crapped out on me . . . lol. I knew that I wanted to get'er painted anyway, but now it looks like it's gonna have to come sooner, rather than later. Anybody know of any good body shops around Cleveland?

2002 Dodge Neon Base Model
Exterior: Bright Silver Metallic Clearcoat
Interior: Dark Slate Gray
Mods: Panasonic AM/FM/CD, Alarm system

User avatar
greybox
2GN Member
Posts: 97
Joined: Fri Jan 28, 2011 12:27 pm

side door molding removal with many photos

Post by greybox » Thu Jul 21, 2011 9:59 pm

first start with your neon (not any one elses)
Image
and you need these things to start -the adhesive remover is a MUST!!! (I recommend using something very un-sharp to get the trim started, I used a knife today as it was all I had and was very careful)
Image
Image
then as soon as you can get your fingers in there and start pulling away from the car

Image
and this is an action shot as the trim springs loose (it was really floating in the air for this second too)
Image
and this is what it looks like with the trim removed....all yucky from 11 years of dirt and adhesive strips
Image
Image
use adhesive remover generously!!!!! It makes a huge difference!!!
and start with your own improvised adhesive scraper (the top of the bottle had one but I broke it off getting the vinyl letters off the back of the car)
Image
the angle matters-more pushing it back instead of cutting under it did wonders...learn as we go method
Image
half cleaned
Image
use this to clean up the residue after adhesive is gone....(DO NOT use this abrasive of a product if you have new or great quality paint...my car wasn't perfect so i was okay with it)
Image
half cleaned
Image
cleaned!!!
Image
use this to get it all shiny...maybe it was too fine cuz it took forever
Image
and there you go...clean and smooth!!!!
Image

C1DoG
2GN Member
Posts: 1455
Joined: Thu Sep 09, 2010 11:50 am
Location: Pensacola, FL
Contact:

Post by C1DoG » Thu Jul 21, 2011 10:03 pm

If you had checked first, you would have seen a thread on this subject.
viewtopic.php?t=31618
Drove my neon until it was killed in a flood.
Image

User avatar
greybox
2GN Member
Posts: 97
Joined: Fri Jan 28, 2011 12:27 pm

Post by greybox » Thu Jul 21, 2011 10:09 pm

I did see that...found a way to do it differently and without heat and fishing line....

C1DoG
2GN Member
Posts: 1455
Joined: Thu Sep 09, 2010 11:50 am
Location: Pensacola, FL
Contact:

Post by C1DoG » Fri Jul 22, 2011 7:22 am

greybox wrote:I did see that...found a way to do it differently and without heat and fishing line....
But could have added to this one instead of making a new one.
Drove my neon until it was killed in a flood.
Image

User avatar
greybox
2GN Member
Posts: 97
Joined: Fri Jan 28, 2011 12:27 pm

Post by greybox » Fri Jul 22, 2011 5:17 pm

Cool...didn't know you could do that...

User avatar
2005.Neon.SXT
2GN Member
Posts: 2177
Joined: Mon Feb 04, 2008 2:16 am
Location: Raleigh, NC

Post by 2005.Neon.SXT » Fri Jul 22, 2011 6:26 pm

I didn't use heat on mine. Well, one part I did, but I realized that the heat gun was melting the residue and making it a bi*** to get off, so I just used an old credit card on the other pieces, adhesive remover, and yea. Good stuff.
Image
Progress Log --- Life & Work > Car... :(

fox02neon
2GN Member
Posts: 26
Joined: Wed Nov 01, 2006 7:33 pm
Location: Yakima WA

Post by fox02neon » Sun Mar 10, 2013 1:57 am

They sure do look better
foxo2neon

Post Reply

Return to “HT Exterior”