Wiring up HID kit.
-
clancaster23
- 2GN Member
- Posts: 173
- Joined: Fri Mar 14, 2008 5:21 pm
Wiring up HID kit.
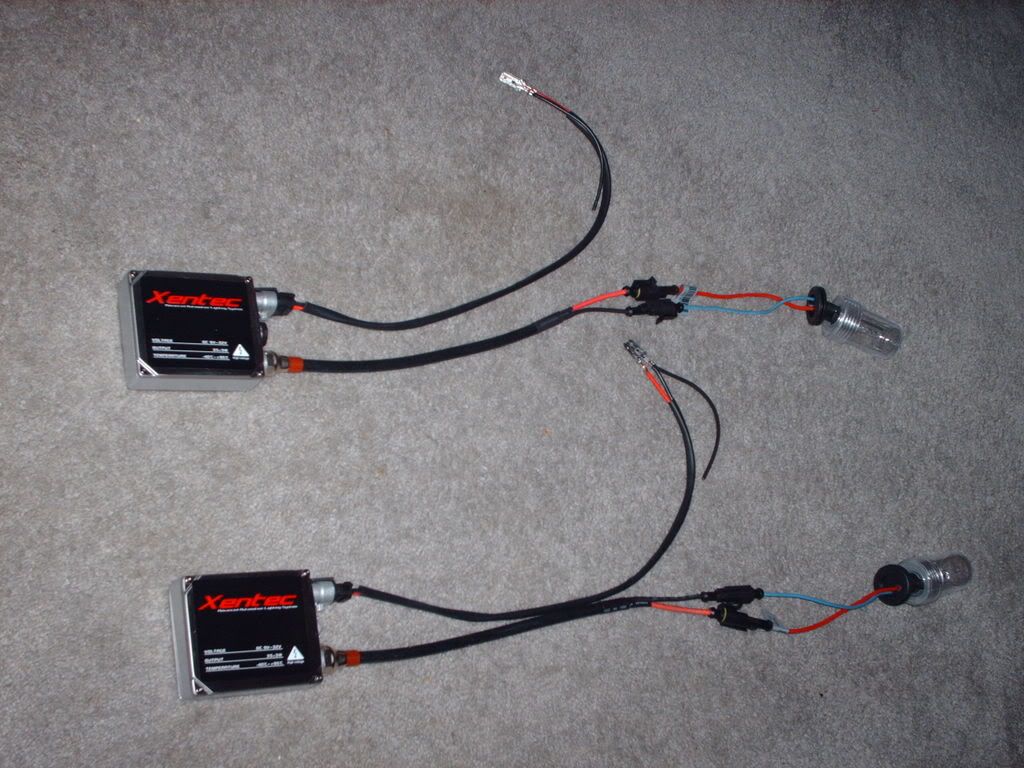
Just go tmy HID kit and I don't see how I would be able to hook the wires up to the battery. Don't seem to be long enough, at least not for the passenger side. What to do??? Below is a pic of what I got with the kit. Do I need to get something else??
-
[DJ]Tomski

- 2GN Member
- Posts: 729
- Joined: Mon Feb 13, 2006 2:10 pm
- Location: IL
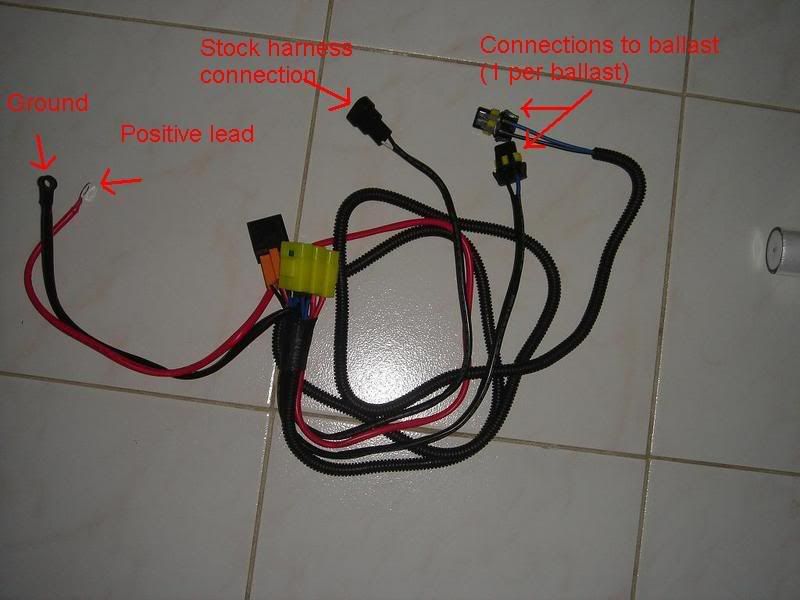
you're gonna need a a wiring harness like this one if you don't want to take a risk of melting your factory wires or even worse, starting a fire.

idk if all wiring harnesses look like the one above, it's just what i got with my hid kit.
idk if all wiring harnesses look like the one above, it's just what i got with my hid kit.

j0n wrote:I recently discovered that I was modifying a neon and came to my senses...
-
clancaster23
- 2GN Member
- Posts: 173
- Joined: Fri Mar 14, 2008 5:21 pm
-
[DJ]Tomski
- 2GN Member
- Posts: 729
- Joined: Mon Feb 13, 2006 2:10 pm
- Location: IL
idk about auto zone or anything like that but a quick search for "9007 hid harness" on ebay came up with some good results. this one looks like what you need and is inexpensive http://cgi.ebay.com/ebaymotors/9007-HID ... 0221716401
maybe someone else can chime in to confirm?
maybe someone else can chime in to confirm?
j0n wrote:I recently discovered that I was modifying a neon and came to my senses...
-
clancaster23
- 2GN Member
- Posts: 173
- Joined: Fri Mar 14, 2008 5:21 pm
I have a H1 bulb. Will that matter? I checked the stores and no one had one.
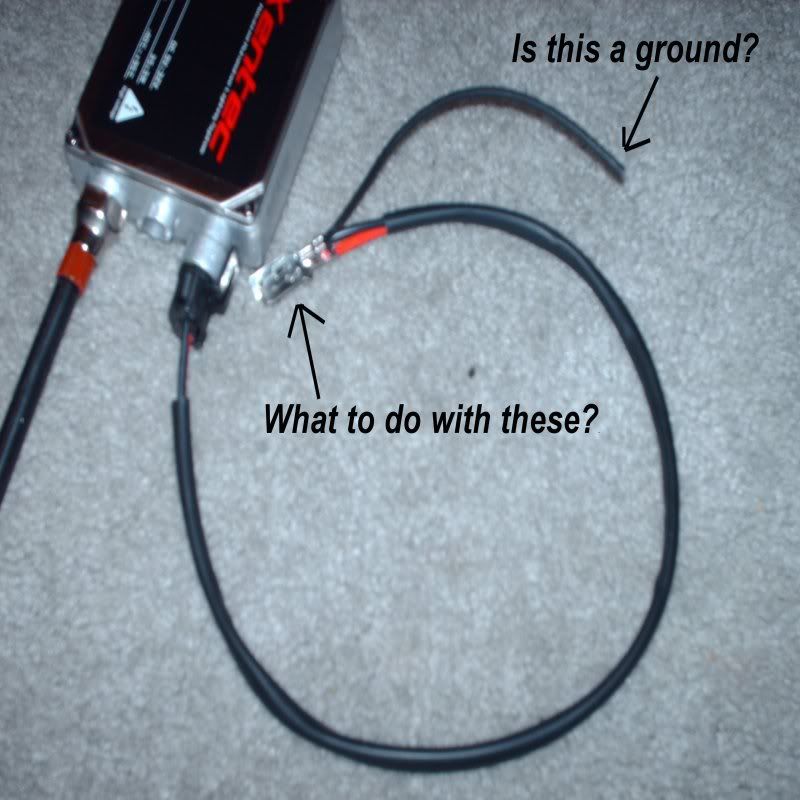
Question about the pic you posted. The blue OEM plus, where does it go?? I have those blue plugs on my projectors but I don't think that's what is in that picture. I'm kind of confused as to how all this is to get wired up. I am guessing the plugs in the relay harness will go in the ballasts in place of the ones I have in there now (see the wires on the top halves on my picture)? Also, the black wire right by the words Ballast Plus, is that just a ground wire I hook up to the negative terminal on my battery?
I may have put myself in a hole I can't quite get out of LOL
-
clancaster23
- 2GN Member
- Posts: 173
- Joined: Fri Mar 14, 2008 5:21 pm
-
[DJ]Tomski
- 2GN Member
- Posts: 729
- Joined: Mon Feb 13, 2006 2:10 pm
- Location: IL
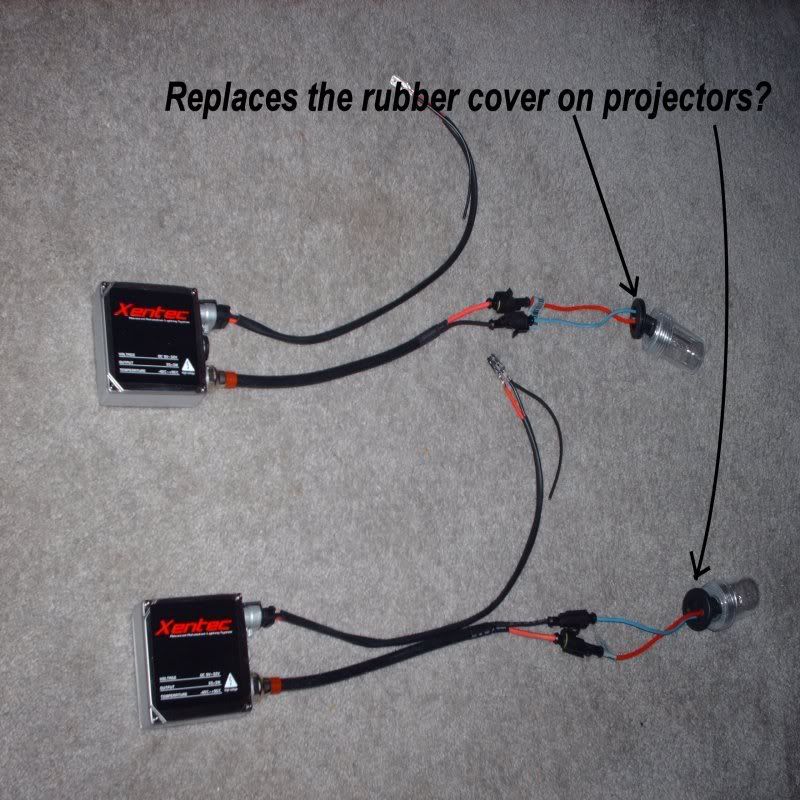
i have the blue plug bc i have 9007 bulbs, since you're using h1 bulbs you will have different plugs i think. take a look at this pic. it shows how to connect a h1 hid kit without using a harness.

if you do get a wiring harness, which i suggest (or make your own like ZeroChad said), it should look similar to mine but the blue "OEM plug" will look different. take a look at this one. it is labeled what goes where. again, the "stock harness connection" might look different bc of different bulbs used but everything connects the same for the most part.
hope that helps.
j0n wrote:I recently discovered that I was modifying a neon and came to my senses...
-
ZeroChad
- 2009 Gold Contributor
- Posts: 3165
- Joined: Sat Sep 01, 2007 11:08 pm
- Location: Austin, Tx
- Contact:
Ok. I'll work on one. Yeah the power consumption of the HID kit is generally lower than the halogen bulbs, so you wouldn't think it would melt your harness. Its true, after they've been running for a while, they have less of a current draw. However, when they are initially turned on, they have a peak current draw of about 12 amps. This is because they have to heat up the bulb.
Do you want to have your HIDs stay on when you turn on your halogen brights? I would suggest this especially if you flash your brights alot, because turning them on/off quickly will decrease their lifespan.
Do you want to have your HIDs stay on when you turn on your halogen brights? I would suggest this especially if you flash your brights alot, because turning them on/off quickly will decrease their lifespan.
-
clancaster23
- 2GN Member
- Posts: 173
- Joined: Fri Mar 14, 2008 5:21 pm
-
clancaster23
- 2GN Member
- Posts: 173
- Joined: Fri Mar 14, 2008 5:21 pm
-
[DJ]Tomski
- 2GN Member
- Posts: 729
- Joined: Mon Feb 13, 2006 2:10 pm
- Location: IL
i'm guessing you're gonna use these on the projectors headlights you have listed in your garage? can you post a pic or two of the back of the progectors and the wires from them? i'm not familiar with how projectors wire up so i would need to see the back of them to figure it out.
btw, did you get any sort of instructions with your hid kit?
btw, did you get any sort of instructions with your hid kit?
j0n wrote:I recently discovered that I was modifying a neon and came to my senses...
-
clancaster23
- 2GN Member
- Posts: 173
- Joined: Fri Mar 14, 2008 5:21 pm
Yep, want to do it on the ones I just got. I found someone else's post that has pics of the backs of them. These are the same ones I have.
Yes, I did get a small book for instructions but being that it doesn't exactly refer to the projectors I have, it's kind of useless.
Forgot to post the link to the pics.... http://forum.2gn.org/viewtopic.php?t=17 ... =projector
Yes, I did get a small book for instructions but being that it doesn't exactly refer to the projectors I have, it's kind of useless.
Forgot to post the link to the pics.... http://forum.2gn.org/viewtopic.php?t=17 ... =projector
Last edited by clancaster23 on Sat Mar 22, 2008 9:43 pm, edited 2 times in total.
-
ZeroChad
- 2009 Gold Contributor
- Posts: 3165
- Joined: Sat Sep 01, 2007 11:08 pm
- Location: Austin, Tx
- Contact:
my scanner is freakin out. Hold on a sec...
I would have done it on the computer , but I felt like busting out the markers.
In the diagram below, I should have said "You could do a 30amp fuse before the wire splits to both ballasts, instead of 2 15amp fuses."
I would have done it on the computer , but I felt like busting out the markers.
In the diagram below, I should have said "You could do a 30amp fuse before the wire splits to both ballasts, instead of 2 15amp fuses."
Last edited by ZeroChad on Sat Mar 22, 2008 9:33 pm, edited 1 time in total.
-
ZeroChad
- 2009 Gold Contributor
- Posts: 3165
- Joined: Sat Sep 01, 2007 11:08 pm
- Location: Austin, Tx
- Contact:
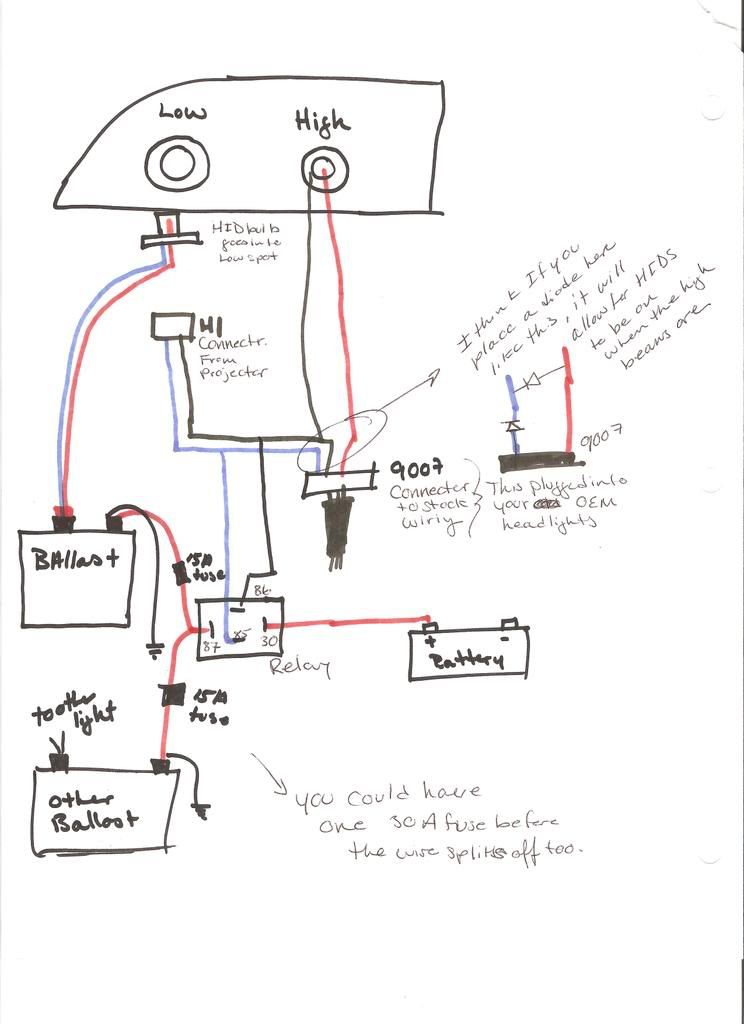
There. If you do decide to use the diodes to leave your HID bulbs on with the highs, make sure they have a breakdown voltage of greater than 12VDC.
The only thing you have to be careful about when doing the always on setup with the diodes, is during the day. When you don't have your headlights on and you flash your brights, you'll also be flashing the HIDs. This is something you don't want to be doing.
-
clancaster23
- 2GN Member
- Posts: 173
- Joined: Fri Mar 14, 2008 5:21 pm
For the most part... that confuses the hell outta me LOL!
One, how does all this connect to the stock wiring harness? That would solve a big question of mine.
Two, I'm not changing the high beam at all but it obviously needs to be wired up some how. Where in the diagram are you referring to the high beam? Would it be possible to get s step-by-step list of what to hook up when and where? I know this is asking a lot but I know next to nothing about electric stuff in a car and probably never should have gone this route. Wasn't aware there was this much involved in it.
I got the 14g wire from the positive terminal to the 30 slot in the relay. Then I run some 14g from the 87 slot in the relay, cut in a 30a inline fuse, then create a split of 14g to the red wires of each ballast. The stock wiring for the ballasts is 16awg. Will this matter of should I switch all wiring to 16g? As for the bulb wire, I just run it straight into the projector slot in the headlight replacing the one it came with? If so, how are the high beams connected? This is where I get stuck. Will I be totally eliminating the actual plug that is the stock wiring harness? Just taking the wires out and splicing them up to these for the kit?
-
ZeroChad
- 2009 Gold Contributor
- Posts: 3165
- Joined: Sat Sep 01, 2007 11:08 pm
- Location: Austin, Tx
- Contact:
Don't worry man, its not as bad as it looks. I'm gunna be doing mine in a couple of weeks. I'd be doing a little research anyway sooner or later. The stock harness is the connector to the left of the 9007 in the diagram. Without the HIDs in, this is what your projectors are currently connected to.
You really only need the 14g wire from the battery to the relay, and from the relay up to the fuse. Then you can split off with the 16g that came with the ballast. This is because 14g is rated to 32amps.
You really don't do anything to the high beams, unless you got one of those bi-zenon kits. Just leave them hooked up as they are right now.
Keep in mind, your stock 9007 connector will be connected to the projector wire harness's 9007 connector as it is now without the HIDs. The black and red will lead to the high beam h1 connector. The blue and black should be connected to your relay. You can leave the h1 low connector hanging if you want to take out the HIDs later.
You really only need the 14g wire from the battery to the relay, and from the relay up to the fuse. Then you can split off with the 16g that came with the ballast. This is because 14g is rated to 32amps.
You really don't do anything to the high beams, unless you got one of those bi-zenon kits. Just leave them hooked up as they are right now.
- 1) Unplug your low beam bulb, and replace with the Hid bulb.
2) Mount the ballasts, and connect the HID bulb to the ballast using the existing wiring.
3) Tap into the originaly plug that was in your projector low beams. (The one with the purple lens) Send the blue wire to the 85 post on the relay, and the black to the 86 post.
4) Cut off the connector on the power cord to each ballast. Ground the black wire. Connect both red wires to the 30amp fuse.
5) Using 14g wire connect the fuse to post 57 on the relay.
6) Using 14g wire connect post 30 on the relay to ground.
DONE!!!!!!1121!!!!one!!!
Keep in mind, your stock 9007 connector will be connected to the projector wire harness's 9007 connector as it is now without the HIDs. The black and red will lead to the high beam h1 connector. The blue and black should be connected to your relay. You can leave the h1 low connector hanging if you want to take out the HIDs later.
-
clancaster23
- 2GN Member
- Posts: 173
- Joined: Fri Mar 14, 2008 5:21 pm
Think I can do that without any problems. One question though, what kind of relay should I be picking up?? One f the ones with the plugs sticking out of it? Example: http://www.autozone.com/images/products ... r76003.jpg but with just four plugs? Am I connecting these wires to the plugs with connectors?
Also, I'm going to be having a ground wire and the main power wire going from the battery to the relay switch on post 30 right? Just want to be clear on this. Is it ok if they are touching? I don't see how I can connect the power and ground that are on the same switch.
Also, I'm going to be having a ground wire and the main power wire going from the battery to the relay switch on post 30 right? Just want to be clear on this. Is it ok if they are touching? I don't see how I can connect the power and ground that are on the same switch.
-
kc2005ptgt

- Former Moderator
- Posts: 6587
- Joined: Wed Dec 14, 2005 7:39 pm
- Location: Kansas City, MO
- Contact:
-
LilSparkPlug
- 2GN Veteran
- Posts: 12206
- Joined: Thu Jan 10, 2008 4:49 pm
- Location: RI
-
kc2005ptgt
- Former Moderator
- Posts: 6587
- Joined: Wed Dec 14, 2005 7:39 pm
- Location: Kansas City, MO
- Contact:
So, between the high beam positive wire, and the low beam HID positive wire?LilSparkPlug wrote:Just one diode for the power wire leaving the 85 for the 9007 wire/plug.
SOLD 5/13- 2005 Chrysler PT Cruiser GT Convertible | 2.4L Turbo HO | Bright Silver Metallic
SOLD 7/09- 2002 Dodge Neon ACR | Flame Red
The Offical: Sold My Neon Even Though I Swore I Never Would Club | Member #777

SOLD 7/09- 2002 Dodge Neon ACR | Flame Red
The Offical: Sold My Neon Even Though I Swore I Never Would Club | Member #777
-
ZeroChad
- 2009 Gold Contributor
- Posts: 3165
- Joined: Sat Sep 01, 2007 11:08 pm
- Location: Austin, Tx
- Contact:
I looked up the light wiring schematic for neons in the hayne's manual. Turns out, you don't need the second diode. I just threw it in there as a precaution. (You don't want to see voltage at an output of an ecu when there shouldn't be.)
On the diode, you'll see a little line in a different color. This refers to the cathode end. You'll want that to be on the low beam wire coming from the 9007 plug on the projectors wiring harness. Connect the other end to high beam wire at the same connector.
Keep in mind what I said about flashing your brights while your head lights are off. (during the day). You will be flashing your HIDs as well.
-
kc2005ptgt
- Former Moderator
- Posts: 6587
- Joined: Wed Dec 14, 2005 7:39 pm
- Location: Kansas City, MO
- Contact:
hey, thanks man... btw, I will be doing this this weekend, so I want to make sure how did you "wire" up this diode to your lights? Just cut and snip and re attach? I dunno what I should do, I got a soddering gun, etc, so I will use it that way, but I am assuming you need to either expose the wire and make a bridge between the two wires that the diode connects too... also, I got a diode labeled 1N4001 not the 14N001 you posted, no one ever heard of it, but it is rated at the same 50V but 1A, is this a problem?
SOLD 5/13- 2005 Chrysler PT Cruiser GT Convertible | 2.4L Turbo HO | Bright Silver Metallic
SOLD 7/09- 2002 Dodge Neon ACR | Flame Red
The Offical: Sold My Neon Even Though I Swore I Never Would Club | Member #777
SOLD 7/09- 2002 Dodge Neon ACR | Flame Red
The Offical: Sold My Neon Even Though I Swore I Never Would Club | Member #777
-
clancaster23
- 2GN Member
- Posts: 173
- Joined: Fri Mar 14, 2008 5:21 pm
-
ZeroChad
- 2009 Gold Contributor
- Posts: 3165
- Joined: Sat Sep 01, 2007 11:08 pm
- Location: Austin, Tx
- Contact:
You're right on the diode. That was a typo. When I do my installation, what I'm going to do is strip about half inch of the shielding on both of the wires. From there I'll solder in two small leads to the diode and heat shrink wrap everything. Good luck on the install.kc2002acr wrote:hey, thanks man... btw, I will be doing this this weekend, so I want to make sure how did you "wire" up this diode to your lights? Just cut and snip and re attach? I dunno what I should do, I got a soddering gun, etc, so I will use it that way, but I am assuming you need to either expose the wire and make a bridge between the two wires that the diode connects too... also, I got a diode labeled 1N4001 not the 14N001 you posted, no one ever heard of it, but it is rated at the same 50V but 1A, is this a problem?
Glad everything worked out for you clancaster!
-
clancaster23
- 2GN Member
- Posts: 173
- Joined: Fri Mar 14, 2008 5:21 pm
I said I would post some night pics when I got them. Had a warm night and thought I'd take them.
I have halos on with parking lights and three led's on with turn signals. I may redo these to be on at all times and turns later. My camera is very picky with taking night pics. With the flash off, have to remain almost like a statue to ge it to take right. Sorry for the blurry ones.
Flash on this camera is too bright but took this one anyways. It's with parking lights/halos on. I need to paint those fog light inserts
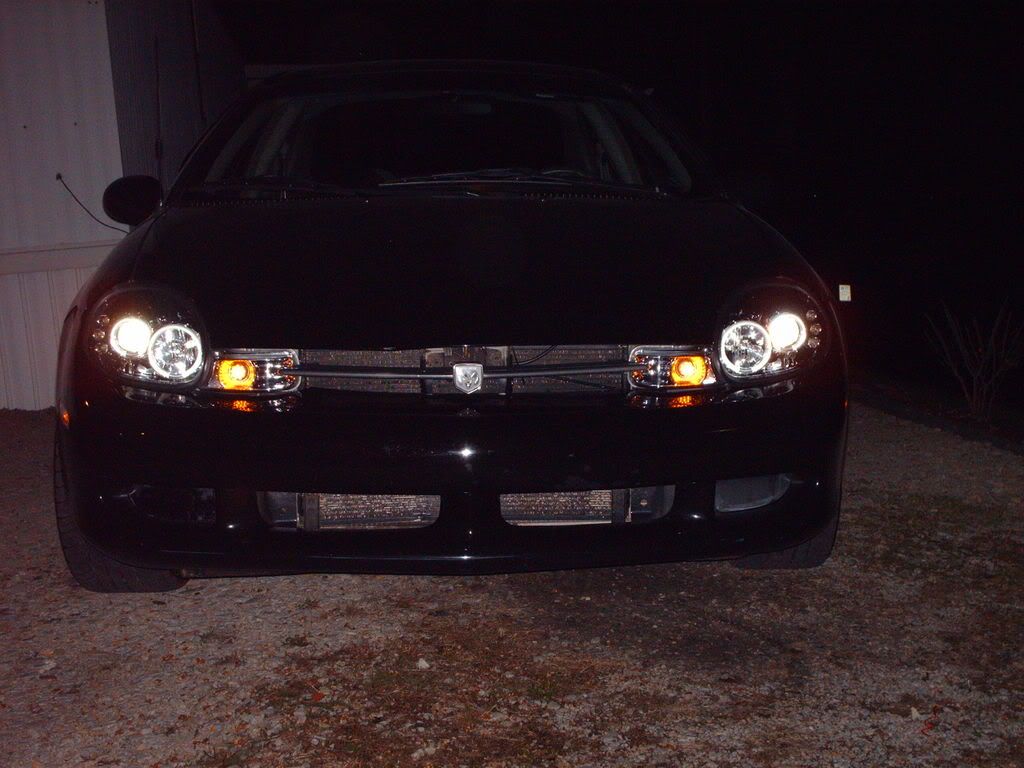
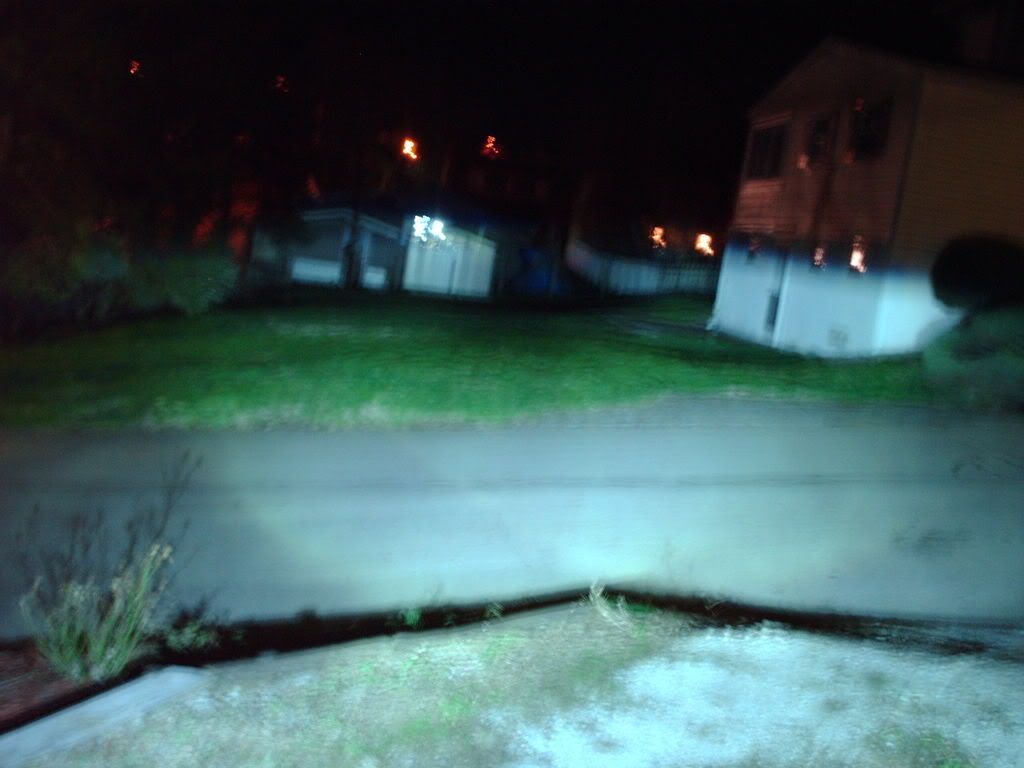
Parking/halos on.
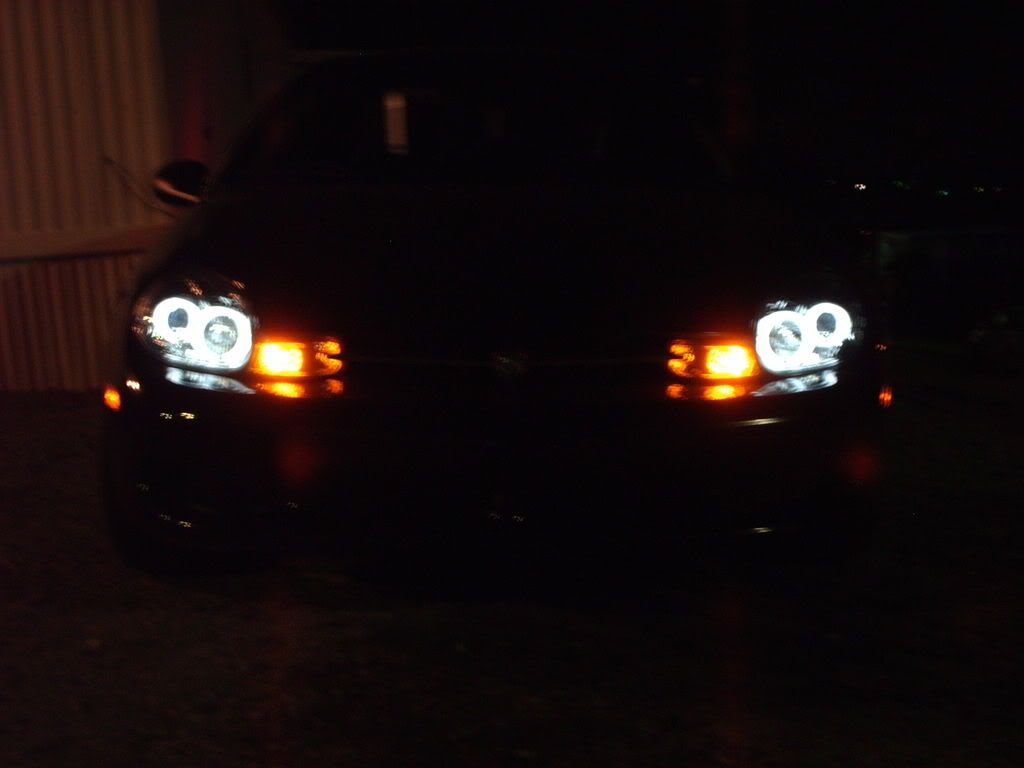
Closeup.
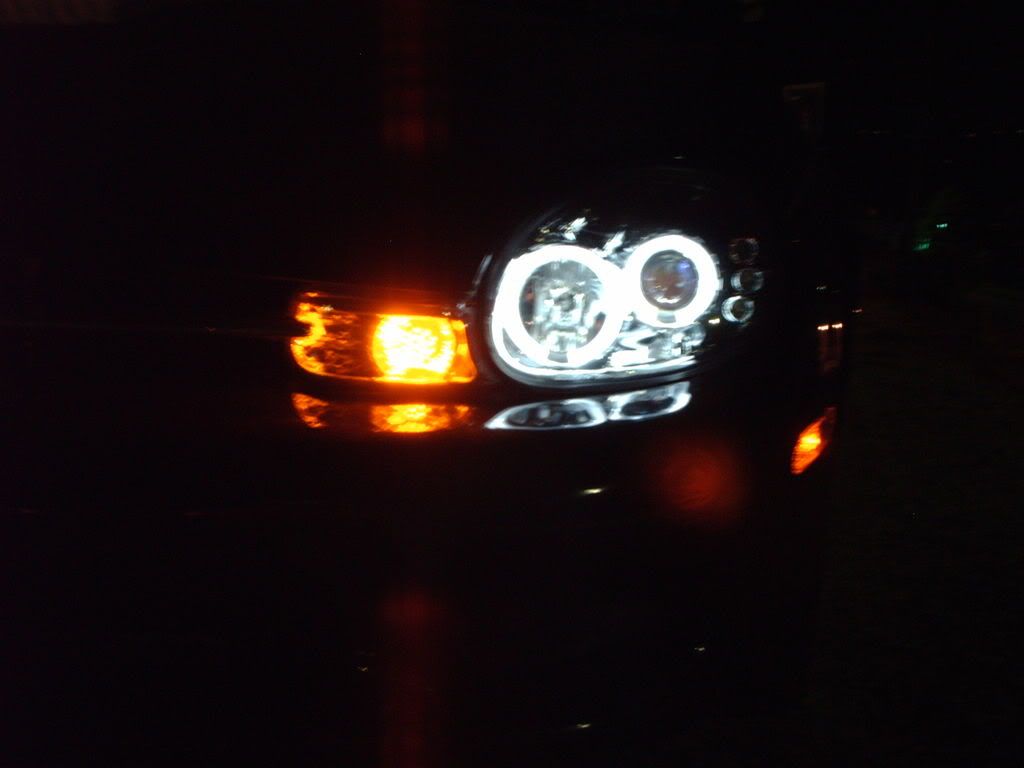
Projectors with HID (10k) on. I love the blue.
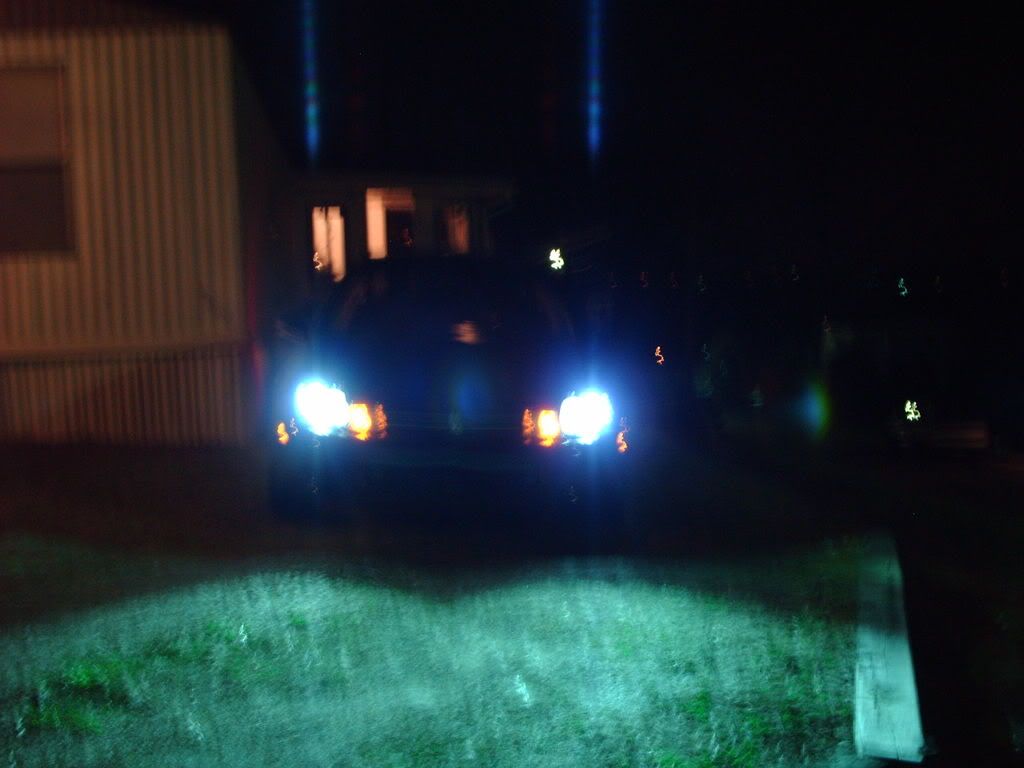
A little closer:
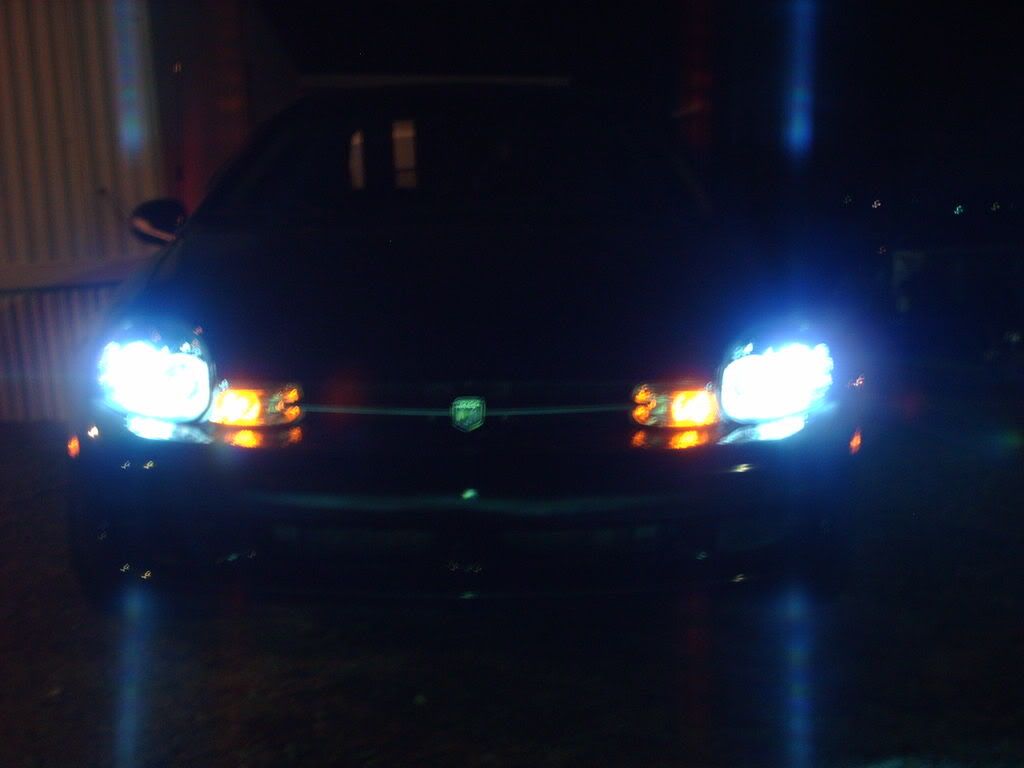
Projector light output with HID:
High beam:
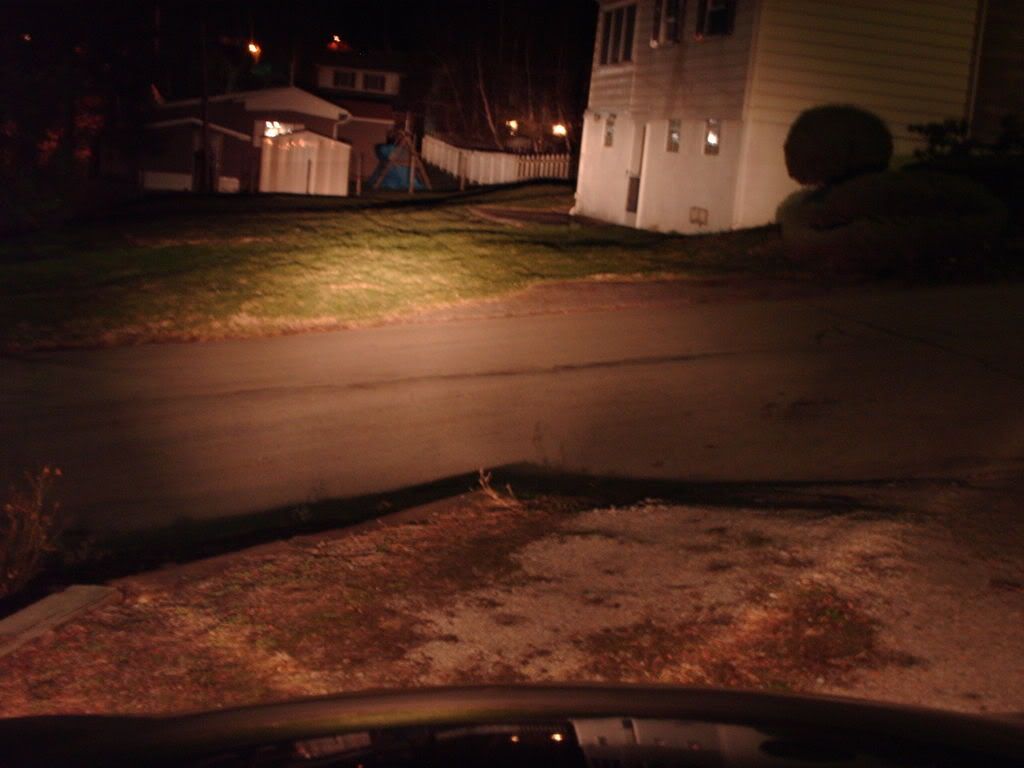
My high beams still need adjusted but projectors are pretty close to where I want them.
I have halos on with parking lights and three led's on with turn signals. I may redo these to be on at all times and turns later. My camera is very picky with taking night pics. With the flash off, have to remain almost like a statue to ge it to take right. Sorry for the blurry ones.
Flash on this camera is too bright but took this one anyways. It's with parking lights/halos on. I need to paint those fog light inserts
Parking/halos on.
Closeup.
Projectors with HID (10k) on. I love the blue.
A little closer:
Projector light output with HID:
High beam:
My high beams still need adjusted but projectors are pretty close to where I want them.
-
PeterKesel
- BANNED
- Posts: 1
- Joined: Thu Sep 17, 2009 2:20 am
-
Peter Kesel
- BANNED
- Posts: 1
- Joined: Wed Jul 21, 2010 7:10 am
HID Lights
oh very nice lights.Its looking so beautiful.I will purchase for my vehicle.