How To: SOHC Coil on Plug Ignition

dieseldak
2GN Member
Posts: 74
Joined: Mon Jul 05, 2010 9:31 am
Location: Belle River

How To: SOHC Coil on Plug Ignition

Post by dieseldak » Thu Dec 09, 2010 3:49 pm

Ok i'm going to try and not make this a novel. The dimensions I have provided are designed to the absolute limit, so don't try to make them larger. I did this to make it less likely that someone makes the plate and it doesn't fit. There is room for the coils to move in the holes so that if you didn't lay it out exactly or were off a bit, it will still work for you. Not everyone will be using a vernier and scribe to make their plates..........Please don't tell me "these dimensions arent consistent" or "why do the holes seem so big". This way everyone will have success, I know for a fact if I gave dead on dimensions a lot of people would have had fitment issues. The only thing that is absolutely important is the space from coil opening to coil opening..............those need to be deadly. If they aren't perfect it will still work but you will be left with small gaps where you can see through the plate.

The one thing in this whole project I must stress the most is, please solder all of your connections, this is your ignition system here, the last thing you want is for it to fail at 6:30am 400kms from home in a snowstorm...................so SOLDER ALL CONNECTIONS

I made this how to so that people in the Neon community could do something themselves that is different that what has been done before and make our ever aging cars have alittle modern touch. All I ask is that someone doesnt go and make these plates and sell them at a profit of their own on a design of mine.

Materials list:
*Piece of .250" thick aluminum 14.5" wide by 8" tall
*4x 2000 Dodge Intrepid 2.7L coils($29.99ea at Murrays, BWD p/n E230)
*4x 2001 Honda Passport 3.2L V6 coil boots(cyl 1-5)($6.99ea at Murrays, BWD p/n SPB125)
*4x 2000 Dodge Intrepid coil pig tails(got mine at the junkyard)
*Small spool of 16GA wire(used to extend and make harness)
*MSD coil connector($25 at Summit, p/n 8883)(not necessary but if you want it plug and play it is)
*Small tube of Ultra Black RTV
*Small tube of dielectric grease
*4x 1/8" x 1" bolts and NYLOCK nuts
*8x 1/8" washers
*4x M6x1.0 40mm long bolts
*4x M6 large washers
*8x 3/8 Nylon spacers(got mine at Lowes, they didnt have any 3/4" spacers I liked)

How to make the plate:
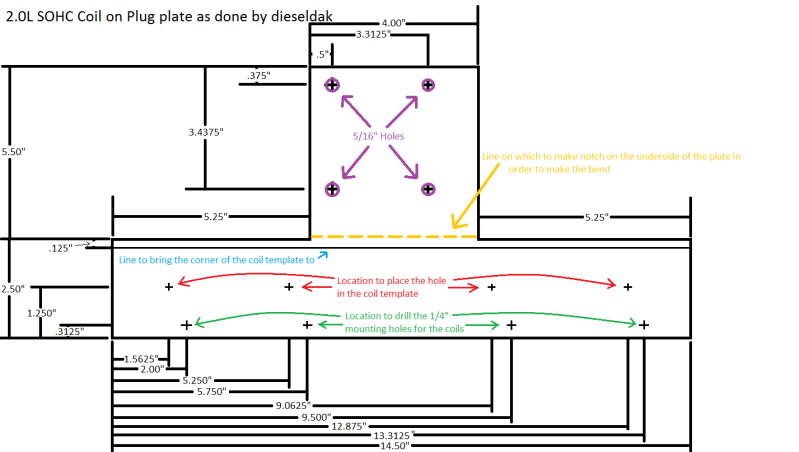
*First layout what the plate is to look like using the measurements I have provided. Make all of the marks first before cutting out the final shape.
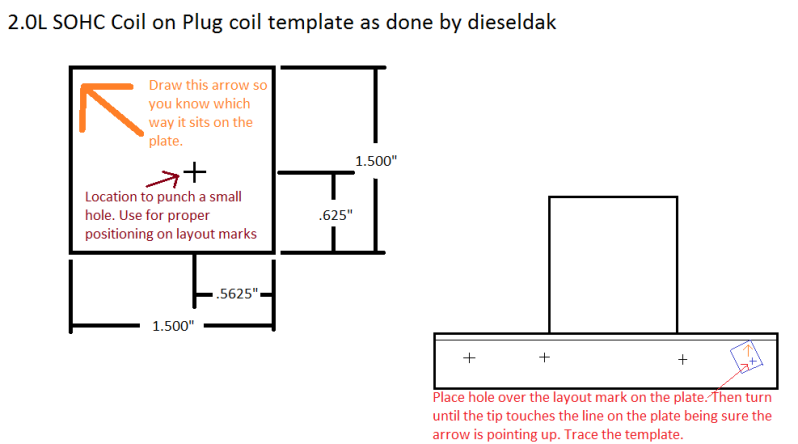
*Once you have transferred all the marks I have in the diagram make the "coil template" out of bristol board or something similar. Using this template you will mark all the holes the coils will pass through. Place the template on the piece so that the hole lines up on the layout mark you made, now rotate it so that the tip touches the line you made on the top of the plate. Make sure the arrow is pointing up. Do this for all 4 marks.
*Now its time to do some drilling. Center-punch and drill a 1/4" hole at each of the bottom marks on the plate, this is where the coils will be bolted down to the plate.
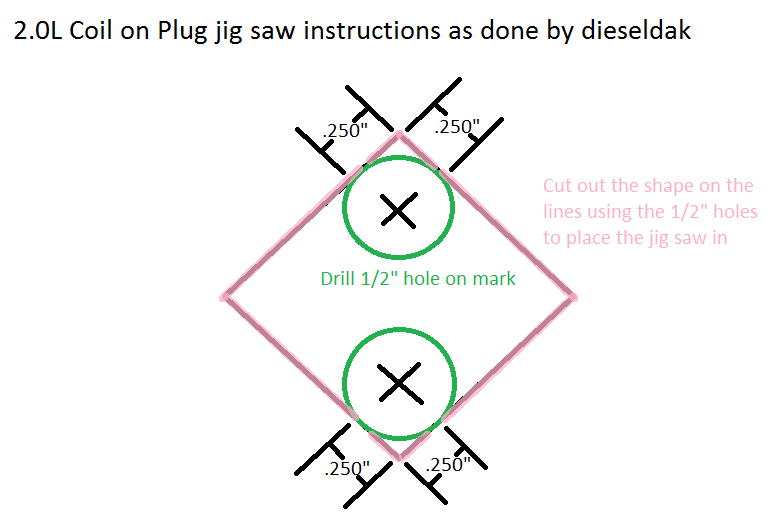
*With those drilled you can now move onto the holes the coil is to pass through. There are a couple different ways to do this but I will address the one that anyone can so with basic tools(I used a Bridgeport myself). Pick to opposite points on each square you layed out, measure 1/4" over from each point and use the intersection of those lines to mark where to drill a 1/2" hole. Center-punch this mark and drill your hole here, this will allow you to drop in a jigsaw with a bi-metal blade and cut out each square. Take your time and do it right, its not worth forcing it and screwing up over an extra 20 seconds. *****You can place the coils in any position you want just make sure that the hole in the coil template is on the X you marked on the plate, but remember the mounting holes for the coils will now be off and you will need to mark and drill them later once the coils are in the plate.********
*With all the coil openings now cut out drill the 4 holes you layed out on the top of the plate, these are what will hold the plate to the valve cover. Center-punch them and drill them to 5/16".
*Now that everything that had to be drilled is drilled you can cut out the plate itself. Use a band saw or jig saw and cut out the plate as per the dimensions provided.
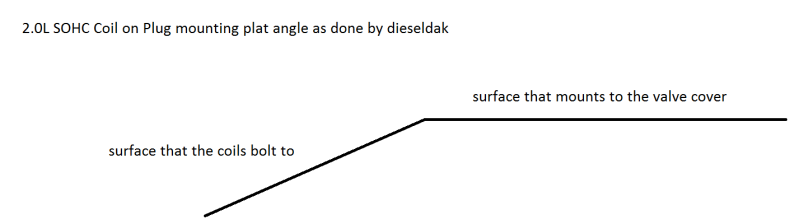
*The last step in making the plate is putting the bend in it. I did this with a press but it can easily be done with some wood, a vice and a hammer. You are going to bend it right where the two "shapes" meet. Use a grinder with a 3/16" grinding wheel and make a 1/16" grove along the BACKSIDE of the plate where it is to be bent. This will ensure it bends where it is supposed to and decrease the stress on the front side of it allowing it to bend and not tear. With the grove cut place the long or coils side of the plate in the vice with a piece of wood on either side so that you don't ruin the finish. Using another piece of wood to hit against hit the part of the plate that bolts to the valve cover with a large hammer until it bends to the angle of the template I provided.
*Now that the angle is there, the holes are drilled and the coil holes are cut out the plate is done.........................not decide whether you want to paint it, polish it, powder coat it, or leave it.

Making the boots fit the coils:
*Ok so the boots aren't a "perfect fit", they work but are a little loose and left alone the spring doesn't fit in the 2.7L coil.
*Take the spring that came with the boots and stretch it out a couple times until it is a little shorter than the length of the boot. This makes sure that once you get it all together there will be really good contact between the coil, spring and spark plug............kinda important.
*Now to make the spring fit into the 2.7L coil grab the very tip of one side with a pair of side cutters and stretch it out, cut off the first couple coils, it will now fit in the coil(try it and make sure).
*Place some dielectric grease in the top of the boot and slide the spring in from the top until it pops out the bottom, pull it back enough that it will contact the coil once installed.
*Since the boot is a slightly loose fit I place a small bead of Ultra Black RTV on the base of the coil to make sure nothing got in there or out of there. With the bead of RTV on the coil, place a small amount of dielectric grease in the tip of the coil where the spring goes and place the boot onto the coil. Make sure the boot is firmly pressed onto the coil for at least a couple hours(I left mine overnight).
*That's it you know have coils that will work on a SOHC car.
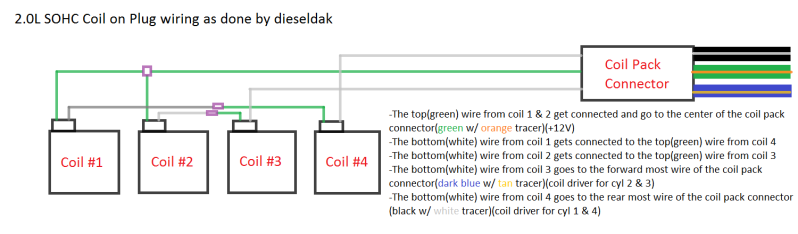
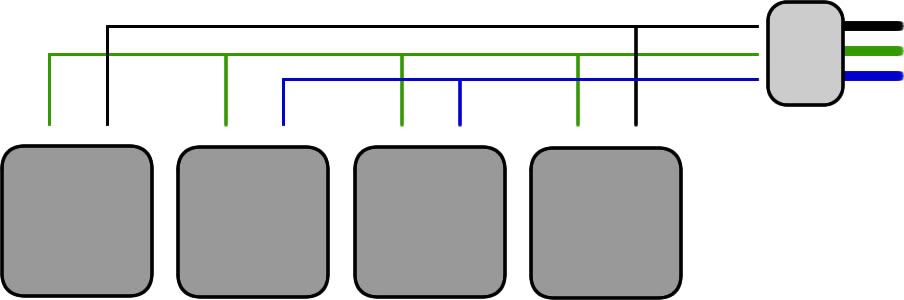
Coil wiring:
*This believe it or not is both the easiest and most important part of the whole job.
*Simply follow the instruction in the diagram I provided, and make sure to solder and shrink tube all joints.
*If you are using the MSD adapter, then wire it onto the adapter in the same orientation as it will go onto the coil pack connector. I provided alternative instructions cause I knew I would be getting the questions "what wires do I hook it into if I don't have the MSD harness"
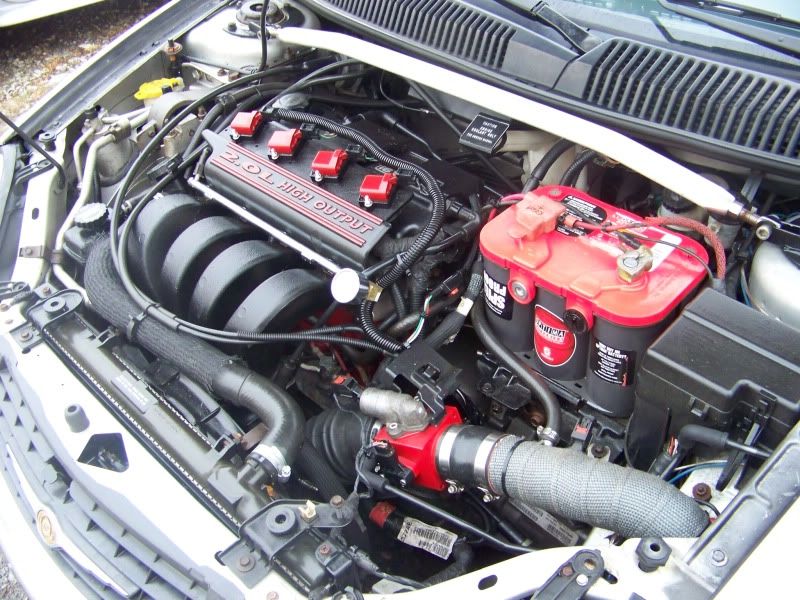
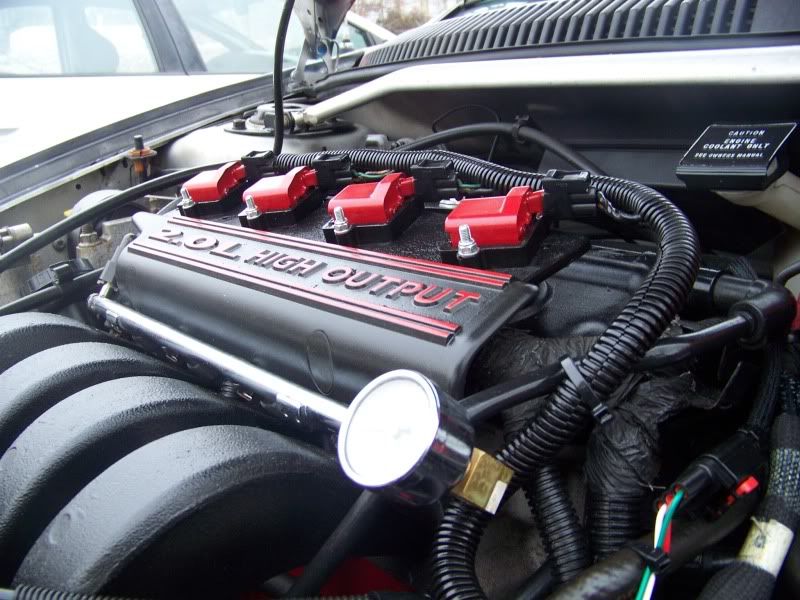
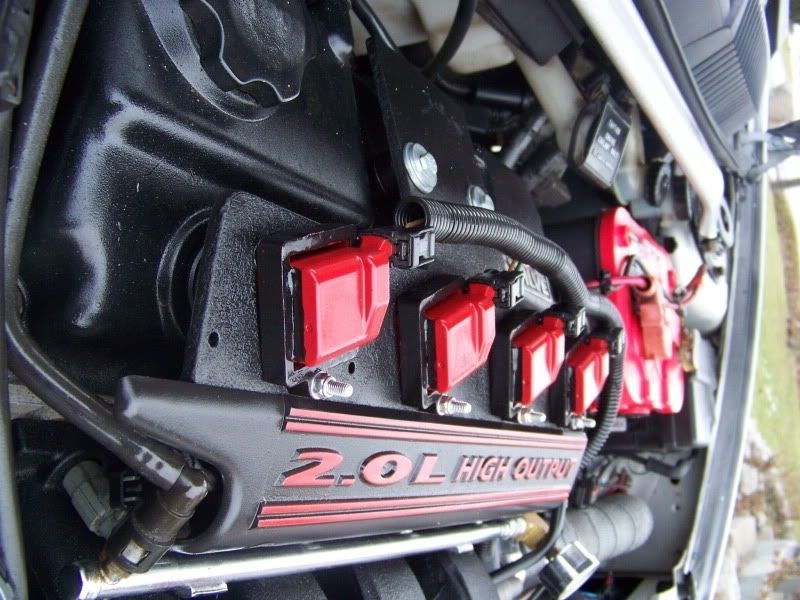
Assembly:
*Bolt the coils to the plate
*Put some dielectric grease in the ends of the boots and push the whole assembly into the spark plug holes. You wont fell a "snap" when the plugs are on place cause they aren't spark plug wires so just put some good pressure on it to insure its on there good.
*Place your spacers on top of each other(I put a small amount of RTV between each set of 2 and let them dry overnight to make things easier) and slide them under the plate lining them up with the hole in it. Place you M6 bolts with washers through the holes and snug them down.
*Install your wiring harness, plug it all in and start the car.............If you did it right it will work if not then you somehow wired it wrong, check everything over again and find the issue.

Image
Image
Image
Image
Image
Image
Image
Image
Last edited by dieseldak on Thu Mar 10, 2011 12:17 pm, edited 4 times in total.
2000 Dodge Dakota Quad Cab 4x4 -- 5.9L Cummins Turbo Diesel
2002 Chrysler Neon R/T - Mopar Performance IT Crate motor
2001 Chrysler Neon R/T - SOHC Turbo

occasional demons
Junior Admin
Posts: 20306
Joined: Thu May 03, 2007 12:14 pm
Location: Ashland Ohio

Post by occasional demons » Thu Dec 09, 2010 3:56 pm

That is how I would think it should be wired too. :thumbup:
Bill
Olha Koba, a psychologist in Kyiv, said that “anger and hate in this situation is a normal reaction and important to validate.” But it is important to channel it into something useful, she said, such as making incendiary bombs out of empty bottles.
2000 Neon MTX swap with '02 R/T PCM
1999 neon coupe 2.4 swap
2021 Forester

User avatar
Haganracing
2GN Member
Posts: 4168
Joined: Tue Jan 30, 2007 11:23 pm
Location: Mount Airy, Maryland
Contact:

Post by Haganracing » Thu Dec 09, 2010 6:26 pm

Wow, thats all I have to say... What a write up!!
occasional demons wrote:So maybe a FuzzyDanteHagan sammich might just beat a FuzzyHagan. :-k
Danteneon wrote:My advice is to fight those urges and enjoy the fact that you have both X and Y chromosomes. And an SRT. And your hand. You don't need a girl.

screaming03neon
2GN Member
Posts: 135
Joined: Tue Jun 12, 2007 7:52 pm
Location: appleton WI

Post by screaming03neon » Fri Dec 10, 2010 12:19 am

Would it work if you turned the coils 180 degrees and ran the wiring under the fuel injector cover?

racer12306
Junior Admin
Posts: 16126
Joined: Sun Oct 24, 2004 8:53 pm
Location: Baltimore, MD
Contact:

Post by racer12306 » Fri Dec 10, 2010 6:53 am

I can't think of a reason that turning the coils would cause a problem.
-Frank
Member of Spork Racing
Forum issues: racer12306@2gn.org
Forum Behavior
Support your favorite forum, DONATE!

dieseldak
2GN Member
Posts: 74
Joined: Mon Jul 05, 2010 9:31 am
Location: Belle River

Post by dieseldak » Fri Dec 10, 2010 8:15 am

screaming03neon wrote:Would it work if you turned the coils 180 degrees and ran the wiring under the fuel injector cover?
That again is the main reason I re-designed this whole how to from the way I originally did it. So long as you use the coil template, you can put the coils in any orientation you want. Just make sure the hole in the template goes on the layout X on the plate and turn it any which way, it will work every time.
2000 Dodge Dakota Quad Cab 4x4 -- 5.9L Cummins Turbo Diesel
2002 Chrysler Neon R/T - Mopar Performance IT Crate motor
2001 Chrysler Neon R/T - SOHC Turbo

User avatar
NiteHawk
2GN Member
Posts: 3130
Joined: Sun Nov 13, 2005 10:48 am
Location: Export, PA
Contact:

Post by NiteHawk » Fri Mar 04, 2011 9:54 am

while it's great someone made a how to for doing Coil On Plug, the wiring diagram above looks like its still going to give the same output since the coils are being wired in series of each other.

Has anyone tried wiring all of the coils in parallel?

Image
Matt Cresto
Fueled By Matt
Fueling Your Passion

Fuel systems turbo kits and components, tuning, performance parts. Contact us for all of your performance needs.

occasional demons
Junior Admin
Posts: 20306
Joined: Thu May 03, 2007 12:14 pm
Location: Ashland Ohio

Post by occasional demons » Fri Mar 04, 2011 9:59 am

I think there was a discussion in another thread about if the coil drivers would handle it./?
Bill
Olha Koba, a psychologist in Kyiv, said that “anger and hate in this situation is a normal reaction and important to validate.” But it is important to channel it into something useful, she said, such as making incendiary bombs out of empty bottles.
2000 Neon MTX swap with '02 R/T PCM
1999 neon coupe 2.4 swap
2021 Forester

User avatar
NiteHawk
2GN Member
Posts: 3130
Joined: Sun Nov 13, 2005 10:48 am
Location: Export, PA
Contact:

Post by NiteHawk » Fri Mar 04, 2011 10:04 am

i know something that might solve any issues with that........

the Fusion Brain i'm using to control stuff in my car, it has an accessory card you can buy, it's a MOSFET power output board, using 2 MOSFET's it allows you to drive high loads (20A+) and has 2 channels per board, which is all we would need in a neon.....

i can check on the max switching frequency but I'm sure its higher than a neon engine can fire...
Matt Cresto
Fueled By Matt
Fueling Your Passion

Fuel systems turbo kits and components, tuning, performance parts. Contact us for all of your performance needs.

User avatar
BlackRoseRacing
2009 Platinum Contributor
Posts: 12737
Joined: Sat Dec 25, 2004 8:58 am

Post by BlackRoseRacing » Fri Mar 04, 2011 11:19 am

I can't believe I missed this topic :shock:
Gives me something else to look for at the junkyard today :rockon:

User avatar
NiteHawk
2GN Member
Posts: 3130
Joined: Sun Nov 13, 2005 10:48 am
Location: Export, PA
Contact:

Post by NiteHawk » Fri Mar 04, 2011 11:57 am

after checking the specs on the mosfet's, there's absolutely no reason why the power board couldn't be used to supply the coils...
Last edited by NiteHawk on Fri Mar 04, 2011 12:26 pm, edited 1 time in total.
Matt Cresto
Fueled By Matt
Fueling Your Passion

Fuel systems turbo kits and components, tuning, performance parts. Contact us for all of your performance needs.

occasional demons
Junior Admin
Posts: 20306
Joined: Thu May 03, 2007 12:14 pm
Location: Ashland Ohio

Post by occasional demons » Fri Mar 04, 2011 12:26 pm

Pretty effin' sweet.

Being small, they could be mounted either near the PCM or the coil packs. Not sure how well they would hold up at the coil packs, but at the core support, there should be no real heat issues.
Bill
Olha Koba, a psychologist in Kyiv, said that “anger and hate in this situation is a normal reaction and important to validate.” But it is important to channel it into something useful, she said, such as making incendiary bombs out of empty bottles.
2000 Neon MTX swap with '02 R/T PCM
1999 neon coupe 2.4 swap
2021 Forester

User avatar
NiteHawk
2GN Member
Posts: 3130
Joined: Sun Nov 13, 2005 10:48 am
Location: Export, PA
Contact:

Post by NiteHawk » Fri Mar 04, 2011 12:27 pm

I'm going to talk to jason and the admins about this.....i may start producing fully plug and play setups but wanna get their approval to post about it on 2gn....

i already have a DOHC tester ready to go and I'll do the SOHC testing.
Matt Cresto
Fueled By Matt
Fueling Your Passion

Fuel systems turbo kits and components, tuning, performance parts. Contact us for all of your performance needs.

sunburnedaz
2GN Member
Posts: 76
Joined: Thu Sep 09, 2010 3:33 pm
Location: Arizona

Post by sunburnedaz » Fri Mar 04, 2011 1:17 pm

Other than the fact that its really neat, what is the reason for converting to coil on plug tech?

Second look at the early 2000 GSXR 1ks coil on plug coils, if i remember correctly they had a dust sheild and were round and you would not have to build the hold down bracket for the larger coil on plug designs. If you can not find those most of the Jap bikes use the same coils no matter who made the bike, some came with dust sheilds and some did not. I might try a dry test tonight now that you got me thinking about it since I have and extra set of coils for my F4i.

occasional demons
Junior Admin
Posts: 20306
Joined: Thu May 03, 2007 12:14 pm
Location: Ashland Ohio

Post by occasional demons » Fri Mar 04, 2011 2:48 pm

sunburnedaz wrote:Other than the fact that its really neat, what is the reason for converting to coil on plug tech?
Mostly for the bling factor. There could be some gain in voltage/amperage to the plugs, but not as much as a full sequential spark set up. It still has the same dwell time/wasted spark as the regular neon dual coil pack.

Not 100% sure but possibly the newer versions of MS may be able to fire them sequentially, if there was a way to make a compatible input. If somehow the injector pulses could be used, that would be one possibility. But they are a fairly fixed timing event. But if it could be used to switch on or off one of the pair, then it would be sequential.

But then, how much would the pulse widths mess with it. Meh it was just a thought...
Last edited by occasional demons on Fri Mar 04, 2011 2:50 pm, edited 1 time in total.
Bill
Olha Koba, a psychologist in Kyiv, said that “anger and hate in this situation is a normal reaction and important to validate.” But it is important to channel it into something useful, she said, such as making incendiary bombs out of empty bottles.
2000 Neon MTX swap with '02 R/T PCM
1999 neon coupe 2.4 swap
2021 Forester

User avatar
NiteHawk
2GN Member
Posts: 3130
Joined: Sun Nov 13, 2005 10:48 am
Location: Export, PA
Contact:

Post by NiteHawk » Fri Mar 04, 2011 2:50 pm

what im proposing may greatly improve spark because each coil will get powered separately..... still a wasted spark setup, but power wont be divided between 2 coils.....

stay tuned :)
Matt Cresto
Fueled By Matt
Fueling Your Passion

Fuel systems turbo kits and components, tuning, performance parts. Contact us for all of your performance needs.

User avatar
BlackRoseRacing
2009 Platinum Contributor
Posts: 12737
Joined: Sat Dec 25, 2004 8:58 am

Post by BlackRoseRacing » Fri Mar 04, 2011 8:05 pm

NiteHawk wrote:what im proposing may greatly improve spark because each coil will get powered separately..... still a wasted spark setup, but power wont be divided between 2 coils.....

stay tuned :)
This would also help me firing my cylinder pressures as I'm constantly boosting because of the supercharger, running high timing advance, and E85 for fuel. Local dyno shop stated at even 10psi of boost, my setup should have blown the head off my car and now I'm hitting 20psi of boost at WOT. So this COP setup may be my next mod....

occasional demons
Junior Admin
Posts: 20306
Joined: Thu May 03, 2007 12:14 pm
Location: Ashland Ohio

Post by occasional demons » Fri Mar 04, 2011 9:41 pm

I was watching ESPN2 the other day. Top fuel runs 60 psi boost, give or take. The amperage from each magneto is in the 44 amp range to fire the plugs. Two per cylinder@44 amps each. But then 8000 hp needs all it can get.

We might be using what, about 2 to 4 amps. :lol:

But that 44 amps is what really got my attention. The total amps for our appartment is 30. :) or more like :(
Bill
Olha Koba, a psychologist in Kyiv, said that “anger and hate in this situation is a normal reaction and important to validate.” But it is important to channel it into something useful, she said, such as making incendiary bombs out of empty bottles.
2000 Neon MTX swap with '02 R/T PCM
1999 neon coupe 2.4 swap
2021 Forester

User avatar
BlackRoseRacing
2009 Platinum Contributor
Posts: 12737
Joined: Sat Dec 25, 2004 8:58 am

Post by BlackRoseRacing » Sat Mar 05, 2011 5:05 am

Amperage on a house Vs a car cant really be measured equally. Amerage is basically flow, so 120v flowing 30amps is different than 12vots flowing 30amps. Also remember a Blown funny car runs probably 16volt electrical systems for about 5 seconds, staging and track run....
People have used the stock coil pack without issues up to 500hp or so I hear. Beyond that a better ignition is needed and could probably help people down in the low 300hp range as well. The bolt on coil pack replacements just do not cut it.
This setup not only has bling factor, it will provide a better spark to help fire that crappy gas we all use now a days that is causing known misfire problems and carbon deposit build ups.

occasional demons
Junior Admin
Posts: 20306
Joined: Thu May 03, 2007 12:14 pm
Location: Ashland Ohio

Post by occasional demons » Sat Mar 05, 2011 6:39 am

Amperage is amperage. The difference is the higher the voltage, less amperage is needed. But I just used that as a loose example, not really comparing apples to apples. The biggest difference here would be AC vs DC current.

And besides, you are only running 15% crappy fuel. :lol:

(I understand not everyone will be running E85.) :thumbup:

These may also provide some benefit on a bone stock engine, via improved fuel economy. But whether or not that holds true would also require some testing, and calculations to figure how much, and if the savings pays for the cost in a reasonable amount of miles.
Bill
Olha Koba, a psychologist in Kyiv, said that “anger and hate in this situation is a normal reaction and important to validate.” But it is important to channel it into something useful, she said, such as making incendiary bombs out of empty bottles.
2000 Neon MTX swap with '02 R/T PCM
1999 neon coupe 2.4 swap
2021 Forester

User avatar
BlackRoseRacing
2009 Platinum Contributor
Posts: 12737
Joined: Sat Dec 25, 2004 8:58 am

Post by BlackRoseRacing » Sun Mar 06, 2011 9:29 am

^^^
I'ts being tested as we speak :rockon:

dieseldak
2GN Member
Posts: 74
Joined: Mon Jul 05, 2010 9:31 am
Location: Belle River

Post by dieseldak » Wed Mar 09, 2011 2:21 pm

Well its been over 3 months now and im still running the exact same setup............not one issue so far, average of about 450km-550km per tank on Sunoco 94 on a Mopar SCCA Crate motor.

I am happy with the way it has performed, especially for something that cost practically nothing and I kinda threw together on a shitty weekend, lol.

Next is a 2.4L set-up as the 2.0L has me bored, lol.
2000 Dodge Dakota Quad Cab 4x4 -- 5.9L Cummins Turbo Diesel
2002 Chrysler Neon R/T - Mopar Performance IT Crate motor
2001 Chrysler Neon R/T - SOHC Turbo

User avatar
BlackRoseRacing
2009 Platinum Contributor
Posts: 12737
Joined: Sat Dec 25, 2004 8:58 am

Post by BlackRoseRacing » Mon Jun 13, 2011 4:33 am

Image
I used a set of 3.5 coils and a sheet of plexi glass. It does not look that bad, it would be better if I could cut a straight line :lol:
Thanks for this info DieselDak :thumbup:

NickKo
2009 Gold Contributor
Posts: 2248
Joined: Sun Jun 11, 2006 11:24 am
Location: IL./WI.border

Post by NickKo » Mon Jun 13, 2011 1:22 pm

Curious .... Has anyone noticed any 'driveability' improvements, running this setup ?? Smoother idle, better throttle response, etc. ??

I imagine that there will be some improvement, not huge, but it might help.


- Nick
-1998 2-dr SOHC MTX= 57mm TB; Maddog STS
-2000 Ply.LX w/MTX = Maddog STS; CAI; 2.5 exh.; 60mm T/B
-2001 ATX w/Syked PCM + Magnum header
-2001 ACR w/SRT T/B bored out to 55mm

Official "I'm Going to Drive My Neon till it Dies" Club #000009

Dylanderson
2GN Member
Posts: 47
Joined: Sun Jul 10, 2011 4:07 pm

Post by Dylanderson » Thu Sep 01, 2011 8:26 pm

Just wondering if anyone can help me out with this. I recently had these made and after I installed them I took the car out to test them and when I got into boost (around 7 pounds) the car would just break up . What would cause this? Thanks!
Image

ZeroChad
2009 Gold Contributor
Posts: 3165
Joined: Sat Sep 01, 2007 11:08 pm
Location: Austin, Tx
Contact:

Post by ZeroChad » Sun Nov 20, 2011 1:46 pm

Ordered coils :-)
Old Neon Log | Feedback

2000 - Corvette Coupe
2002 - Neon SE Fully Built (scrapped)

NickKo
2009 Gold Contributor
Posts: 2248
Joined: Sun Jun 11, 2006 11:24 am
Location: IL./WI.border

Post by NickKo » Sun Dec 04, 2011 11:23 am

ZeroChad wrote:Ordered coils :-)
Chad - You should post up your results - Please let us know how it goes.


- Nick
-1998 2-dr SOHC MTX= 57mm TB; Maddog STS
-2000 Ply.LX w/MTX = Maddog STS; CAI; 2.5 exh.; 60mm T/B
-2001 ATX w/Syked PCM + Magnum header
-2001 ACR w/SRT T/B bored out to 55mm

Official "I'm Going to Drive My Neon till it Dies" Club #000009

User avatar
BlackRoseRacing
2009 Platinum Contributor
Posts: 12737
Joined: Sat Dec 25, 2004 8:58 am

Post by BlackRoseRacing » Sat Dec 10, 2011 12:36 am

Dylanderson wrote:Just wondering if anyone can help me out with this. I recently had these made and after I installed them I took the car out to test them and when I got into boost (around 7 pounds) the car would just break up . What would cause this? Thanks!
What kind of plugs were you running and what was the gap on the plugs?
Copper plugs should be gapped 0.29-0.35 for boost over 8psi

User avatar
D-Railed_Neon
2011 Bronze Contributor
Posts: 723
Joined: Sun Oct 23, 2011 8:39 pm
Location: Bellevue, NE

Post by D-Railed_Neon » Tue Jun 12, 2012 2:44 am

post resurrection!!! One of the other n00bs asked about this and, since we have some new faces figured I'd bump it. Anyone got more pis of their completed COP set ups? Thanks guys :thumbup:
MY PROJECT LOG My Old 2002 ES AND My 2003 SXT

It is not that we cannot be friends, it's that you are a zombie, and I am almost out of ammo. -Someone

User avatar
jmoddes
2GN Member
Posts: 65
Joined: Mon Jun 04, 2012 11:07 am
Location: United States

Post by jmoddes » Tue Jun 12, 2012 9:53 am

looks SOOO complicated. i still wanna try... curse you low budget!!!

awesome freakin' post though!
-jmoddes (@gmail)
00 Neon
65 Classic

Car\Facebook\My Lights

Post Reply

Return to “HT Engine”