How to $40 Beast Oil catch can + reroute PCV system.

Post Reply
chew*
2GN Member
Posts: 655
Joined: Thu Nov 17, 2011 12:14 am
Location: Rhode island

How to $40 Beast Oil catch can + reroute PCV system.

Post by chew* » Thu Nov 17, 2011 2:41 am

First post here goes.

Whats needed.

Tools

Tubing cutter
Tubing bender
Wrenches
Time

Parts
14.99 water seperator from harbor freight (145 PSI rating)

$4.99 oil plug repair kit ( it works like a rubber coolant expansion plug )

2 brass NPT downsize fittings ( home depot $2.00 each I forget size, take water seperator with you)

2 3/8 compression fittings to NPT ( thes will screw into above ) $2.00 each ( will post size info tommorow )

Stainless Steel 3/8 tubing 3 ft max $8.00 ( 3 ft in case you screw up, can be done with 1 1/2 ft )

Pipe thread tape $?

Hose clamps $? ( you should have some lying around, I didn't :roll: )

First things first and what I don't have pictures for.

Gut the bottom drain fitting out of the unit, it works based on pressure and we are pulling vaccum.

Unscrew the bottom peices then pull hard on the remaining ,you can literally rip it out with your bare hands, it's like a half assed cheap rivet.

Install that rubber expansion oil drain plug in it's place.

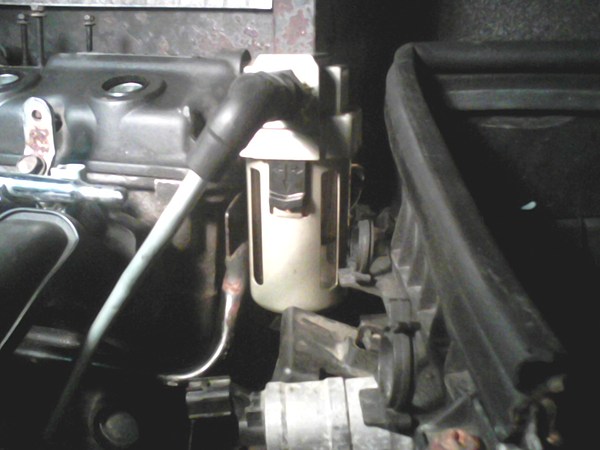
Remove PCV, Install the NPT to 3/8 compression fitting into valve cover. Cut the end of tubing and make a 90 degree in it. Measure with catch can making sure that you are clearing the metal heater pipes and air box. Cut.

Install the downsize NPT into water seperator intake side ( it has an arrow ). Install the second NPT to 3/8 compression fitting and then screw the line you bent, measured and cut.

Install the second downsize NPT into the exhaust side ( exit side ) of air water seperator. Install the PCV valve into this.

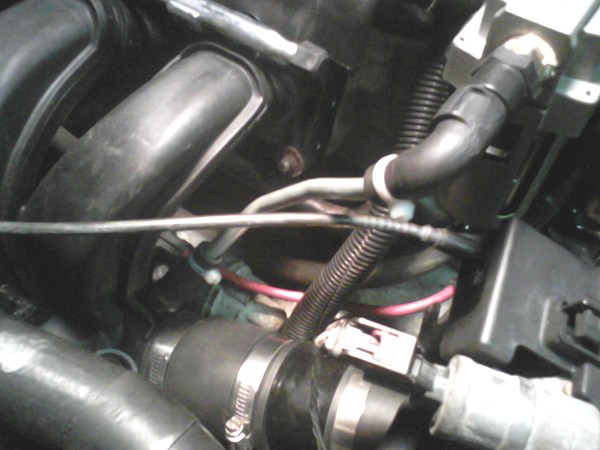
Now the next part you are going to have to custom fit a little, the key thing is to make sure your not rubbing the throttle cables. Anyway after a few bends and measurements you should be able to massage the tubing from the intake to the PCV without interfering with anything else.

Use the factory L that is installed on the PCV and the factory rubber mount thats installed on the intake, install clamps and your good to go.

As far as other intakes go this should be a no brainer, just measure, bend, measure bend, cut and your good to go.

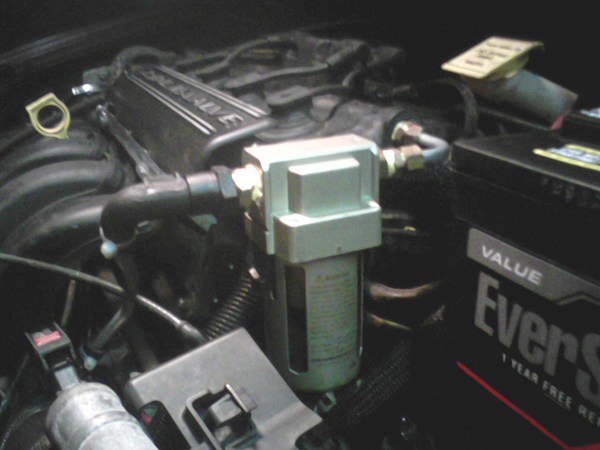
The purpose for using steel or stainless is so that no hardware is needed to mount the catch can, this design is free floating, looks clean ( almost factory ), very sturdy, allows the PCV to function while never being submerged in OIL ever again ( the way it's supposed to ) and you get all the benefits of having a oil catch can plus a preety pimp looking mod.

If you have spare engines lying around like me you can mock this up. I mocked up a "stock" modified air box for all clearances to cover all users.

Sorry for crappy quality pics

Image

See that black lever? Slide down turn bowl 1/8th voila bowl seperates, quick and easy drains. You can gain even more clearnace by removing the guts ( plastic piece, a rod and brass filter which all just uncrews by hand )

Image

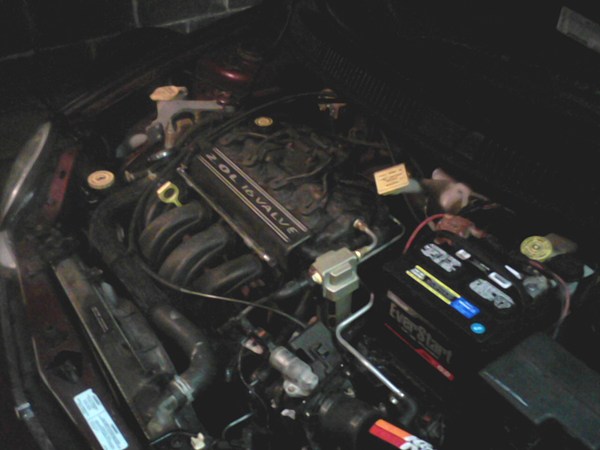
Actual images installed on my car. I used zip ties till I could make a trip to grab some hose clamps.

Image

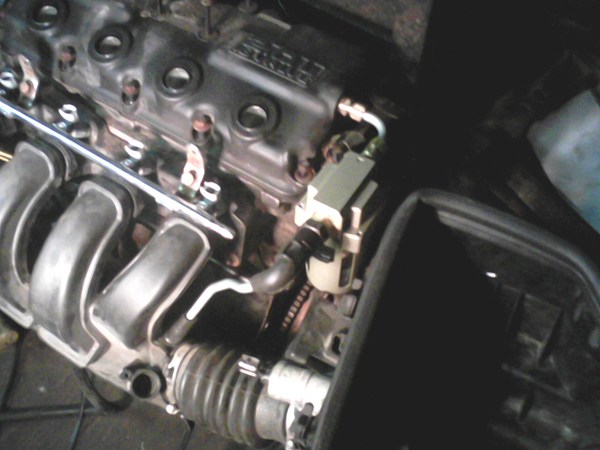
Here you can see how I massaged the tubing around the throttle cable

Image

Hose clamps now installed and since I bought to much line I made a custom pipe from the rear vent on valve cover to my CAI as well.

Toss a little paint on there to match colors and you would almost think it's factory.

Yes my engine is dirty, it's a beater engine shhhhhh :)

Image
Last edited by chew* on Thu Nov 17, 2011 2:52 am, edited 2 times in total.

User avatar
D-Railed_Neon
2011 Bronze Contributor
Posts: 723
Joined: Sun Oct 23, 2011 8:39 pm
Location: Bellevue, NE

Post by D-Railed_Neon » Thu Nov 17, 2011 2:47 am

Nice write up bro. Did the same thing on my first car, a 93 tempo. Worked well enough and I agree that draining was easy as all get out. Nice job man.
MY PROJECT LOG My Old 2002 ES AND My 2003 SXT

It is not that we cannot be friends, it's that you are a zombie, and I am almost out of ammo. -Someone

chew*
2GN Member
Posts: 655
Joined: Thu Nov 17, 2011 12:14 am
Location: Rhode island

Post by chew* » Thu Nov 17, 2011 2:51 am

Thx man my main goal was to keep it cheap for most people but make it more appealing visually and increase volume while not leaving out stock neon owners.

Not one to brag but I think I nailed it this time :)

occasional demons
Junior Admin
Posts: 20306
Joined: Thu May 03, 2007 12:14 pm
Location: Ashland Ohio

Post by occasional demons » Thu Nov 17, 2011 8:50 am

The problem I had with the poly carbonate bowls was the oil/heat would cause the bowls to crack. Thus why I relocated the PCV valve like you, so there was no vacuum leak from the cracked bowl. But in the end, I just went with an aluminum box with a sight glass.

With the separator so close to the engine, the oil vapor will not condense enough for it to separate. I cured that by using a cooler mounted in the cowl. I went from a dab of oil in the bowl, to having to drain water and oil almost daily. In the winter months, I bypass the cooler, otherwise the system freezes shut.

Edit: if you re route the throttle cable under the IM it will line up better. ;)

Plus you may want to put a support bracket on the separator, The plastic VC's are known for cracking around the PCV outlet bung almost on their own.
Bill
Olha Koba, a psychologist in Kyiv, said that “anger and hate in this situation is a normal reaction and important to validate.” But it is important to channel it into something useful, she said, such as making incendiary bombs out of empty bottles.
2000 Neon MTX swap with '02 R/T PCM
1999 neon coupe 2.4 swap
2021 Forester

chew*
2GN Member
Posts: 655
Joined: Thu Nov 17, 2011 12:14 am
Location: Rhode island

Post by chew* » Thu Nov 17, 2011 12:40 pm

occasional demons wrote:The problem I had with the poly carbonate bowls was the oil/heat would cause the bowls to crack. Thus why I relocated the PCV valve like you, so there was no vacuum leak from the cracked bowl. But in the end, I just went with an aluminum box with a sight glass.

With the separator so close to the engine, the oil vapor will not condense enough for it to separate. I cured that by using a cooler mounted in the cowl. I went from a dab of oil in the bowl, to having to drain water and oil almost daily. In the winter months, I bypass the cooler, otherwise the system freezes shut.

Edit: if you re route the throttle cable under the IM it will line up better. ;)

Plus you may want to put a support bracket on the separator, The plastic VC's are known for cracking around the PCV outlet bung almost on their own.
I will keep an eye on cracks on the bowl, it appears to be catching oil fine. The unit doesn't really get hot.

As far as mounting wise I took care to line it up near a bolt that holds the heater tubes in just in case, the unit itself has pretapped holes in the top for a bracket if need be but I will let it ride for now, I have some spare valve covers for worst case scenarios.

User avatar
D-Railed_Neon
2011 Bronze Contributor
Posts: 723
Joined: Sun Oct 23, 2011 8:39 pm
Location: Bellevue, NE

Post by D-Railed_Neon » Thu Nov 17, 2011 7:54 pm

Make sure to report back to us in a couple of weeks and let us know how this has worked out for ya. GL brother, I think it looks sharp.
MY PROJECT LOG My Old 2002 ES AND My 2003 SXT

It is not that we cannot be friends, it's that you are a zombie, and I am almost out of ammo. -Someone

chew*
2GN Member
Posts: 655
Joined: Thu Nov 17, 2011 12:14 am
Location: Rhode island

Post by chew* » Fri Dec 30, 2011 10:14 pm

occasional demons wrote:Plus you may want to put a support bracket on the separator, The plastic VC's are known for cracking around the PCV outlet bung almost on their own.
As you said the VC did hairline crack, I have a feeling it was from me tightening it to much.

No oil seapage or vaccum leak from crack nor has it enlarged and I let it roll for a month or so now.

Catching oil well, res is not showing signs of cracks.

So other than cracking it seems good to go even under harsh driving conditions.

chew*
2GN Member
Posts: 655
Joined: Thu Nov 17, 2011 12:14 am
Location: Rhode island

Post by chew* » Thu Oct 04, 2012 9:49 pm

Had this on a replacement VC for about 6 months now. No cracking, doesn't move. Required grinding length of brass fitting down that screws into VC so it didn't bottom out. :)
If the parts car is cleaner rust wise than your car, swap the inner dash panels (VIN) and use the parts car with your title.
But don't street race..!!??

Post Reply

Return to “HT Engine”