How-To: Front Wheel Bearing
Posted: Thu Jun 16, 2011 4:55 pm
It's a long story, better left for another time, but I found myself in the situation of needing to separate the hub from the knuckle on the front right corner of my 2001 R/T. Without using any special tools, the only way to do this is to replace the wheel bearing as well, because you'll either outright destroy the old bearing, or at least weaken/damage it. Mine got destroyed. But it was due for a change....when the wheel was off the car, I could wiggle the hub face by hand. Granted the bearing wasn't making any bad growling sounds, and the car drove fine, but it still had play in it.
So, before you even get started doing this job, here's what you'll need for sure:
-A press
-Some random flat stock for aligning and pressing everything
-Some BIG sockets to choose from
-Replacement wheel bearing. I got mine from Advance Auto for $50. It is a "National" brand bearing.
These tools are not 100% required, but they make it 100% easier.
-Impact wrench
-Big pickle fork
-Cutting torch
Also
You'll probably ruin your old ball joint seal when prying the ball joint out of the knuckle. A new ball joint seal is cheap, and you should go ahead and get a zerk fitting for the old ball joint if it's still a OEM original ball joint. OEM's have a little nut screwed in to the grease joint, but you can replace it with a zerk very easily. That way, you can just ruin the old seal and not have to try to be careful with it. Then install a new seal, install a zerk fitting and grease the joint. Wa-la. The Part Number is 4656464AA.
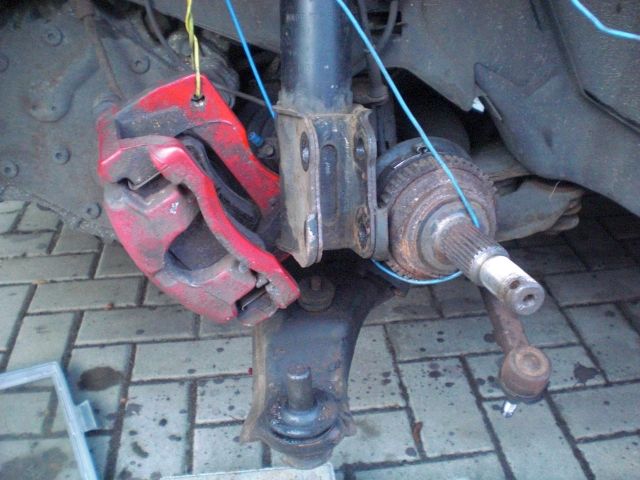
Step 1: Jack up the front of the car and remove the wheel where you're working.
Step 2: Remove the brake caliper. There are two 10mm bolts holding it on, and they are very easy to take out. Once the caliper is off, use some wire to hang it up out of the way...don't let it hang on the brake line!
Step 3: Remove the rotor. Sometimes they pull right off, other times they are rusted in place. A little persuasion with a mallet always does the trick.
Step 4: Remove both sway bar endlinks and rotate the swaybar down and out of the way. To take the endlinks off, you need to grab the top of the link with some big vise-grips, and then hit the lower bolt head with your impact wrench. This is the one place where the impact wrench is nice, because you're holding the top with vise-grips...not a wrench.
Step 5: Remove the tie rod end. Simpley take the nut off the bottom, and hammer it up out of the hole.
Step 6: Remove the ball joint. Take the nut off the bolt, then hammer the bolt out. The ball joint has a groove in it where the bolt sits, so the bolt has to come all the way out, you can't just loosen it and expect to pry it down. Once the bolt is out, you need to pry the lower control arm down away from the knuckle. A big pickle fork comes in VERY handy here. Don't worry about ruining the ball joint seal/boot. Just replace it.
Step 7: Remove the cotter pin and keeper for the axle nut. Then remove the axle nut.
Step 8: Push the axle out of the hub.
Step 9: Remove the strut bolts, then remove the knuckle/hub assembly from the car.
---------------------------------------------------
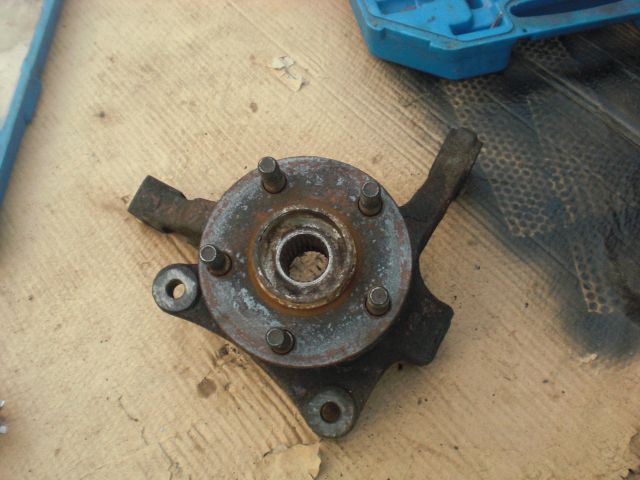
Now you've got your parts to work on. I had all the wheel studs out of the hub for this job, so that's why you won't see them in any pictures.
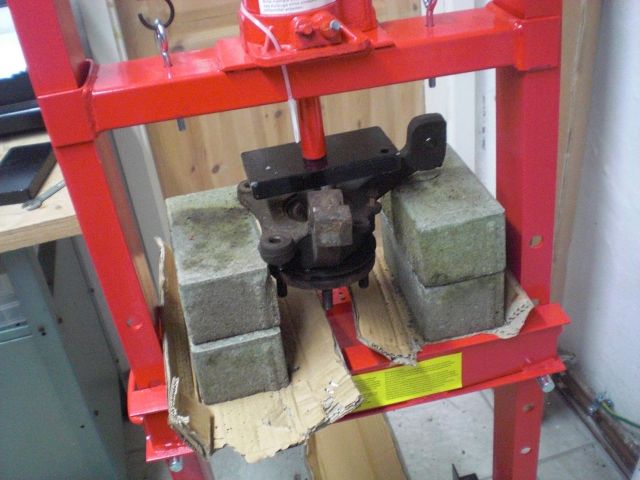
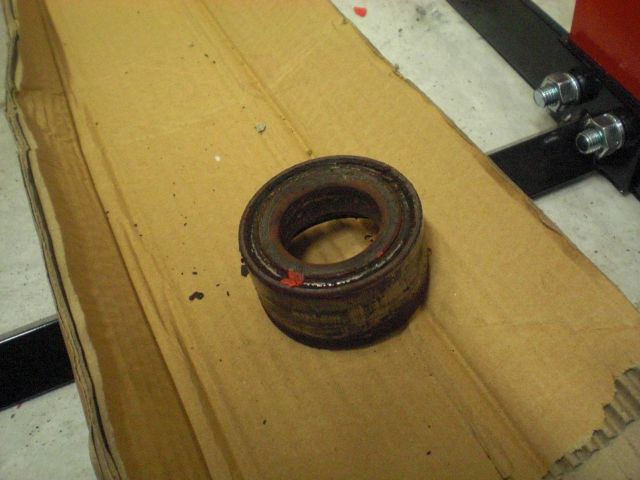
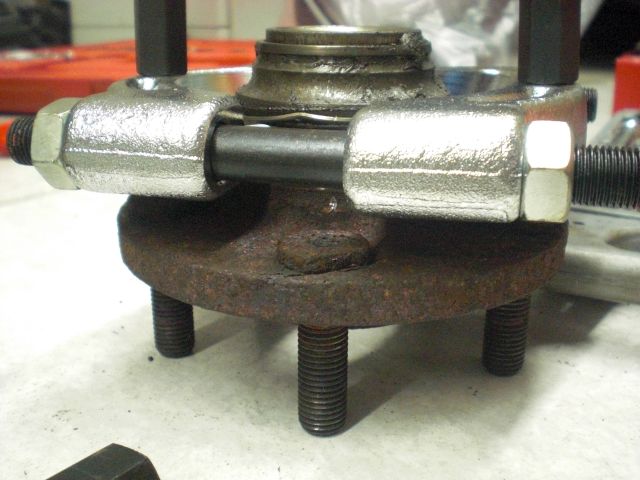
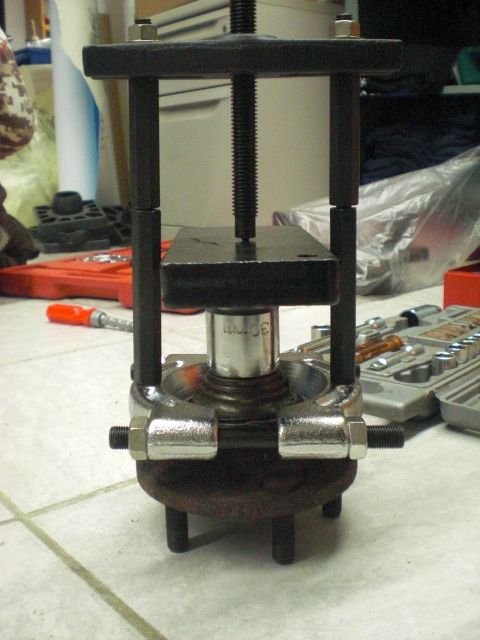
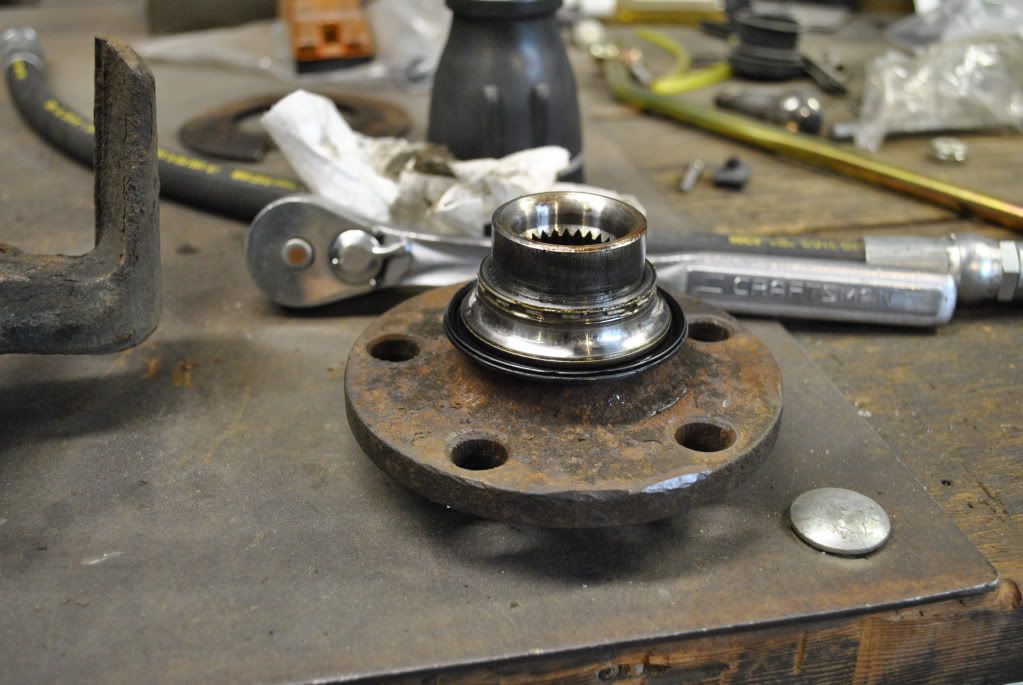
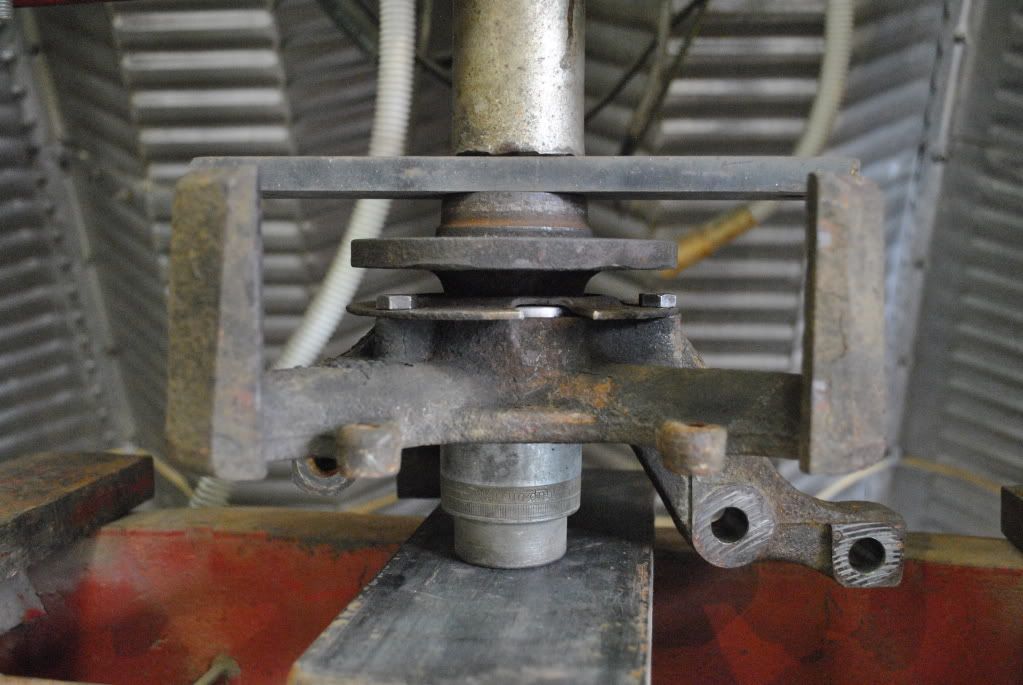
-Set your knuckle under your press, and use a socket that is the same size as the inner splined part of the hub. You don't want to be pushing on the inner race of the bearing, just the splined hub spindle. The goal is to press the hub out of the bearing...however, the bearing will come apart long before the hub will press out of it. So, start pressing, and pretty easily the hub will come falling out (be ready to catch it)...however it'll still have part of the bearing on it.
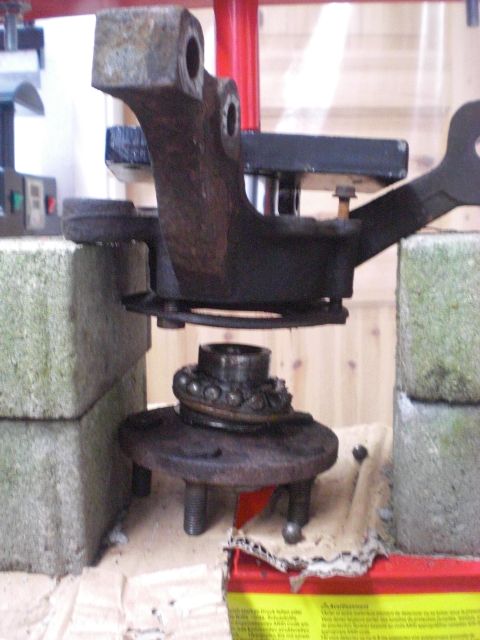
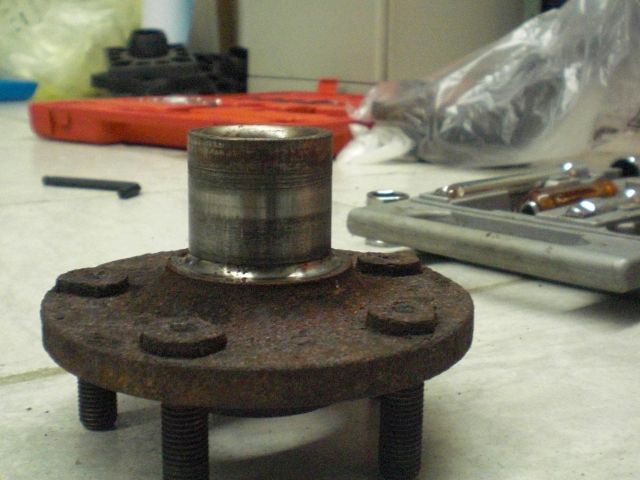
In the pictures, you can see part of the bearing still stuck on the hub.
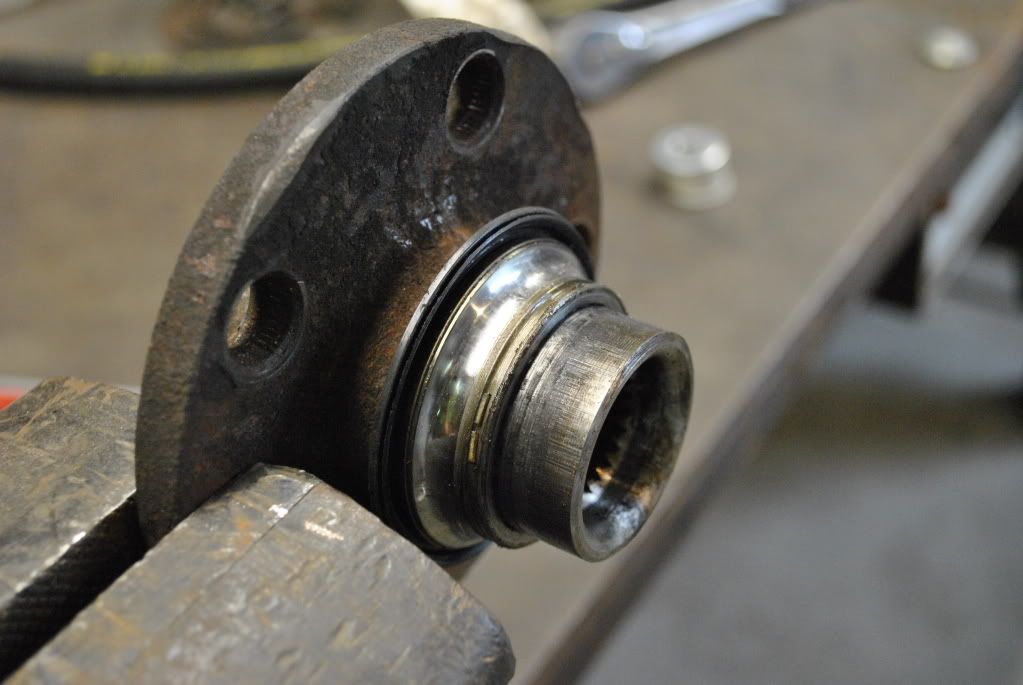
We used a torch, heated the bearing piece, and then pulled it right off. If you don't have a torch, you'll have to get more creative. Anyway, get the hub cleaned up.
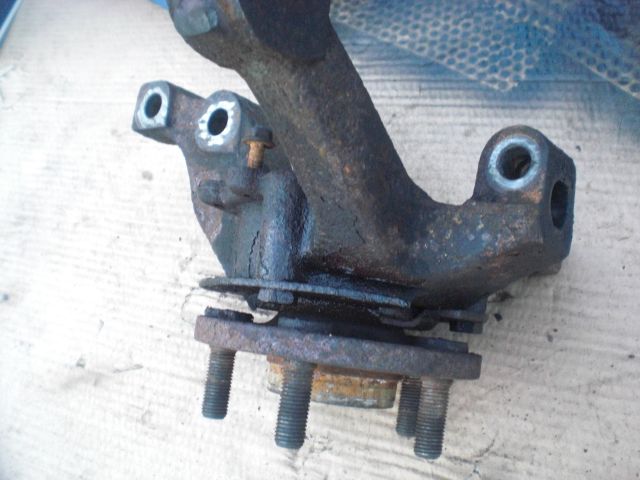
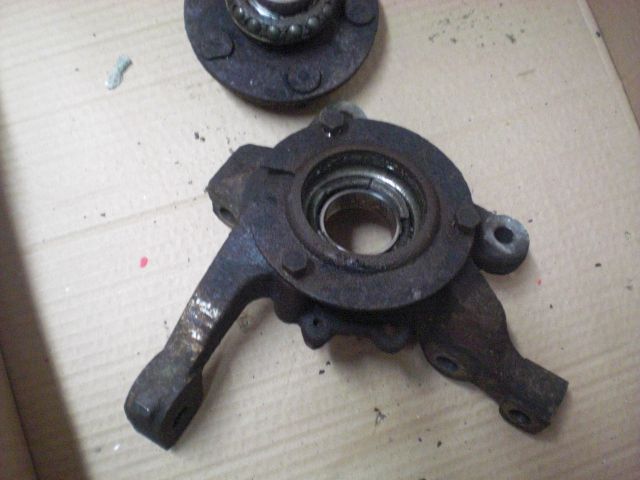
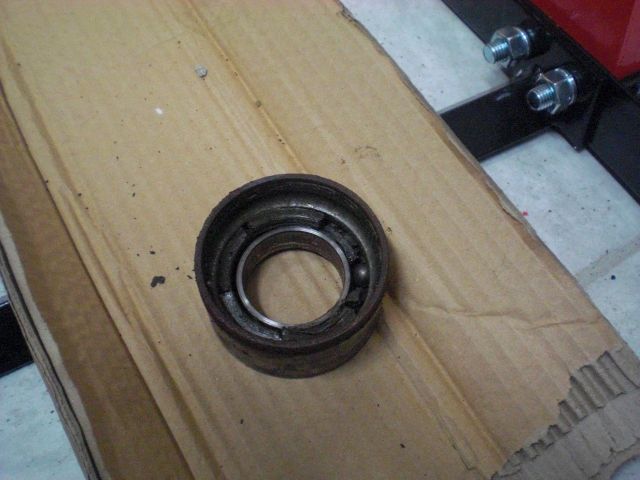
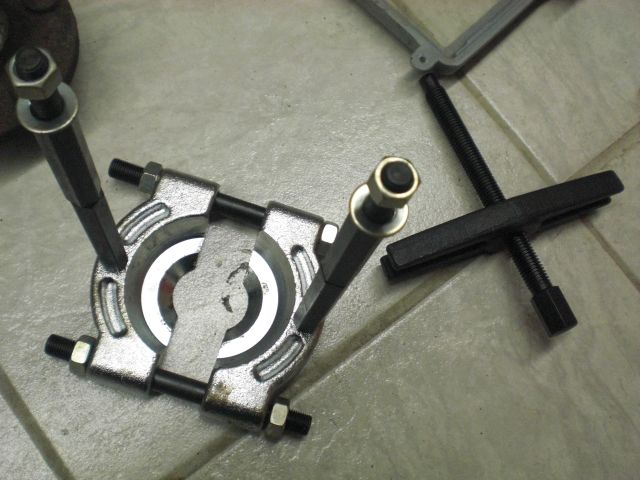
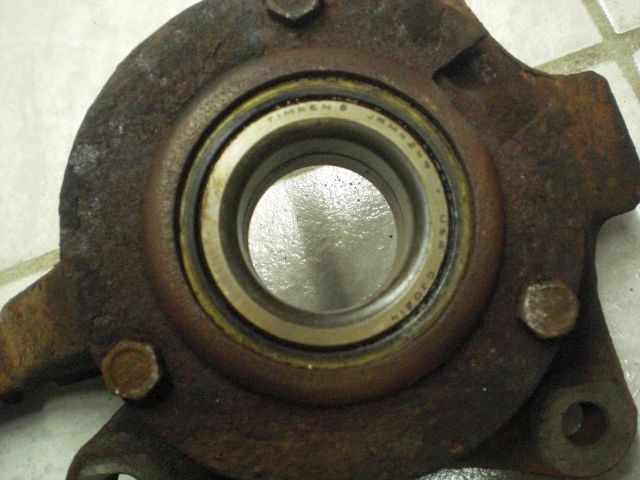
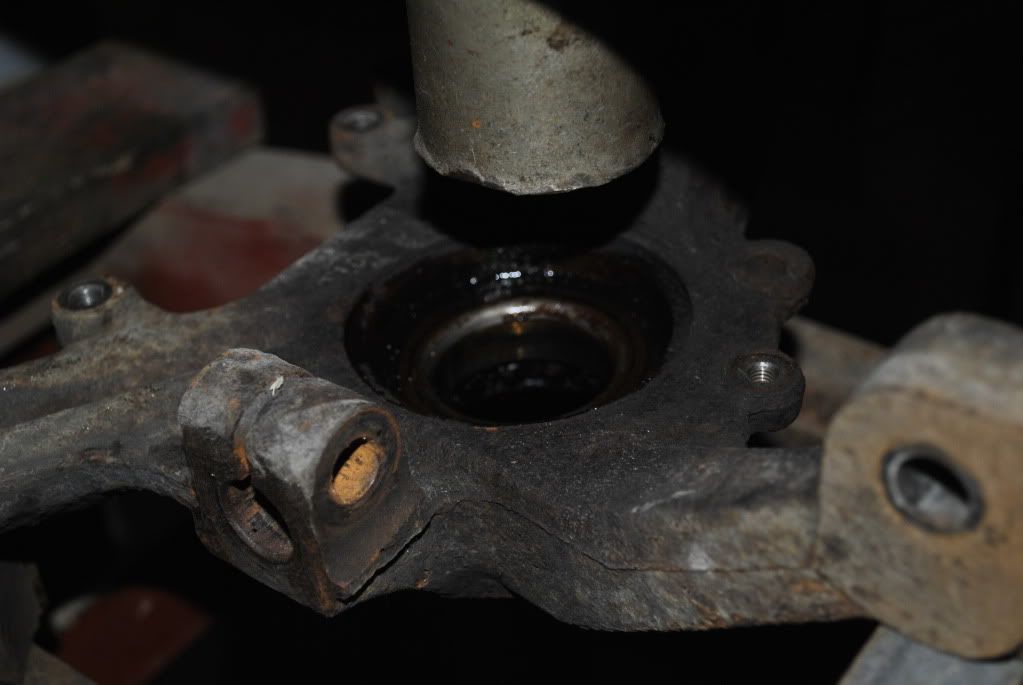
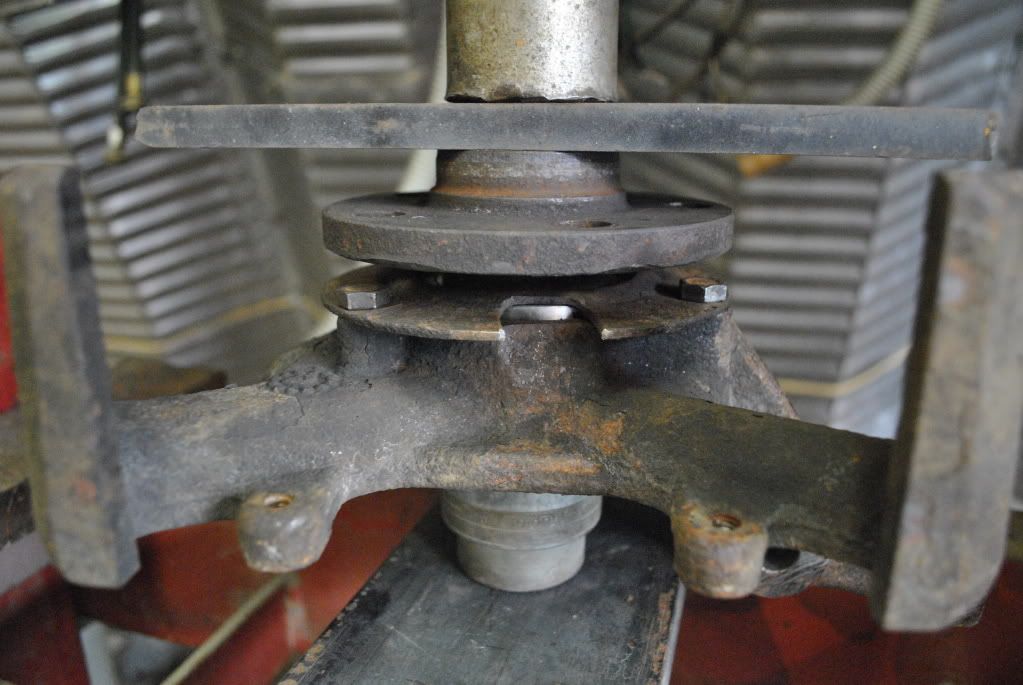
-Now take the three bearing retainer ring bolts out and remove the retainer ring. You're left with MOST of the bearing still stuck in the knuckle. Flip the knuckle over, and press the rest of the bearing out.
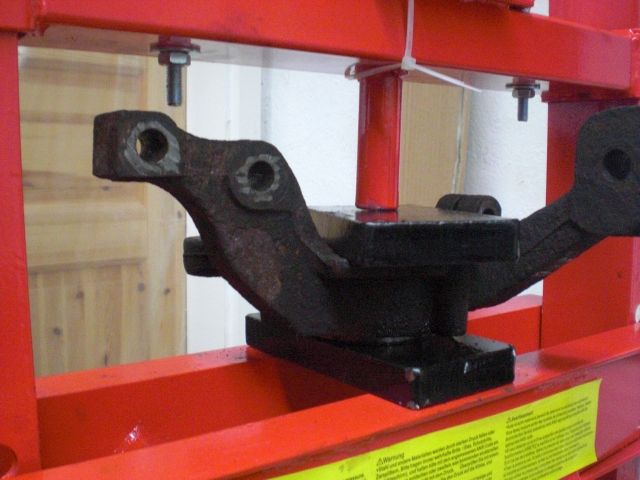
Getting ready to press the broken bearing out of the knuckle...
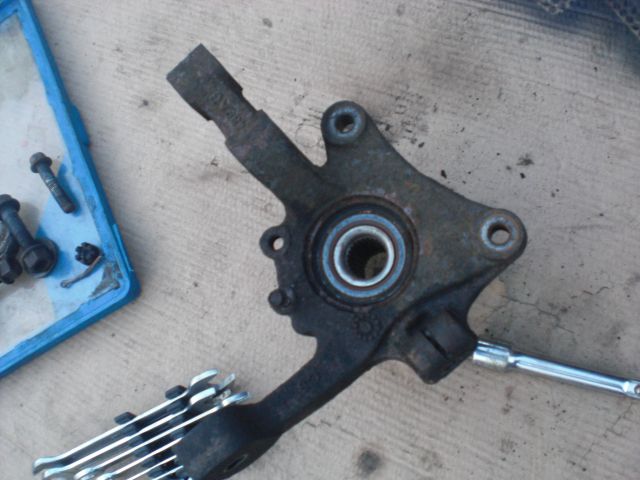
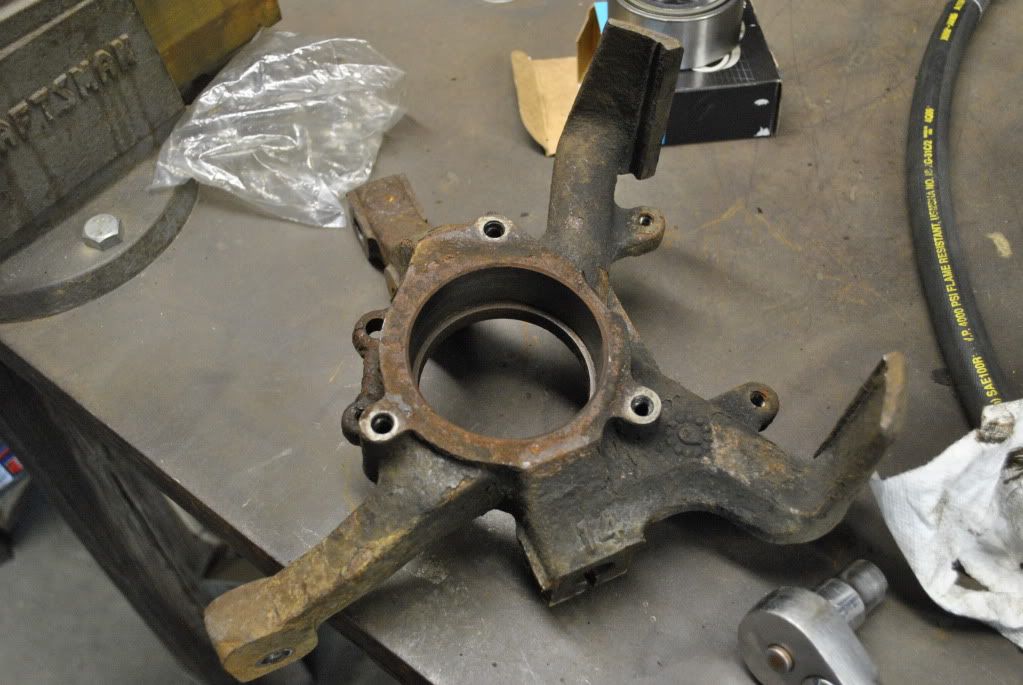
Now your knuckle should look like this...
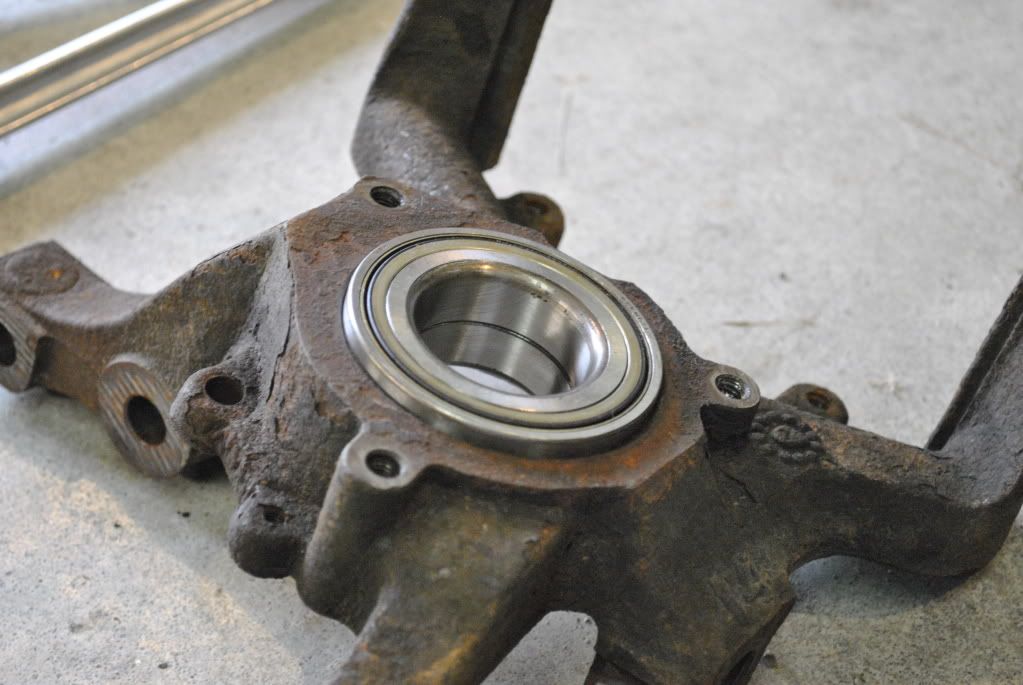
-Support the knuckle on the press, making sure it's level in all directions. Set your new bearing in, and using some flat bar stock, push the new bearing into the knuckle. Make sure whatever you use to push it in with spans the entire bearing and distributes the load evenly.
New bearing pressed into knuckle....
-Re-install the bearing retainer ring and bolts. I cleaned the threads up and used some blue loc-tite when I reinstalled the bolts.
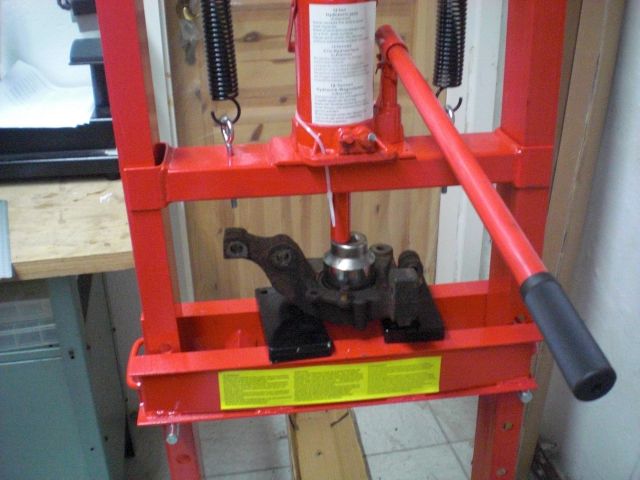
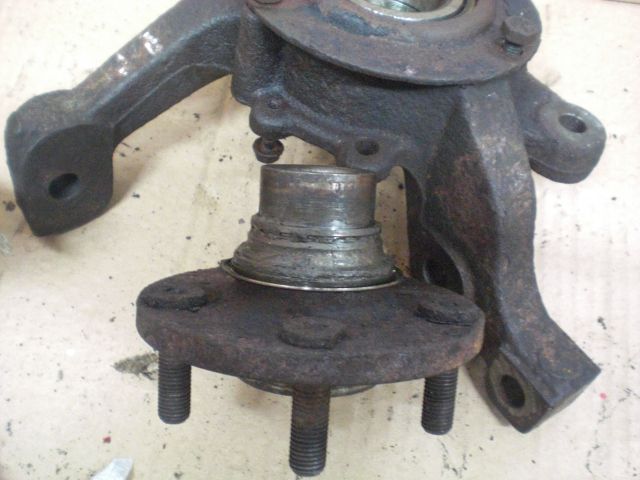
-Now you are ready to press the hub into the new bearing. There are TWO keys to this: 1) support the inner race of the bearing with a socket... and 2) make sure everything is square and level on the press.
I also put some grease on the hub to make it press easier. If you're using a socket to support the inner race of the bearing, the socket walls are thin enough that you'll basically JUST be supporting the inner race. Which is totally fine, but you just have to make sure you are squarely supporting that inner race, or else you'll tear the bearing apart.
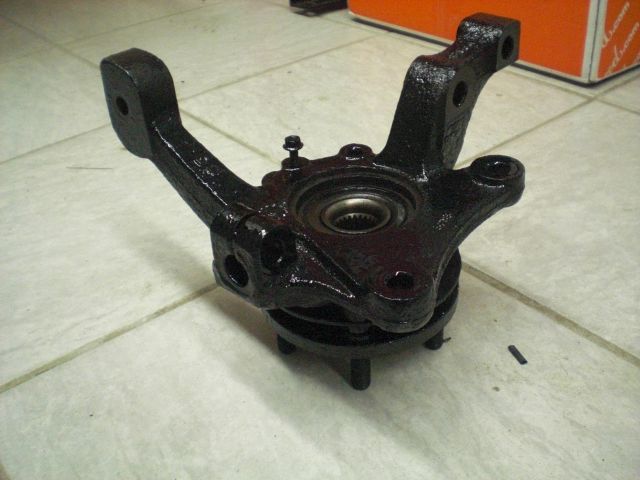
Hub pressed into bearing....
You can see the shiny part of the new bearing under the retaining ring.
You're done!


Now go re-install everything and get a front end alignment. I can recommend checking your tie rod end when you do this, and replace if necessary before you get your alignment.
So, before you even get started doing this job, here's what you'll need for sure:
-A press
-Some random flat stock for aligning and pressing everything
-Some BIG sockets to choose from
-Replacement wheel bearing. I got mine from Advance Auto for $50. It is a "National" brand bearing.
These tools are not 100% required, but they make it 100% easier.
-Impact wrench
-Big pickle fork
-Cutting torch
Also
You'll probably ruin your old ball joint seal when prying the ball joint out of the knuckle. A new ball joint seal is cheap, and you should go ahead and get a zerk fitting for the old ball joint if it's still a OEM original ball joint. OEM's have a little nut screwed in to the grease joint, but you can replace it with a zerk very easily. That way, you can just ruin the old seal and not have to try to be careful with it. Then install a new seal, install a zerk fitting and grease the joint. Wa-la. The Part Number is 4656464AA.
Step 1: Jack up the front of the car and remove the wheel where you're working.
Step 2: Remove the brake caliper. There are two 10mm bolts holding it on, and they are very easy to take out. Once the caliper is off, use some wire to hang it up out of the way...don't let it hang on the brake line!
Step 3: Remove the rotor. Sometimes they pull right off, other times they are rusted in place. A little persuasion with a mallet always does the trick.
Step 4: Remove both sway bar endlinks and rotate the swaybar down and out of the way. To take the endlinks off, you need to grab the top of the link with some big vise-grips, and then hit the lower bolt head with your impact wrench. This is the one place where the impact wrench is nice, because you're holding the top with vise-grips...not a wrench.
Step 5: Remove the tie rod end. Simpley take the nut off the bottom, and hammer it up out of the hole.
Step 6: Remove the ball joint. Take the nut off the bolt, then hammer the bolt out. The ball joint has a groove in it where the bolt sits, so the bolt has to come all the way out, you can't just loosen it and expect to pry it down. Once the bolt is out, you need to pry the lower control arm down away from the knuckle. A big pickle fork comes in VERY handy here. Don't worry about ruining the ball joint seal/boot. Just replace it.
Step 7: Remove the cotter pin and keeper for the axle nut. Then remove the axle nut.
Step 8: Push the axle out of the hub.
Step 9: Remove the strut bolts, then remove the knuckle/hub assembly from the car.
---------------------------------------------------
Now you've got your parts to work on. I had all the wheel studs out of the hub for this job, so that's why you won't see them in any pictures.
-Set your knuckle under your press, and use a socket that is the same size as the inner splined part of the hub. You don't want to be pushing on the inner race of the bearing, just the splined hub spindle. The goal is to press the hub out of the bearing...however, the bearing will come apart long before the hub will press out of it. So, start pressing, and pretty easily the hub will come falling out (be ready to catch it)...however it'll still have part of the bearing on it.
In the pictures, you can see part of the bearing still stuck on the hub.
We used a torch, heated the bearing piece, and then pulled it right off. If you don't have a torch, you'll have to get more creative. Anyway, get the hub cleaned up.
-Now take the three bearing retainer ring bolts out and remove the retainer ring. You're left with MOST of the bearing still stuck in the knuckle. Flip the knuckle over, and press the rest of the bearing out.
Getting ready to press the broken bearing out of the knuckle...
Now your knuckle should look like this...
-Support the knuckle on the press, making sure it's level in all directions. Set your new bearing in, and using some flat bar stock, push the new bearing into the knuckle. Make sure whatever you use to push it in with spans the entire bearing and distributes the load evenly.
New bearing pressed into knuckle....
-Re-install the bearing retainer ring and bolts. I cleaned the threads up and used some blue loc-tite when I reinstalled the bolts.
-Now you are ready to press the hub into the new bearing. There are TWO keys to this: 1) support the inner race of the bearing with a socket... and 2) make sure everything is square and level on the press.
I also put some grease on the hub to make it press easier. If you're using a socket to support the inner race of the bearing, the socket walls are thin enough that you'll basically JUST be supporting the inner race. Which is totally fine, but you just have to make sure you are squarely supporting that inner race, or else you'll tear the bearing apart.
Hub pressed into bearing....
You can see the shiny part of the new bearing under the retaining ring.
You're done!
Now go re-install everything and get a front end alignment. I can recommend checking your tie rod end when you do this, and replace if necessary before you get your alignment.