How-to: Flip-flop rear trunk

Post Reply
daaboots
2GN Member
Posts: 762
Joined: Wed Mar 22, 2006 8:22 am
Location: Ottawa, ON
Contact:

How-to: Flip-flop rear trunk

Post by daaboots » Sat Aug 19, 2006 1:41 pm

Disclaimer: I assume no responsibility for injury or death by following these instructions.

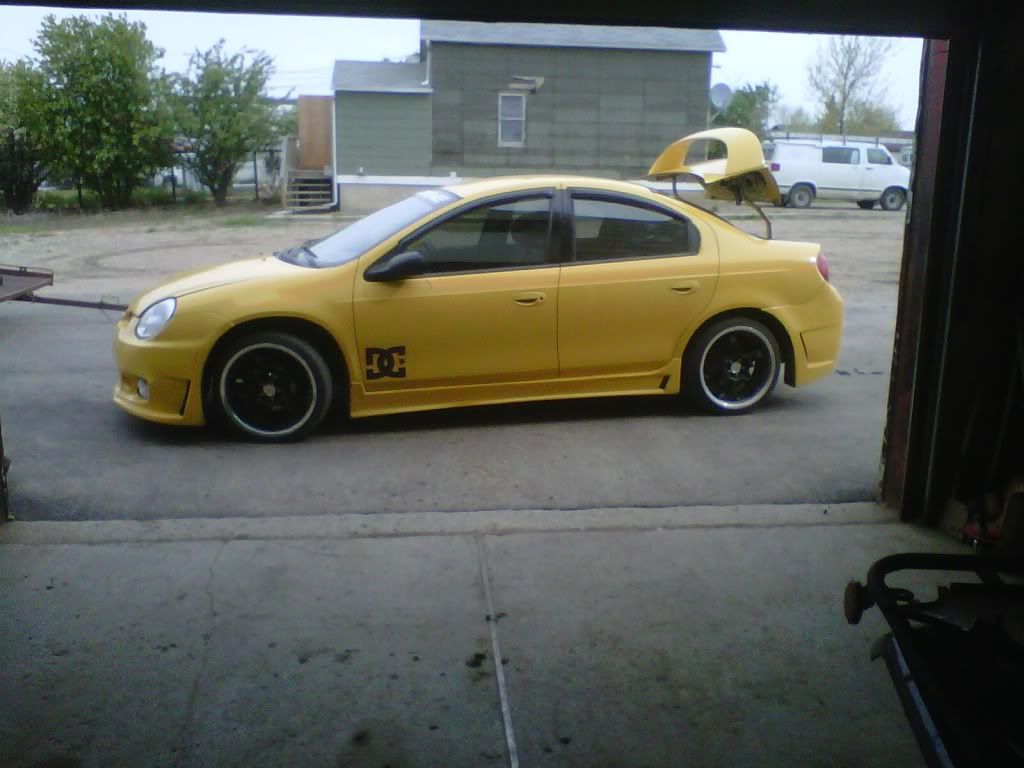
You've seen them at car shows and in magazines. Now it’s time to "flip-flop" the Neon. And best of all, it's almost free!

Tools and parts you will need:
- 10mm socket & ratchet
- Flat tip screw driver
- Reciprocating saw or angle grinder
- Hacksaw
- File
- Thick clean blanket
- Masking tape
- Two washers
- A friend

Overview:
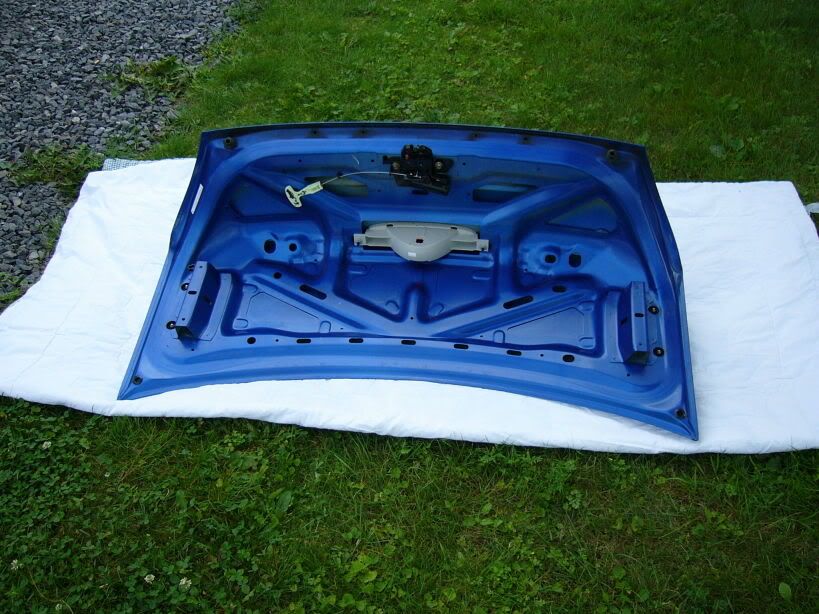
We will be cutting the bracket on the trunk lid so that the connecting arms can pivot allowing the trunk to "flip-flop".

Steps:

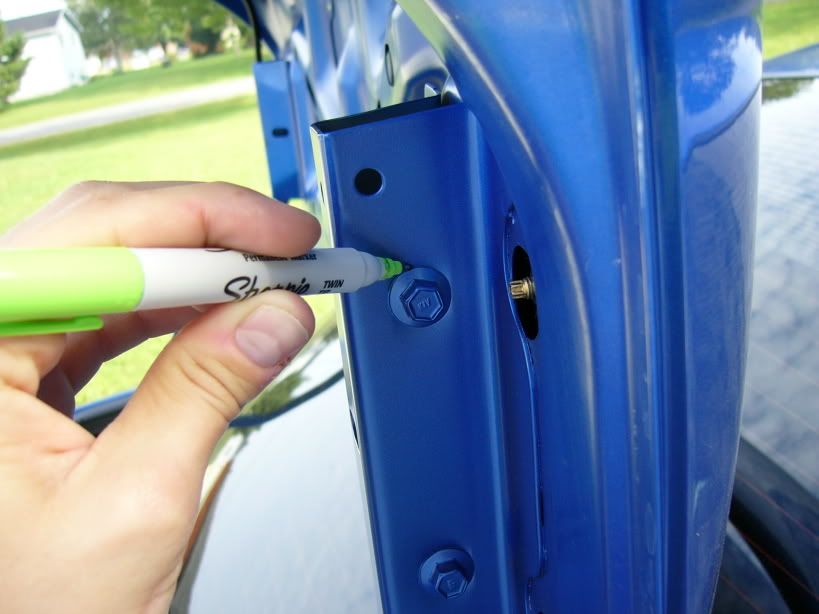
First draw a circle around the bolt connecting the trunk to the connecting arms. This will allow us to correctly position the trunk when we are finished.
Image

Disconnect all the wires and pull the harness out of the trunk. Use the flat tip screw driver to open the clips holding the black wire casing to the trunk arms.
Image

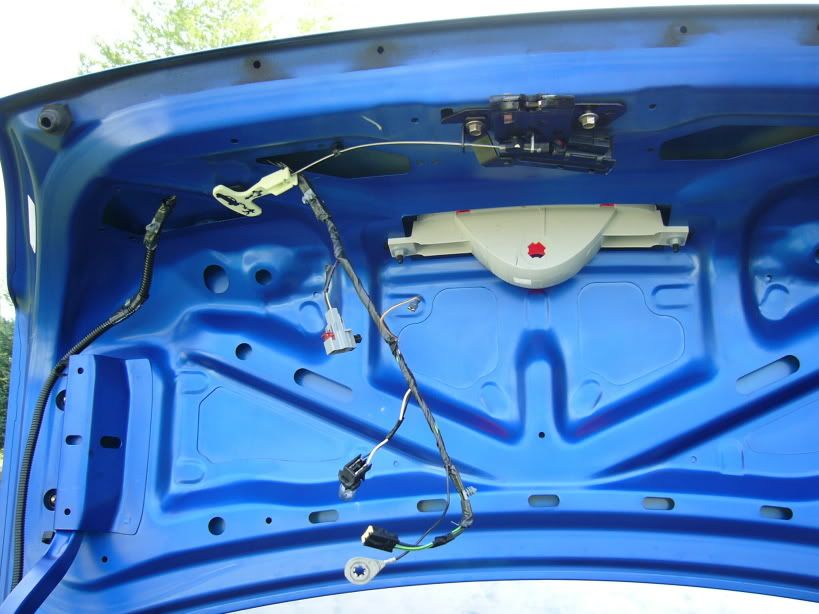
Remove the bottom bolts on both sides of the trunk using the 10mm socket and ratchet.
Image

Now with the bottom bolts removed, lower the trunk and remove the top bolts. This will prevent the trunk from falling on your rear window. I suggest placing a blanket under the corners of the trunk just in case it slips.
Image

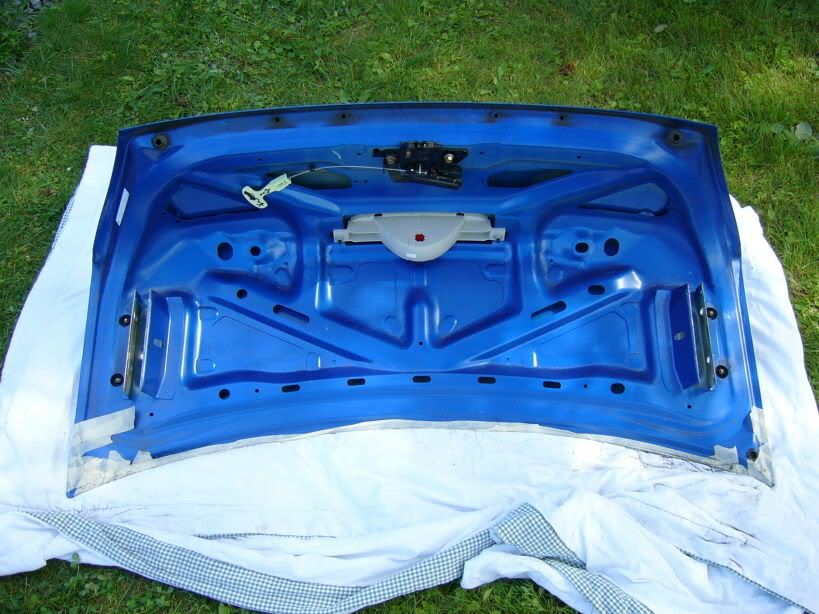
Once all the bolts are out, get your friend to help you remove the trunk and place it on the thick clean blanket. BE CAREFUL not to scratch your paint!!
Image

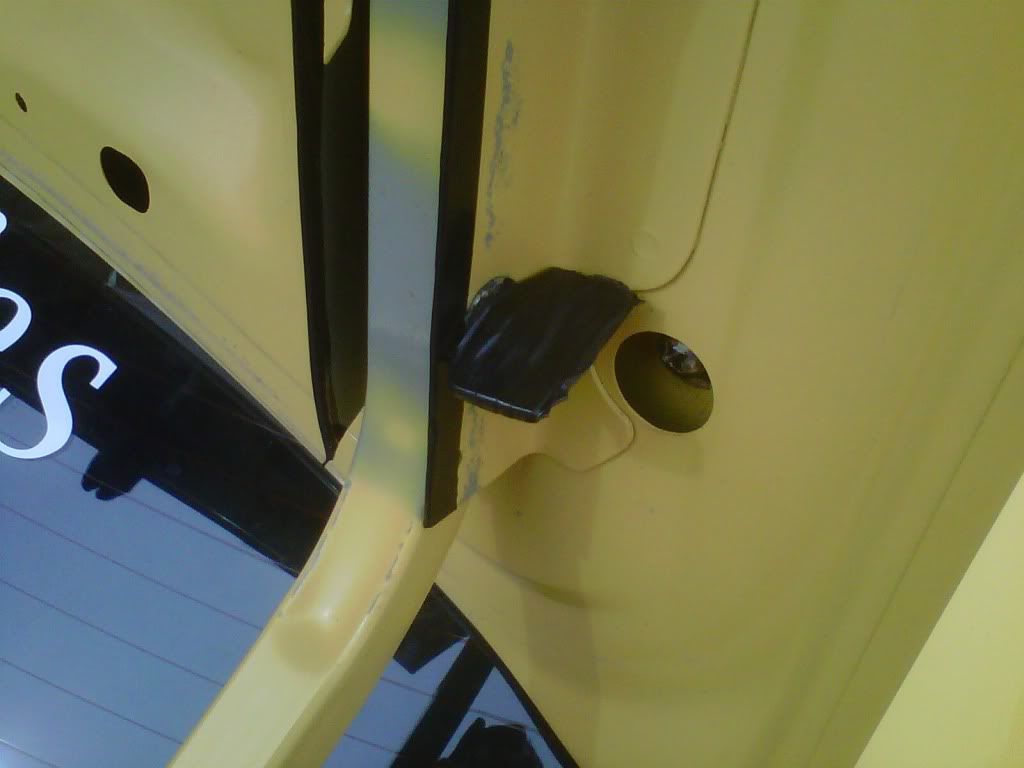
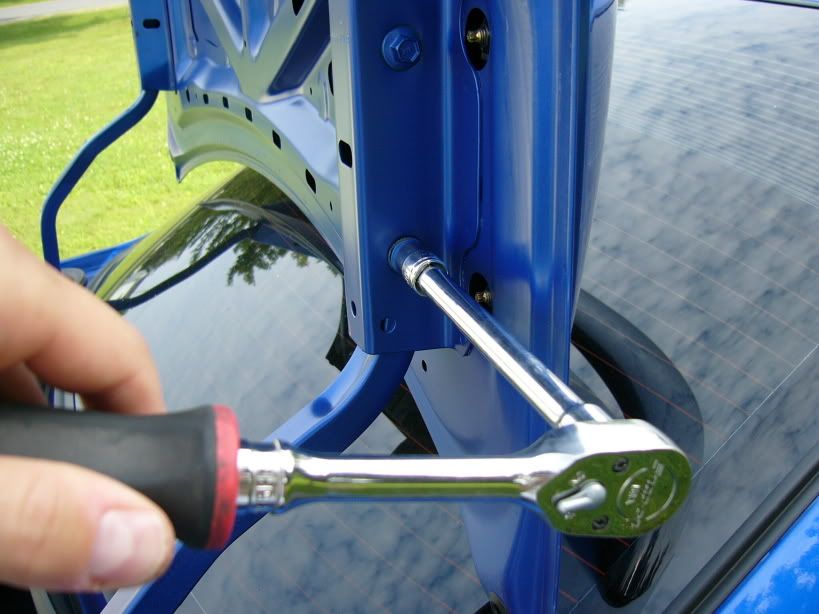
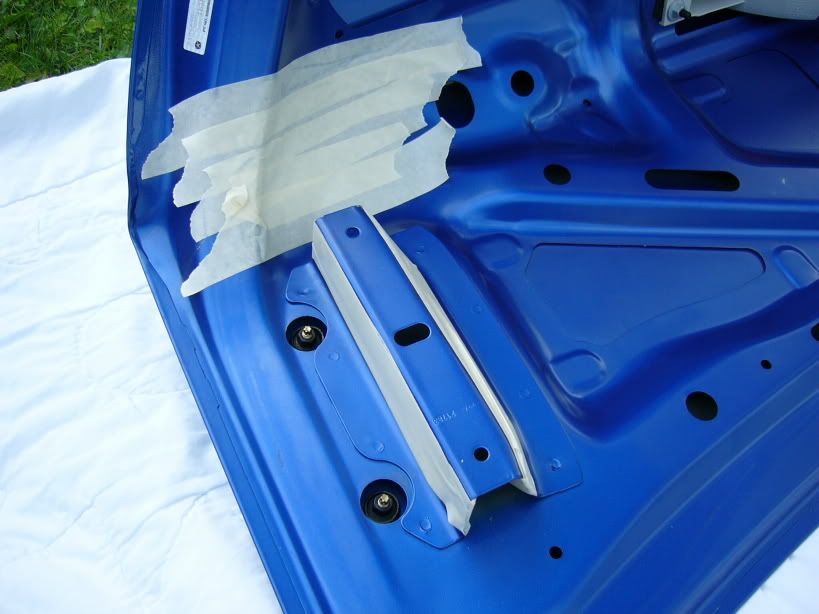
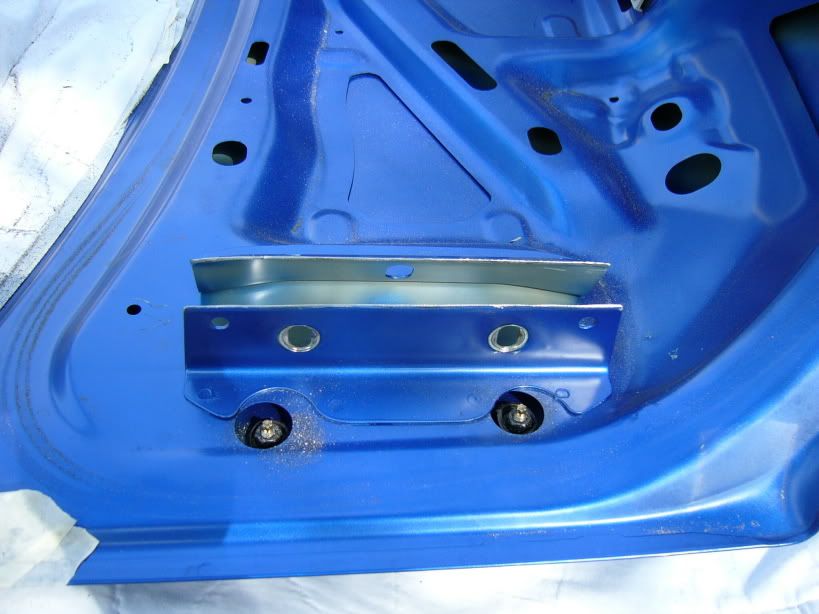
Mask of the sides of the trunk bracket and some of the surrounding area.
Image

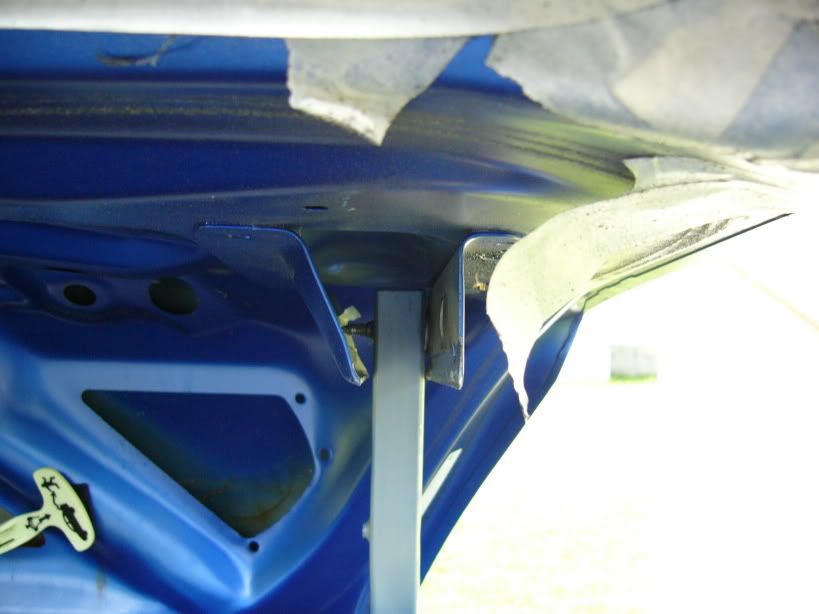
Using the hack saw, cut a small notch into the bracket. This will make it easier to start cutting with the reciprocating saw or angle grinder.
Image

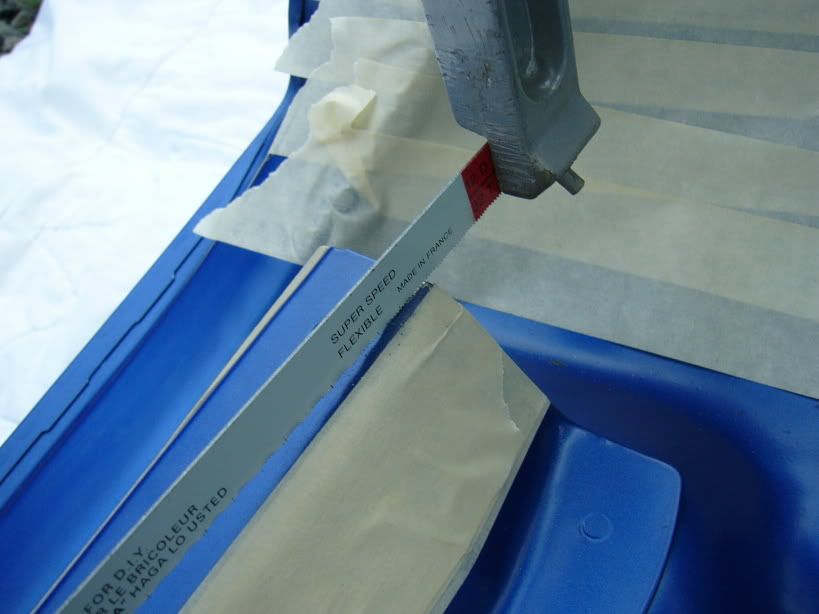
Now using the reciprocating saw or angle grinder, cut a section out of the bracket so that the connecting arms can freely pivot on the bracket. Clean up the sharp edges with a file so you don’t cut yourself.
Image

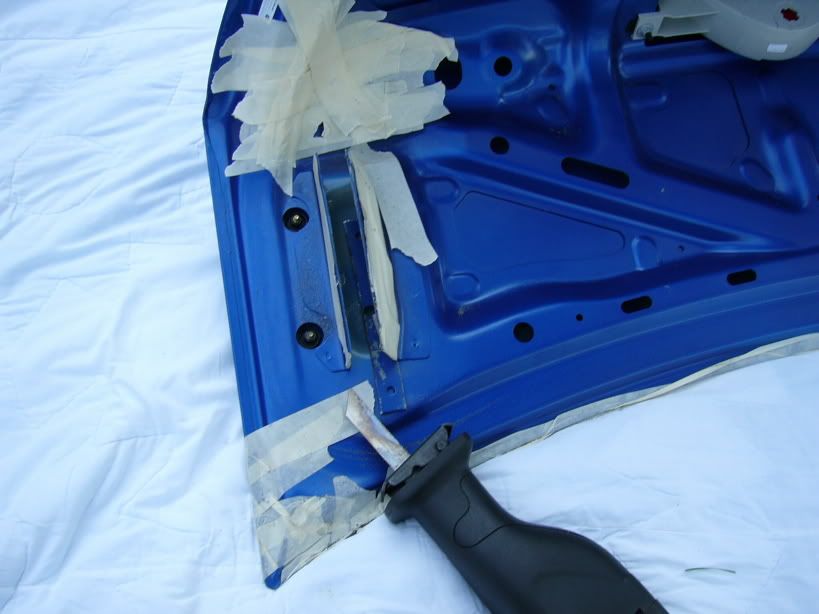
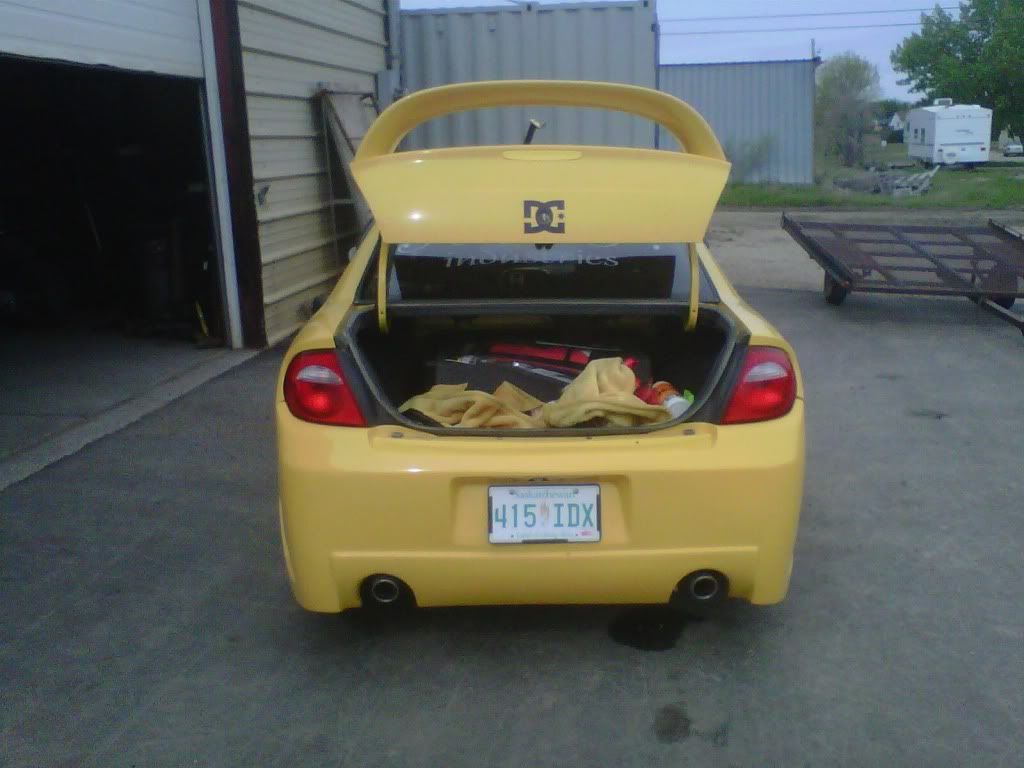
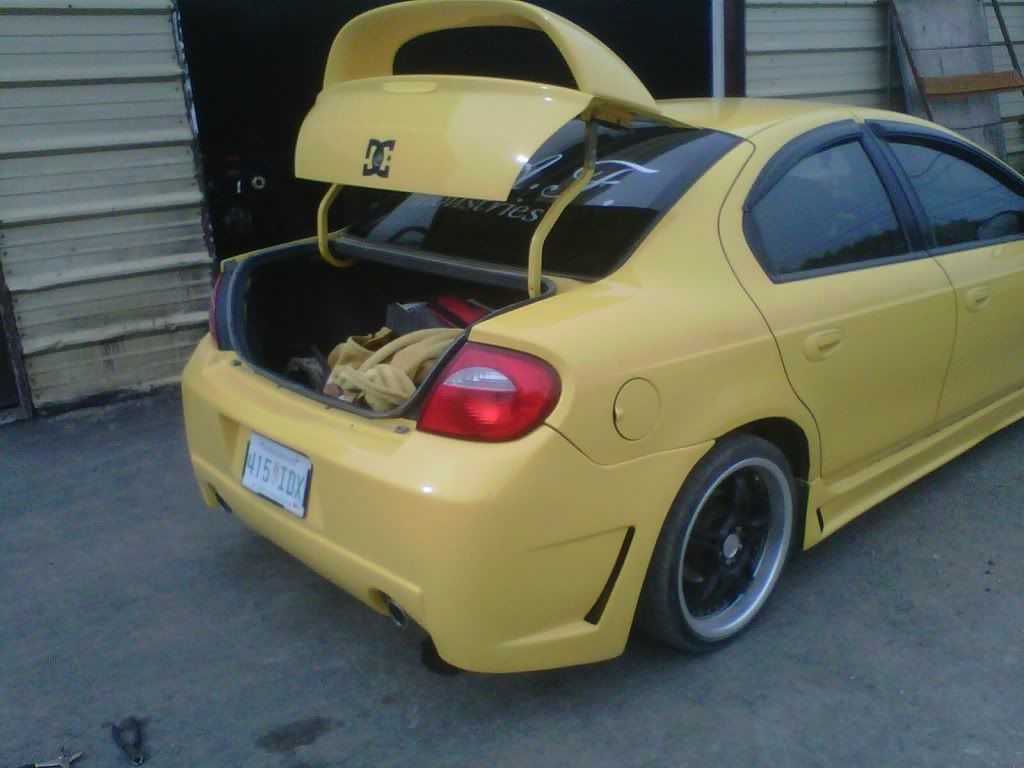
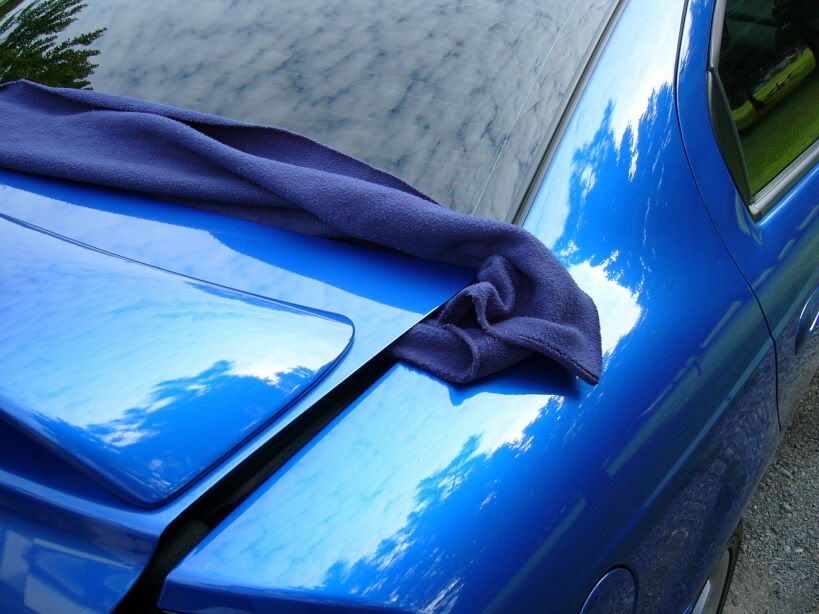
The finished product.
Image
Image

Now get your friend to help you re-install the trunk. Start with the top bolts this time and insert a washer between the trunk bracket and the connecting arm. Don't tighten it too much at this point. Once you have both top bolts in place, the trunk should be able to easily pivot. If it does not easily pivot, you may need to remove more metal from the trunk bracket.
Image
Image

Finish the project by installing the bottom two bolts and reconnecting the wires. You may want to paint some parts for a better look.
Image
Image
Image

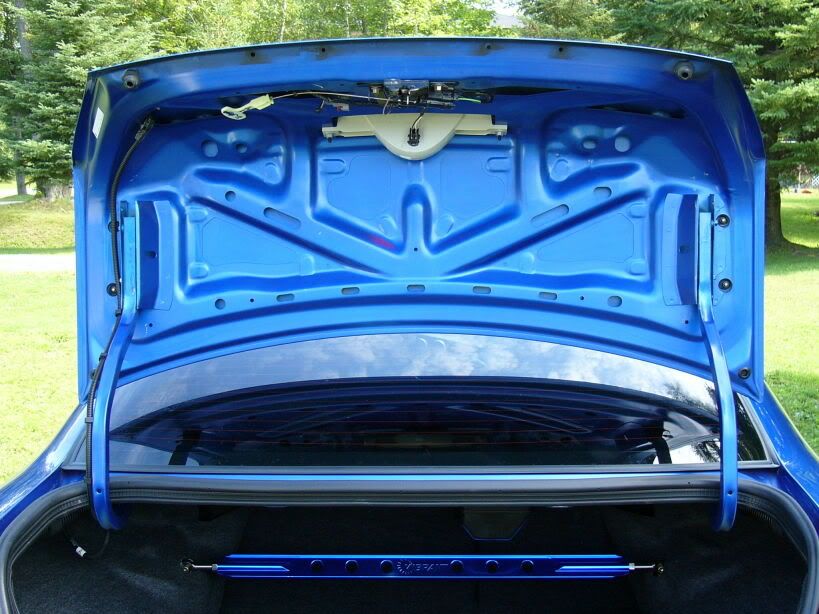
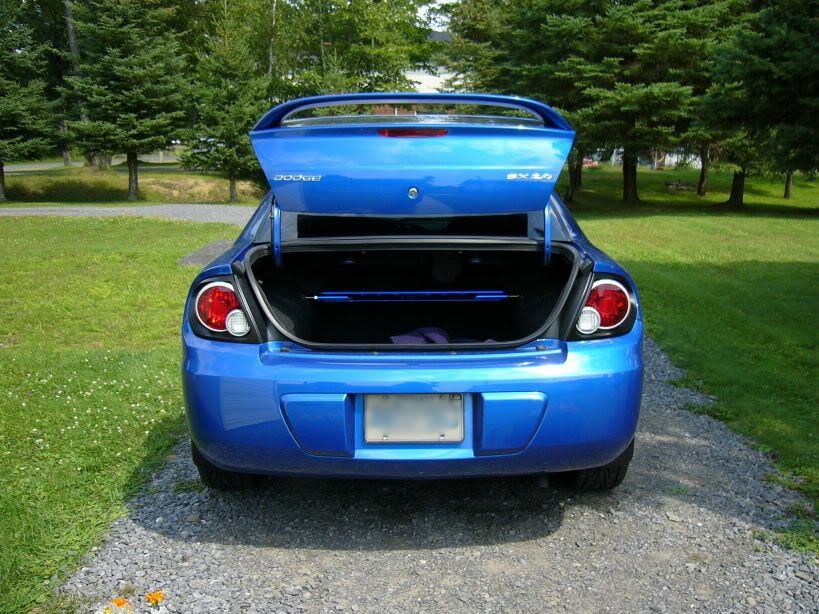
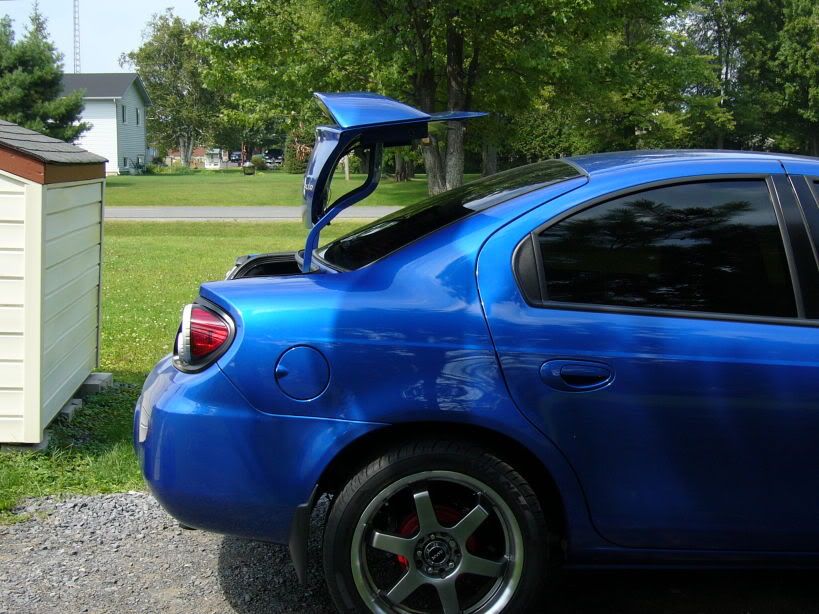
Now when you go to a car show you can pull out the bottom two bolts and "flip-flop" your trunk 8)
Last edited by daaboots on Sat Sep 02, 2006 11:33 am, edited 3 times in total.
2005 SX 2.0 - http://www.cardomain.com/ride/2092484
Rear sway bar brackets on sale! - viewtopic.php?t=19840
My Feedback - viewtopic.php?t=10546
Image

User avatar
BlackRoseRacing
2009 Platinum Contributor
Posts: 12737
Joined: Sat Dec 25, 2004 8:58 am

Post by BlackRoseRacing » Sat Aug 19, 2006 2:22 pm

Great write up.. a better one with detailed pics....

Here is the other write up:
http://forum.2gn.org/viewtopic.php?t=2042

User avatar
danielc24
2GN Member
Posts: 601
Joined: Mon Jul 31, 2006 3:59 pm
Location: Sidney , OH

Post by danielc24 » Sun Aug 20, 2006 5:23 pm

what if you dont put the other bolt in? would the trunk be loose when shut?

daaboots
2GN Member
Posts: 762
Joined: Wed Mar 22, 2006 8:22 am
Location: Ottawa, ON
Contact:

Post by daaboots » Sun Aug 20, 2006 5:29 pm

danielc24 wrote:what if you dont put the other bolt in? would the trunk be loose when shut?
I didn't really try it to be honest. I'm thinking about buying some quick release pins so I dont have to carry around a socket & ratchet with me. I'll update the how-to with I complete this.
2005 SX 2.0 - http://www.cardomain.com/ride/2092484
Rear sway bar brackets on sale! - viewtopic.php?t=19840
My Feedback - viewtopic.php?t=10546
Image

User avatar
BlackRoseRacing
2009 Platinum Contributor
Posts: 12737
Joined: Sat Dec 25, 2004 8:58 am

Post by BlackRoseRacing » Sun Aug 20, 2006 8:42 pm

If you dont put the bolts back in, when the trunk is closed it will stick up be the rear window....

timplett
2GN Member
Posts: 63
Joined: Sat Sep 30, 2006 5:13 pm

Post by timplett » Sat Sep 30, 2006 5:56 pm

Does the trunk lid just balance like that when it's up or is it catching on something?
Tim Plett

User avatar
BlackRoseRacing
2009 Platinum Contributor
Posts: 12737
Joined: Sat Dec 25, 2004 8:58 am

Post by BlackRoseRacing » Sat Sep 30, 2006 9:06 pm

Its all on how you set it, ingeneral it will sit like the above posted pics but you have to guide it there. This is definately a great free mod for the show guy but I wish I never realy did it since now I have a modded trunk that shows the mod clear as day since the door edge moldings wont stay in place and show the hacked lid every time I open it....

BlackMagic
2GN Member
Posts: 57
Joined: Thu Jul 20, 2006 7:54 pm

Post by BlackMagic » Sat Sep 30, 2006 10:56 pm

ive always wanted to do that maybe i'll try it.
Http://www.notoriousrides.com - Register for free and share your photos, works well for hosting!
Image
2003 Dodge Neon SXT
-AEM CAI
-Vibrant Type V Strut Tower Bar
-Pilot Undercar Neons

User avatar
kc2005ptgt
Former Moderator
Posts: 6587
Joined: Wed Dec 14, 2005 7:39 pm
Location: Kansas City, MO
Contact:

Post by kc2005ptgt » Sun Oct 01, 2006 12:02 pm

Get the pins - much better than a ratchet :) Great write up,btw! Much better than any I have seen on other sites :D Great job!
SOLD 5/13- 2005 Chrysler PT Cruiser GT Convertible | 2.4L Turbo HO | Bright Silver Metallic
SOLD 7/09- 2002 Dodge Neon ACR | Flame Red
The Offical: Sold My Neon Even Though I Swore I Never Would Club | Member #777

Image

J-Villa
2GN Veteran
Posts: 6880
Joined: Thu Apr 28, 2005 12:51 am
Location: Hburg, Pa

Post by J-Villa » Sun Oct 01, 2006 12:42 pm

Very good write up...we need more like this for other mods

#-o flip flop ftl...imo....

plus i have heard more than half the people that have done this now have leaking trunks...
Wanna Sell Me Your 2gn??
Official I sold my Neon Member #004

Paralyzer
2GN Member
Posts: 789
Joined: Tue Dec 20, 2005 3:40 pm
Location: Gallatin, TN

Post by Paralyzer » Mon Oct 02, 2006 10:41 am

J-Villa wrote:Very good write up...we need more like this for other mods

#-o flip flop ftl...imo....

plus i have heard more than half the people that have done this now have leaking trunks...
If you notice how our trunks are designed...we have a uplifted lip with stripping......they won't leak.

WiTeOuT
2GN Member
Posts: 1371
Joined: Fri May 20, 2005 11:54 pm

Post by WiTeOuT » Mon Oct 02, 2006 10:52 am

I really like the finished product, but for some reason or another could never do this to my neon. Still not sure why as I look at it but I don't think I ever will do it. Great job on the write up though!

User avatar
rmc03
2GN Member
Posts: 208
Joined: Tue Oct 03, 2006 12:06 am
Location: Latrobe, Pennsylvania

Post by rmc03 » Thu Oct 05, 2006 10:08 am

if you do the pins take a pic :wink: great write-up!

User avatar
eVilcreations
Former Jr. Admin
Posts: 2411
Joined: Tue Jul 06, 2004 6:52 pm
Location: the flatlands, KS
Contact:

Post by eVilcreations » Thu Oct 05, 2006 7:21 pm

I still stick by my how-to on this mod. I would not recommend cutting the WHOLE bracket out like shown in the how-to in this thread however as that takes away the lateral support for trunk movement. Not saying it is WRONG, just saying that I would not recommend it.

http://www.xtremeneons.com/how-tos/flipfloptrunk.html


Josh
Image

User avatar
dblsg
2GN Veteran
Posts: 10719
Joined: Fri Jun 03, 2005 3:20 am
Location: Aurora, IL
Contact:

Post by dblsg » Thu Oct 05, 2006 11:19 pm

eVilcreations wrote:I still stick by my how-to on this mod. I would not recommend cutting the WHOLE bracket out like shown in the how-to in this thread however as that takes away the lateral support for trunk movement. Not saying it is WRONG, just saying that I would not recommend it.

http://www.xtremeneons.com/how-tos/flipfloptrunk.html


Josh
so basically the only difference is the you didn't cut the whole bracket, right?
Image Sam-I-Am
Image
Official "I'm Going to Drive My Neon till it Dies" Club #000046
Diablo0 wrote: "eh... your opinion doesn't matter... I'm doing what I want..."

User avatar
eVilcreations
Former Jr. Admin
Posts: 2411
Joined: Tue Jul 06, 2004 6:52 pm
Location: the flatlands, KS
Contact:

Post by eVilcreations » Fri Oct 06, 2006 4:51 am

dblsg wrote:
eVilcreations wrote:I still stick by my how-to on this mod. I would not recommend cutting the WHOLE bracket out like shown in the how-to in this thread however as that takes away the lateral support for trunk movement. Not saying it is WRONG, just saying that I would not recommend it.

http://www.xtremeneons.com/how-tos/flipfloptrunk.html


Josh
so basically the only difference is the you didn't cut the whole bracket, right?
Correct.....I cut out as much as possible, while still leaving as much lateral support as possible.

Josh
Image

SinfulNeon
2GN Member
Posts: 254
Joined: Sun Feb 04, 2007 2:21 am
Location: Redding, Ca
Contact:

Post by SinfulNeon » Tue Feb 06, 2007 8:21 pm

Hi I like the how to but I have a question, I have subs and I hate trunk rattle and I have it where it does not rattle anymore but if I do this mod will it cause my trunk to rattle again or will there be no difference?
Image
::WTB:: Dual or Tri-pod A-Pillar (black) : Passenger A-Pillar (Black) : AGP Dog Bone Motor Mounts : 1st Gen ACR Springs : Shorty Attn. :

farmboy
2GN Member
Posts: 305
Joined: Sun Oct 22, 2006 8:18 am
Location: Simcoe, Ontario

Post by farmboy » Tue Feb 06, 2007 10:02 pm

shouldn't if you use the bolts and not pins. i had pins in mine and it rattled like a bitch. once i put the bolts back in everything was cool.

i'm with eVilcreations though. i only cut the channels to about 1/4 inch past the top bolt. that way, when it's flipped, there is a fixed stop point that the trunk will not rotate past. it saves the bottom corners of the trunk lid from rubbing on the trunk arms. i also put nylon washers between the bolt head and the metal washer. this allows me to have the bolts tight, and still have it able to flip.

SinfulNeon
2GN Member
Posts: 254
Joined: Sun Feb 04, 2007 2:21 am
Location: Redding, Ca
Contact:

Post by SinfulNeon » Tue Feb 06, 2007 10:07 pm

awesome thanks, I think I will do this tomorrow ^_^

Edit: Its been raining these last few days and will continue to rain for like the next two weeks >_< so I will have to wait on doing this
Last edited by SinfulNeon on Sat Feb 10, 2007 11:46 pm, edited 1 time in total.
Image
::WTB:: Dual or Tri-pod A-Pillar (black) : Passenger A-Pillar (Black) : AGP Dog Bone Motor Mounts : 1st Gen ACR Springs : Shorty Attn. :

User avatar
BlackRoseRacing
2009 Platinum Contributor
Posts: 12737
Joined: Sat Dec 25, 2004 8:58 am

Post by BlackRoseRacing » Wed Feb 07, 2007 6:19 am

FYI, dont do this mod to your only trunklid!
No offense but once this mod is done your stuck with it :wink:

SinfulNeon
2GN Member
Posts: 254
Joined: Sun Feb 04, 2007 2:21 am
Location: Redding, Ca
Contact:

Post by SinfulNeon » Wed Feb 07, 2007 6:27 am

true but if your handy with a welder you can always weld a new plate to correct what you did and make it good as new. But none the less thanks for the warning.
Image
::WTB:: Dual or Tri-pod A-Pillar (black) : Passenger A-Pillar (Black) : AGP Dog Bone Motor Mounts : 1st Gen ACR Springs : Shorty Attn. :

SinfulNeon
2GN Member
Posts: 254
Joined: Sun Feb 04, 2007 2:21 am
Location: Redding, Ca
Contact:

Post by SinfulNeon » Thu Feb 15, 2007 11:15 pm

and it has been flopped ^_^


Image

I ran out of day light and it was starting to get pretty cold so on my next full day when its not raining, so sometime next week I will take the lid back off, sand and repaint and weld some stop points and just overall clean up the appearance and the ease of making it flip ^_^
Image
::WTB:: Dual or Tri-pod A-Pillar (black) : Passenger A-Pillar (Black) : AGP Dog Bone Motor Mounts : 1st Gen ACR Springs : Shorty Attn. :

toddw814
2GN Member
Posts: 154
Joined: Sun Oct 18, 2009 2:36 pm
Location: st charles,MO

Post by toddw814 » Wed Oct 28, 2009 1:43 am

i floped my trunk as weel which looks great but the back of the trunk isnt flush with the lines or shape of the car
any how to fixes beside putting the back two bolts back in or caring a wrench with me
i also did a lill more modifieing and added a brace across where the back 2 bolts go in so it opens up evenly

Jenni
2GN Member
Posts: 2499
Joined: Tue Aug 23, 2005 1:33 pm
Location: Berlin, Germany

Post by Jenni » Wed Oct 28, 2009 6:01 am

pics?

User avatar
Yellow04r/t
2GN Member
Posts: 234
Joined: Mon Apr 30, 2012 3:25 pm
Location: Saskatchewan

Post by Yellow04r/t » Fri May 25, 2012 12:40 am

I'm considering this... Maybe if Im bored or something one day lol just a thought instead of regular bolts or if yu don't want it to rattle with pins you could use a wing bolt and wing nut? Just a thought though...here we go guys almost done gotta add a brace and paint up some spots and its done.

Image
Image
Image
heres the wing nuts i made out of the exsting bottom bolts. i cut them short so it doesnt take 3 hrs to screw em in and out.
Image
2004 Solar Yellow Dodge Neon R/T
2007 Arctic Cat DVX400
1992 Ford F150

fox02neon
2GN Member
Posts: 26
Joined: Wed Nov 01, 2006 7:33 pm
Location: Yakima WA

Post by fox02neon » Sun Mar 10, 2013 1:55 am

Very nice!
foxo2neon

Post Reply

Return to “HT Exterior”