How-To: Door Handle Courtesy Lights

Post Reply
riiv
n00b
Posts: 11
Joined: Fri Jul 15, 2011 12:53 am

How-To: Door Handle Courtesy Lights

Post by riiv » Mon Aug 08, 2011 6:21 pm

Wasn't sure if this was electrical or exterior. I originally posted this how to on the SRT forums, but one request from RawkBunny in my introduction thread is enough to warrant a copy over here. Copy and pasted. Enjoy.

To start, this is my first how-to, so please excuse the omitance of some things. I tried my best at making this legible and understandable.

I've tried to take as many informational pictures as possible since everything is installed and I wasn't planning on doing a how-to in the first place. I took weeks to decide on placement, what light to use, wires and wiring routes. Change it up if however you want, just note that the door handle will be permanently altered using this method. All materials came from Ace Hardware.

Materials:
Single LED accent light or similar
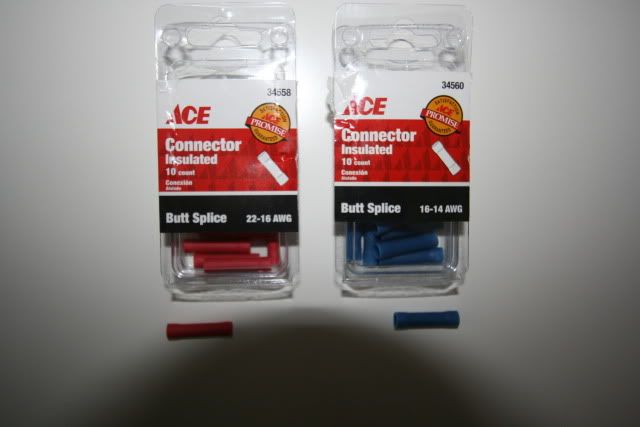
Butt Splice crimp connectors or Terminal Splice connectors (your choice, I used both)
Image
Wire, 40 feet (I used doorbell wire)
Electrical tape

Tools:
Drill and drill bits
8mm socket with extension and ratchet wrench
Wire Crimp/Splicer
Flat head screwdriver
Phillips screwdriver

Time:
I took two weekends. One weekend for the rear doors, one weekend for the front. Analyze what you should to do next and take you're time. PATIENCE.


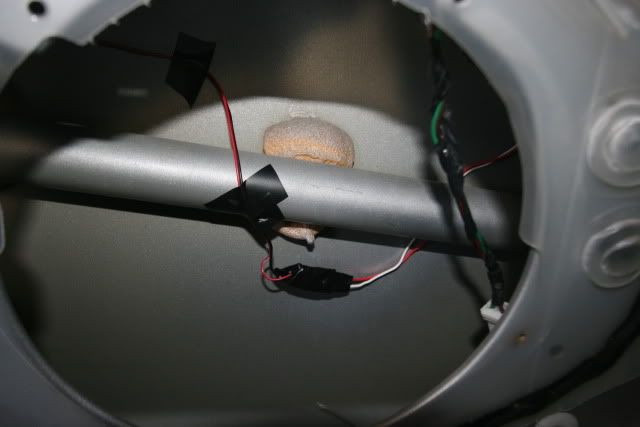
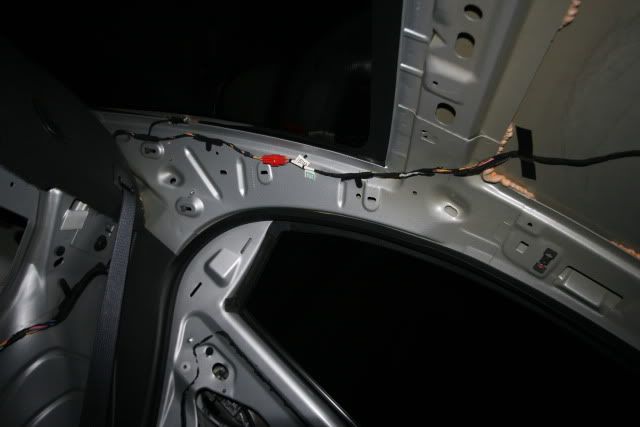
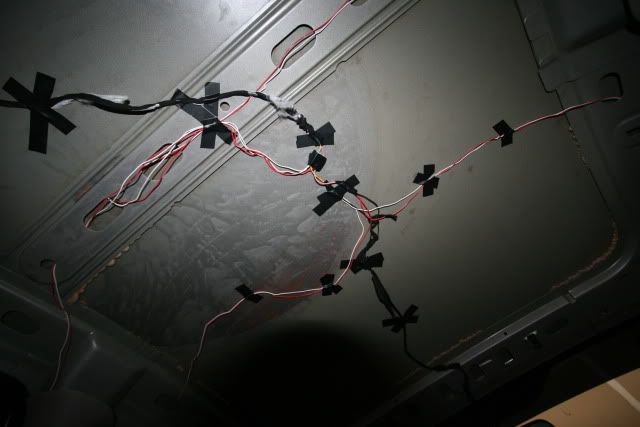
Disconnect the battery. You're going to need to remove door panels, pillar covers, and the headliner. Take the headliner out and do each door as a separate entity. The B pillar trim does not need to come off completely, just make sure you have enough slack in the wire so as not to pull and strip (and potentially short/ground) them. I had one instance where this happened and I just wrapped the stripped part in electrical tape. I'll let you decide how to run the wires, but straight up the A and B pillars is probably the best/shortest to the roof.

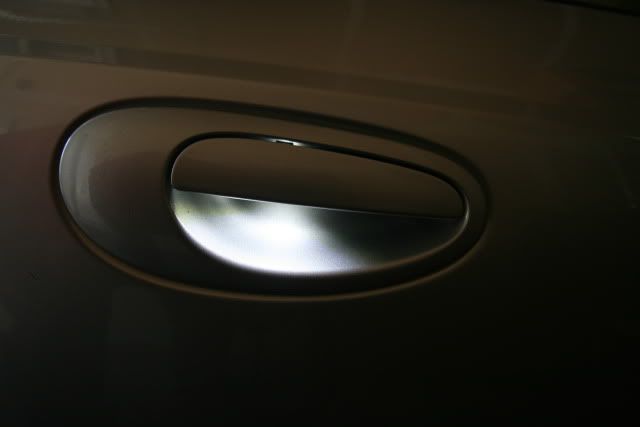
After removing the door panel and peeling back the weather cover, release the door unlocking stem and use the 8mm socket to loosen the screws attaching the door handle. This is the same for all door handles except the driver's door which has two unlocking stems: one for the handle, one for the keyhole.
Image

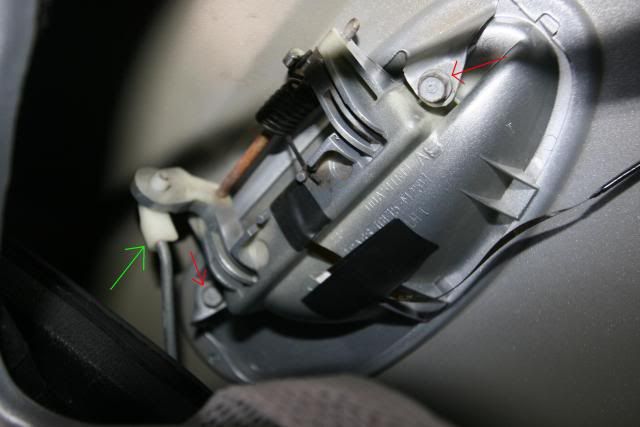
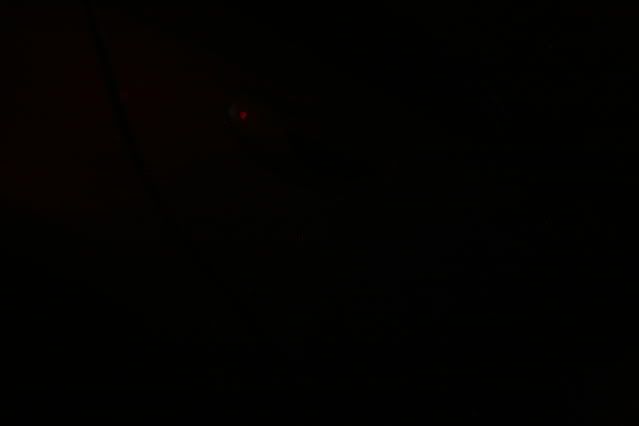
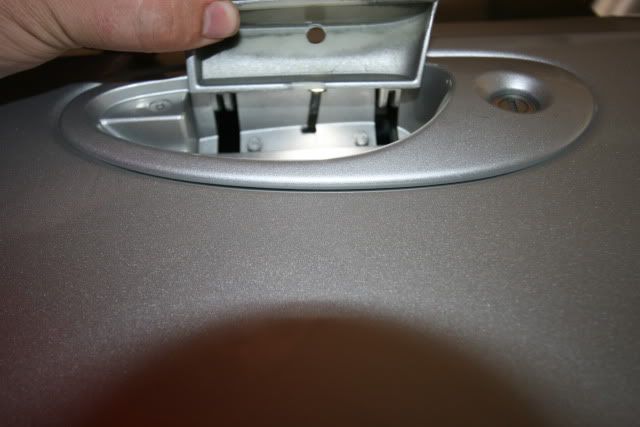
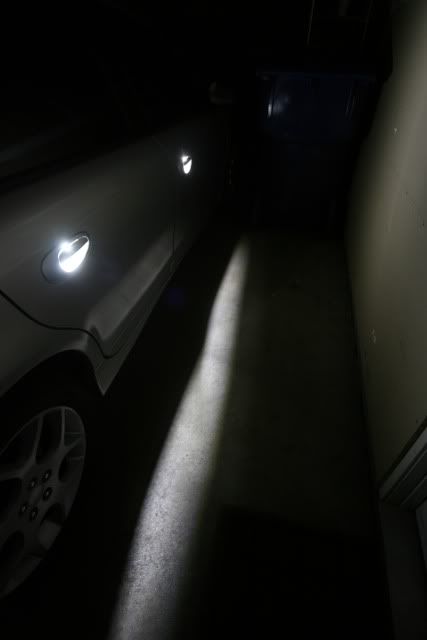
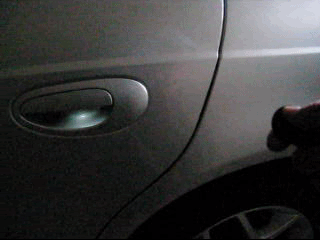
Once the handle is removed, clean it up if you want and analyze where your hole placement should be. The LED from superbrightleds.com sits under the handle with enough space for the handle to glide over it. Drill one hole in the handle itself and one where the wire will be coming through. These specific LED's are waterproof which was the defining factor in why I picked them. They have 3M adhesive on the back of the LED and I secured the wires from tugging or movement by taping the wire to the inside of the door handle.
Image

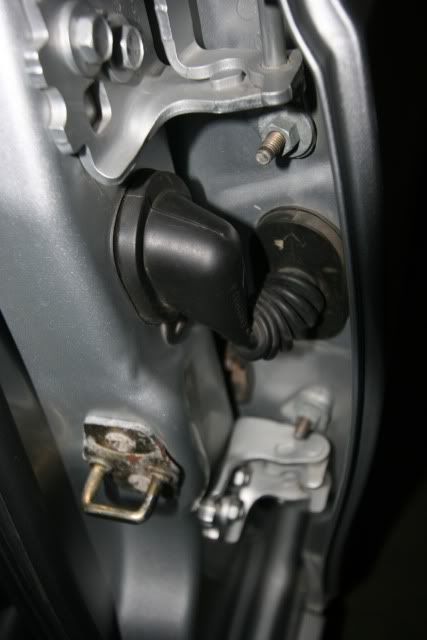
After carefully reinstalling the handle, run the wire along the door. I used tape to attach it to the door. Next is the hardest part of the whole install and where patience really comes in to play. The rubber connectors the allow the wires to run through the door and in to the cabin will either piss you off, or be complete cake. After the first one I did, the others were not to bad, but the rear doors are easier than the front. I would have taken one off to show you, but since things are already installed and I had to figure these out on my own, all I can say is good luck. The door half snaps off and the cabin half is held in with snap connectors. The rubber will slide off and you'll see what I mean. When doing the rear doors, close the door and do things from the front seat. When reinstalling, the connector sits in the rubber part then snaps in to the B pillar. It is easier to pull the wire from inside the cabin to the door.
Image
Image

Once the wire is through and you are satisfied with the slack and such, hook the wires together. REMEMBER: Take care in making sure the wires are not pulled on by the window being rolled down.
Image
Image

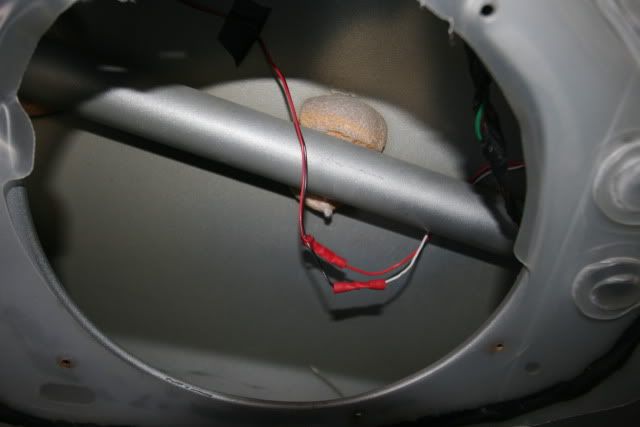
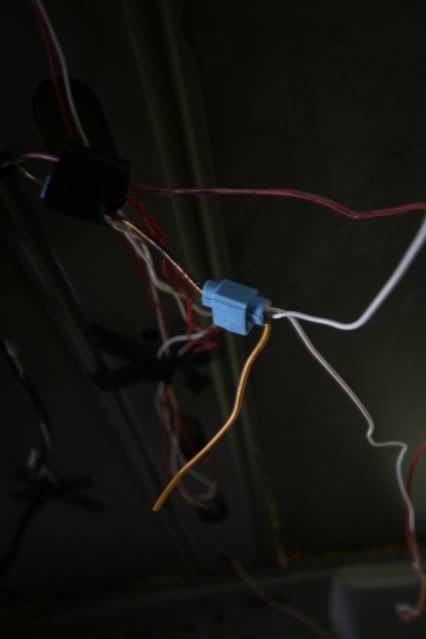
Bring the wires up and prepare to keep track of your mess. This is the wire to the dome light. It runs up the drivers side C pillar. Pink is positive, yellow is negative.
Image

I used the splice connectors the first time, but the drivers side door didnt work at all and the passenger side would flicker at times. So I chopped the old setup, stripped the wire ends then crimped the wires together. The rear doors are still connected/working with splice connectors. I turned the map lights in to my dome light so those wires are optional. For those wires, yellow/black is positive and orange/black is negative.
Old
Image
New
Image

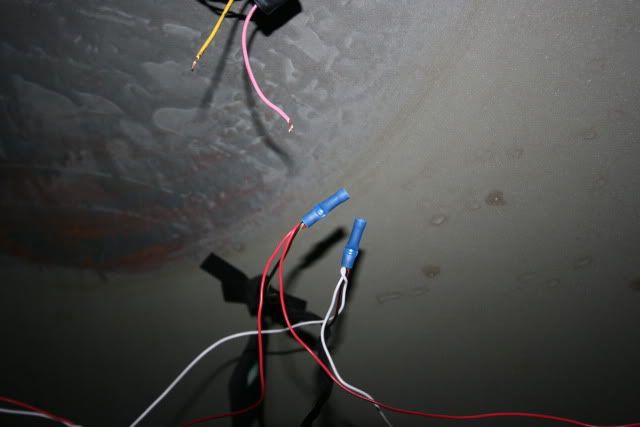
The final clean up. The wires closest to the rear of the car are the splice connectors to the rear doors. The wires closest to the front are the the crimped connectors to the front door and dome/map light.
Image

Success!
Image

Image
Image

Questions and requests for pictures/information will be explained as much as possible.
riiv
Image

User avatar
iThane
2GN Member
Posts: 1251
Joined: Thu Sep 30, 2010 5:33 pm
Location: Las Vegas, NV

Post by iThane » Mon Aug 08, 2011 6:41 pm

thats interesting!

does the light constantly stay on? i'm assuming; being an led..
Image
My Progress Log
Official "I'm Going to Drive My Neon till it Dies" Club #000104

riiv
n00b
Posts: 11
Joined: Fri Jul 15, 2011 12:53 am

Post by riiv » Mon Aug 08, 2011 8:43 pm

You know, I thought they did because in the animated gif you can see the glow a little bit. The other night I went and checked and none of them were glowing. I unlocked and locked the car several times too. I'll check again tonight. The new dome/map light isn't LED yet so maybe that has something to do with it?
riiv
Image

User avatar
iThane
2GN Member
Posts: 1251
Joined: Thu Sep 30, 2010 5:33 pm
Location: Las Vegas, NV

Post by iThane » Mon Aug 08, 2011 9:49 pm

whether the dome light is led or not shouldn't matter. i just know
from experience that switching out the dome light for led will cause
the led dome to have a dim glow all the time. it doesn't drain your battery
at all because theres a constant current going through it regardless,
but because leds use less power to illuminate, they glow dim. i find
it interesting that the door handle leds don't glow though. maybe its
because of where you hooked it up.
Image
My Progress Log
Official "I'm Going to Drive My Neon till it Dies" Club #000104

riiv
n00b
Posts: 11
Joined: Fri Jul 15, 2011 12:53 am

Post by riiv » Mon Aug 08, 2011 11:08 pm

Here is a thirty second exposure of the door handle. No glow haha.

Image

Maybe all of them draw enough voltage that they cant glow?
riiv
Image

User avatar
iThane
2GN Member
Posts: 1251
Joined: Thu Sep 30, 2010 5:33 pm
Location: Las Vegas, NV

Post by iThane » Tue Aug 09, 2011 12:21 am

that, or there isn't enough wattage going through the lines
on power down to illuminate any of them. either way, nice write up
and welcome to the forums! :thumbup:

i might use this how-to if i decide to install this type of accent lighting
under the side mirrors. the handle lights are just a bit too bright for
my taste. i do like the idea though
Image
My Progress Log
Official "I'm Going to Drive My Neon till it Dies" Club #000104

03SXTGUY
2GN Member
Posts: 530
Joined: Wed Jan 12, 2011 12:03 pm
Location: Pittsburgh, PA

Post by 03SXTGUY » Mon Mar 19, 2012 10:06 pm

Unique idea, riiv! :thumbup:

Maybe for your next project, you can come up with a way of drilling a small hole in the bottom of your mirror housings and wiring LEDs pointing down at the ground - many Trucks/SUVs/etc. have this - I believe they call them "Courtesy Lights." That, along with your door handles, should provide any of your passengers enough light to get safely into your vehicle haha
- Ben -

Image
'03 Silver Neon SXT 2.0 SOHC w/ some stuff
Charlotte's Progress Log
_________________

NickKo
2009 Gold Contributor
Posts: 2248
Joined: Sun Jun 11, 2006 11:24 am
Location: IL./WI.border

Post by NickKo » Mon Mar 19, 2012 11:22 pm

'Subscribed'.... This is a pretty cool idea. 8) :thumbup:


- Nick
-1998 2-dr SOHC MTX= 57mm TB; Maddog STS
-2000 Ply.LX w/MTX = Maddog STS; CAI; 2.5 exh.; 60mm T/B
-2001 ATX w/Syked PCM + Magnum header
-2001 ACR w/SRT T/B bored out to 55mm

Official "I'm Going to Drive My Neon till it Dies" Club #000009

User avatar
nerox
2011 Silver Contributor
Posts: 939
Joined: Sun Dec 20, 2009 10:51 am
Location: United Kingdom

Post by nerox » Sat Dec 22, 2012 4:17 pm

iThane wrote:whether the dome light is led or not shouldn't matter. i just know
from experience that switching out the dome light for led will cause
the led dome to have a dim glow all the time. it doesn't drain your battery
at all because theres a constant current going through it regardless,
but because leds use less power to illuminate, they glow dim. i find
it interesting that the door handle leds don't glow though. maybe its
because of where you hooked it up.
you could of course use a tiny circuit to make it only turn on above x volts elliminating the dim glow from LED's.


didnt you use a resistor with them LED's? you could use a higher value resistor to make them dimmer or use a constant current driver
Official "I'm gonna drive my Neon until it dies" Club Member UK#1

Image

occasional demons
Junior Admin
Posts: 20306
Joined: Thu May 03, 2007 12:14 pm
Location: Ashland Ohio

Post by occasional demons » Sun Dec 23, 2012 12:52 am

Well it does matter that he hadn't replaced the dome light with an LED. The regular filament is grounding the circuit out, eliminating the constant glow. Since OP hasn't visited for a while, we may not know if they ever swapped the dome for an LED.
Bill
Olha Koba, a psychologist in Kyiv, said that “anger and hate in this situation is a normal reaction and important to validate.” But it is important to channel it into something useful, she said, such as making incendiary bombs out of empty bottles.
2000 Neon MTX swap with '02 R/T PCM
1999 neon coupe 2.4 swap
2021 Forester

Post Reply

Return to “HT Exterior”