To start off I went to the local JoAnn's Craft store and bought 3 yards of vinyl to use. It was $6.99 a yard, but I also had a 40% off coupon. Over all I paid a little over $12 for the material. No, you will not need that much for the inserts, I have other plans with the rest. I also got some All Purpose Contact Cement, High Output Hot Glue Gun, and Soldering Iron which ran me about $20. You will probably have these items already.
So for this project you need to have the following:
Vinyl (only a half yard will do)
Contact Cement
Soldering Iron
Hair Dryer or heat gun (be careful with high wattage as they can scorch your vinyl)
High Output Hot Glue Gun
Good quality Glue Sticks ( I used Black OEM Industrial Glue sticks, these are hard to find but they are the best for automotive use)
A clean work space
A knife or something that you can pry with a little bit
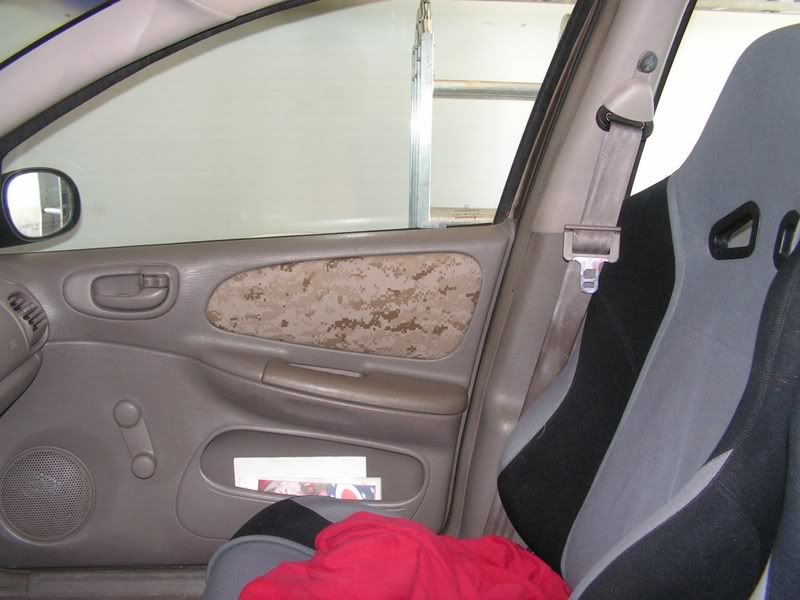
First off you will remove your door panel as shown in the picture. (You will have to remove the window crank if you have one)

Next remove the cotton pad that is on the back of the panel. (just simply pull up on the points that is it glued to the panel)
Next you will be taking the plastic weld points out of the panel. You will do this by using your heated soldering iron to melt the plastic weld joints inward. (Be careful not to melt the panel only the plastic weld joint that will be white)

**Special Note** As you are melting the weld joints, pull on the insert on the other side of the panel. Doing this will save you time and grief. It is better to pull on the insert while the plastic is still warm so that it will not harden itself back on the panel. But make sure that you take your time.

Now that you have the Insert off, pull the factory material off of the insert. It will come off really easy and my ravel when you do this. Just make sure you get it all off..

Now go ahead and roll out some vinyl on the clean work space and then lay the insert down on it.

Now cut a rectangle around the insert leaving at least 1 inch on each end where the curves are.( This will allow the fold over to the back and also allow enough for you to pull on when the stretching process is needed.
Now that you have your material cut for the insert move everything away from the workspace but the insert. Now you can take you contact cement and brush it on evenly and in a thin coat. DO NOT PUT IT ON THICK, AS IT WILL SOAK INTO THE VINYL AND CAUSE THE MATERIAL TO HAVE A YELLOW COLOR TO IT! (while doing this step it would be a good idea to go ahead and plug your hot glue gun in to get it hot)

With that done, you will center the insert on the vinyl.

Get your hair dryer or heat gun and slowly warm up the vinyl. You will see the vinyl start to mold on it’s own around the insert. ( again don’t scorch the vinyl).

While the vinyl is still warm, start pulling on it on the two longest edges.

Once you have pulled them, take your hot glue gun and put a line of glue along the inside edge of the insert in the corner and fold over the vinyl and press it onto the hot glue.

Do this step to the other long side also. (If the vinyl has cooled, go ahead and heat it again)

Once you have done that, take your dryer or heat gun and slowly heat the face of the insert up. While doing this is, it is a good idea to prop your dryer on something because you will need both hands for this part. With the dryer on and heating up the vinyl, slowly use your hands to pull out as many wrinkles as possible. You will not get all of the wrinkles out of the vinyl at this point so don’t try.
Heat up the ends and pull on them to stretch out the material. Glue down the smaller end first as this will help get the pressure on that end and will allow better pulling ability on the bigger end.

Now heat up the bigger end really well and then pull on it. This should pull out several wrinkles that you may have. Once you have done that, hold it while it cools.(This will allow you to let the end mold around the insert and also allow the material to cool and form without wrinkles). Once you have that done, Heat just the end up where it curves and once it is warm, pull on it to tighten it up. I it will get even tighter once it starts to cool down. Keep tension on the material by pulling and also put your hot glue down on it and work the material to where you won’t get humps or creases in the material.
Let it set for a few minutes to let the glue cool down and also to see if there are wrinkles in the material. If there are you can heat it up again and then let it cool down. You may need to do this a couple of times until you are satisfied with it.

You are done with the insert! Now all you have to do it mount it back onto the door panel. For extra support put hot glue on the panel where the insert will be and then press the insert firmly onto it. Let it set just a few minutes to cool and settle well. Once that is done, flip over the panel and put hot glue at every factory plastic weld point. Let that cool once you are done. Set the panel off to the side for a good 15 minutes. Also it helps to take it into an air conditioned room to let the wrinkles fall out of it. Your done! Now enjoy your new style interior.


 Sam-I-Am