How-To: Headliner and visor replacement (DIY)

Post Reply
User avatar
eVilcreations
Former Jr. Admin
Posts: 2411
Joined: Tue Jul 06, 2004 6:52 pm
Location: the flatlands, KS
Contact:

How-To: Headliner and visor replacement (DIY)

Post by eVilcreations » Sun Feb 06, 2005 11:10 pm

Well guys, here it is.

Things you will need:

1. New "foam backed" Headliner material 2 Yards, your choice of color
2. 3M "Super 77" Spray Adhesive
3. Razor Knife, or blade
4. Scissors
5. Alot of Patience

Here's what ya do.

Start by removing the old Headliner. This can be accomplished by removing your "oh sh*t" handles, visors, and visor brackets, 3 plastic pop fasteners in the rear, pull down all the rubber molding around the edges, and pop down the Pillars where they cover the edges. You will also need to remove the some light which can be accomplished by prying down the lense, and then just pulling the whole dome light assy. out of its plug.

Once you have all of that done, bend and flex the headliner out of the car being carful not to break the backer board.

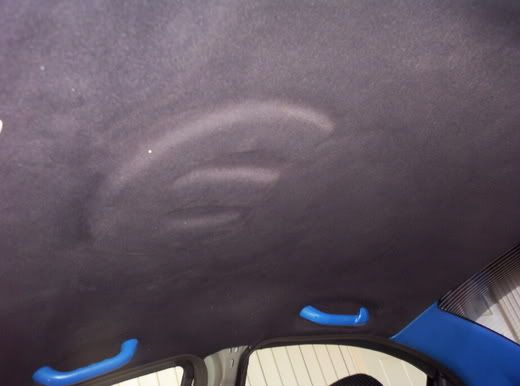
I chose to remove my stock headliner material and lay down the foam for the mopar logo which I had cut and formed before starting this project. Foam can be cut and molded into whatever you like, get creative, or you don't have to do it at all. The stock headliner material is attached to the backer board with what looked like fiberglass so it is quite a pain in the ass to remove, but I was worried it would be too thick if I just put the new stuff over the old, so I chose to remove it.

Once you remove the old stuff, or if you choose not to, you are ready to install the new material.

DO NOT PRECUT THE MATERIAL!!!!

It is best if you just use the material as is instead of precutting it due to the fact that the material isn't cheap and you don't want to cut it short and mess it up.

Lay the material out foam side up, and lay the headliner down with the stock material facing up.... Take yer handy 3M and spray it down, both the new material and the backer board. Allow to tack for 15-30 seconds before you start putting the new material on. It is best to have a helper for this since you will want to start at one end and work the material to the other end.....

Once you have it all stretched out on the backer board, let it dry overnight.

Now for the cutting....

You will want to cut at an angle so that the colored material is slightly longer than the foam.....just use your razor knife and run it along the edge of the backer board at an angle. DO NOT DISCARD THE LARGE LEFTOVER PIECES....you'll need those for the next step.
Continue to cut out the holes for the "oh sh*t" handles and mirrors, and if you want to keep your dome light, you'll need that hole too.


Next is the visors......lightly cut the stiching around the straight "hold" bar that is on the visor, and just start pulling the old material off. Try not to rip it too much because you'll need it for a pattern. The edges of the material ARE NOT STITCHED so you don't need to worry about removing stiches or anything like that.

Now, lay out the old material on the new material(large scraps from the cut off of the headliner) and trace your pattern. Use the scissors to cut it out. Keep in mind that you may need to trim as you go. Now that your pattern is cut out, go ahead and fold it over the edge of the visor, and start tucking.....you can use a flat head screwdriver to pry apart the visor a little, but be careful not to break it.

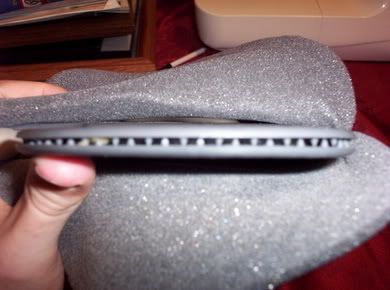
Here you see the teeth on the end of the visor:
Image

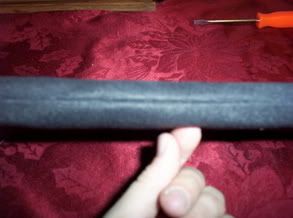
And here is the finished(tucked edge)...just like stock, but black now instead of tan.
Image

Now, reinstall the headliner and visors the same way you took it out, just reversed and voila, a new headliner.

Image


If you have any questions, feel free to eMail me evilcreations@gmail.com or hit me up on AIM evilcreations919


Thanks for looking,
Josh
Image

User avatar
Frizbe
2GN Member
Posts: 2984
Joined: Wed Sep 22, 2004 11:41 pm
Location: Denver, CO
Contact:

Post by Frizbe » Sun Feb 06, 2005 11:55 pm

ohhh.. nice how-to might try this this summer. How much was everything roughly? and a little off-topic but.. does anyone know if normal plastic paint will work on the trim peices? like the pillar peices? I'd like to make them Satin Black like the rest of the interior... anyway nice write up evil.
Justin- I have nothing but smart ass remarks to add.
:-s
Fire_Hippo wrote:Frizbe, you rock my socks.
- Jeff's girlfriend
Image

User avatar
eVilcreations
Former Jr. Admin
Posts: 2411
Joined: Tue Jul 06, 2004 6:52 pm
Location: the flatlands, KS
Contact:

Post by eVilcreations » Mon Feb 07, 2005 8:41 am

The headliner material was 20.00, the 3M Super 77 is about 9 bucks...that's pretty much it.

As far as paint, I used Krylon "Fusion" paint, it is made specifically for plastic, and it does come in black and grey as well as many other colors.
Image

79cutlas
2GN Member
Posts: 38
Joined: Sun Jul 11, 2004 12:38 am
Location: Wichita, Ks
Contact:

Post by 79cutlas » Sun Feb 27, 2005 9:14 pm

linkinevo wrote:ohhh.. nice how-to might try this this summer. How much was everything roughly? and a little off-topic but.. does anyone know if normal plastic paint will work on the trim peices? like the pillar peices? I'd like to make them Satin Black like the rest of the interior... anyway nice write up evil.
Just use the fusion, I used the fusion on my upper A B C pillars and my headliner and visors. I'm too lazy to change the headliner.
Can't find the close-up pics, but here's a pic of the A pillars and the visors.

Image
2001 Neon ES Flame Red
Magnum Swap
Custom CAI
#14 CAm
Crane Cam Gear
3.94 MTX Swap
Accell 24lb injectors
UDP
SAFC 2
Upgraded Ground

User avatar
Frizbe
2GN Member
Posts: 2984
Joined: Wed Sep 22, 2004 11:41 pm
Location: Denver, CO
Contact:

Post by Frizbe » Mon Feb 28, 2005 8:29 am

cool thanks guys!
Justin- I have nothing but smart ass remarks to add.
:-s
Fire_Hippo wrote:Frizbe, you rock my socks.
- Jeff's girlfriend
Image

User avatar
eVilcreations
Former Jr. Admin
Posts: 2411
Joined: Tue Jul 06, 2004 6:52 pm
Location: the flatlands, KS
Contact:

Post by eVilcreations » Mon Feb 28, 2005 10:32 am

I have decided to cover my Pillars and Gauge pod with raw CF.....what do you guys think?
Image

User avatar
Frizbe
2GN Member
Posts: 2984
Joined: Wed Sep 22, 2004 11:41 pm
Location: Denver, CO
Contact:

Post by Frizbe » Mon Feb 28, 2005 5:24 pm

I think that would look awsome!
Justin- I have nothing but smart ass remarks to add.
:-s
Fire_Hippo wrote:Frizbe, you rock my socks.
- Jeff's girlfriend
Image

User avatar
Frizbe
2GN Member
Posts: 2984
Joined: Wed Sep 22, 2004 11:41 pm
Location: Denver, CO
Contact:

Post by Frizbe » Wed May 25, 2005 2:10 pm

I know back from the dead but I'm bored at school.
EvilCreations wrote:I have decided to cover my Pillars and Gauge pod with raw CF.....what do you guys think?
Are you still going to do this?
Justin- I have nothing but smart ass remarks to add.
:-s
Fire_Hippo wrote:Frizbe, you rock my socks.
- Jeff's girlfriend
Image

User avatar
eVilcreations
Former Jr. Admin
Posts: 2411
Joined: Tue Jul 06, 2004 6:52 pm
Location: the flatlands, KS
Contact:

Post by eVilcreations » Wed May 25, 2005 8:55 pm

Hopefully when money permits....I am still planning on doing my pillars and stuff in CF.....
Image

gski4life
2GN Member
Posts: 382
Joined: Mon Apr 10, 2006 12:49 pm
Location: Albany/Tifton, GA

Post by gski4life » Wed Jan 10, 2007 3:00 pm

would you follow this same method for doing the headliner or ANYTHING else like the pillars or the dash if you wanted to use black suede?
"Hold up, you mean to tell me a broken clock is right twice a day?" Brilliant...

KrackstaR
Former Moderator
Posts: 3141
Joined: Sun Jan 15, 2006 6:58 pm
Location: deez nuts,MD
Contact:

Post by KrackstaR » Wed Jan 10, 2007 7:28 pm

gski4life wrote:would you follow this same method for doing the headliner or ANYTHING else like the pillars or the dash if you wanted to use black suede?

I would use 3m adhesive #90 (get this from homedepot) then spray the part then the material and wait a min then combine them two(it has the directions on the can follow them to the T) from there you can pretty much wrap anything just make sure on plastic parts you clean with acetone or something of that sort.
Bella Lugrossi wrote: there's a thin line between being a hero and being a memory. ;)
Image
Image

gski4life
2GN Member
Posts: 382
Joined: Mon Apr 10, 2006 12:49 pm
Location: Albany/Tifton, GA

Post by gski4life » Thu Jan 11, 2007 8:53 am

hhmmmmm, very interesting.......hey krack, how did you end up painting your doors (inside), I saw the great pics of the fronts, but how about the back doors
"Hold up, you mean to tell me a broken clock is right twice a day?" Brilliant...

KrackstaR
Former Moderator
Posts: 3141
Joined: Sun Jan 15, 2006 6:58 pm
Location: deez nuts,MD
Contact:

Post by KrackstaR » Thu Jan 11, 2007 1:00 pm

gski4life wrote:hhmmmmm, very interesting.......hey krack, how did you end up painting your doors (inside), I saw the great pics of the fronts, but how about the back doors
they pretty much look like the fronts and they were alot easier i havnt tooken pics yet cause i was going to take all the pics when iam done with the interior which should be in another week or so.
Bella Lugrossi wrote: there's a thin line between being a hero and being a memory. ;)
Image
Image

gski4life
2GN Member
Posts: 382
Joined: Mon Apr 10, 2006 12:49 pm
Location: Albany/Tifton, GA

Post by gski4life » Thu Jan 11, 2007 1:52 pm

good deal man, can't wait for em.....I'm not jocking you style because I'm doing another color but I hope to have it looking like your doors.......just suede and gloss black (gloss and flat black theme)...........I thought about doing the handle in blue but I think that'll be too bright
"Hold up, you mean to tell me a broken clock is right twice a day?" Brilliant...

KrackstaR
Former Moderator
Posts: 3141
Joined: Sun Jan 15, 2006 6:58 pm
Location: deez nuts,MD
Contact:

Post by KrackstaR » Thu Jan 11, 2007 6:18 pm

gski4life wrote:good deal man, can't wait for em.....I'm not jocking you style because I'm doing another color but I hope to have it looking like your doors.......just suede and gloss black (gloss and flat black theme)...........I thought about doing the handle in blue but I think that'll be too bright
dude iam not like that at all i would do it for you if you were in md....lol good luck and shoot me a PM if you need any help or special pics to help you out. :wink:
Bella Lugrossi wrote: there's a thin line between being a hero and being a memory. ;)
Image
Image

SinfulNeon
2GN Member
Posts: 254
Joined: Sun Feb 04, 2007 2:21 am
Location: Redding, Ca
Contact:

Post by SinfulNeon » Tue Feb 06, 2007 5:33 pm

wow nice also by doing it that way you could reposition your dome light if you wanted to? Sorry if thats a dumb question, I would like to move mine more forward as I want to put a pull down screen for the people in the back but it would be right in the area where the dome light is. Anyhow thanks to anyone who answers this question oh and great how-to.
Image
::WTB:: Dual or Tri-pod A-Pillar (black) : Passenger A-Pillar (Black) : AGP Dog Bone Motor Mounts : 1st Gen ACR Springs : Shorty Attn. :

contagious18
2010 Silver Contributor
Posts: 2420
Joined: Wed Feb 21, 2007 3:18 pm
Location: Stockton, CA

Post by contagious18 » Tue Sep 16, 2008 3:02 am

has someone done da visors, im having problems wit it. i cant seem to get da fabric in the visor
Antagonist crew| Official "I'm Going to Drive My Neon till it Dies" Club #000031
Image
http://www.cardomain.com/ride/2569968
http://contagious209.mybrute.com

ebomb
2GN Member
Posts: 27
Joined: Wed Sep 19, 2007 8:41 pm
Location: NEW JERSEY

Post by ebomb » Wed Nov 19, 2008 6:19 pm

Those visors were hell trying to get apart without braking them.
nvscreations.com

Post Reply

Return to “HT Interior”