How To: Add Extra LED's to HVAC

Post Reply
heydockyle
2011 Silver Contributor
Posts: 4829
Joined: Mon Jul 14, 2008 6:09 pm
Location: Uniontown, Pennsylvania

How To: Add Extra LED's to HVAC

Post by heydockyle » Tue Jul 21, 2009 7:36 pm

So I changed my HVAC lights to blue and it didn't seem bright enough to me. There were a few dark spots that I wanted to get rid of. Well I saw sxxxt added leds to it so I set out to do it and ended up with a How-To.

If you are not familiar with soldering or led's I would not try this.
I am not responsible for anything you do to your assembly as it can be broken...


Item's Needed:

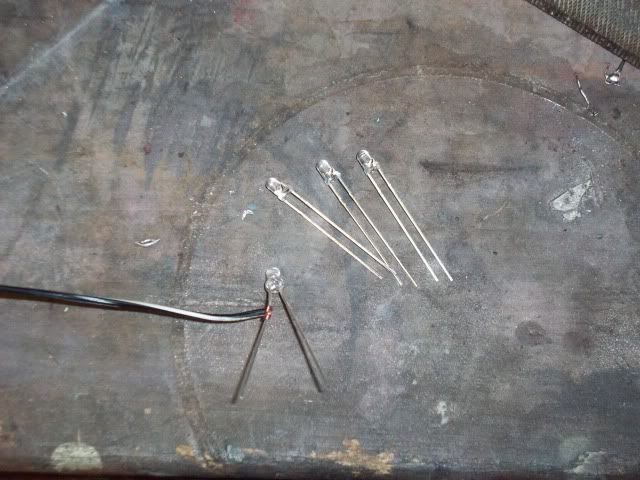
- 4 Non-Wired LEDS. I chose to use 3mm but 5mm would work too.
- Some small wire. 20 Gauge at the biggest. Smaller is neater and easier.
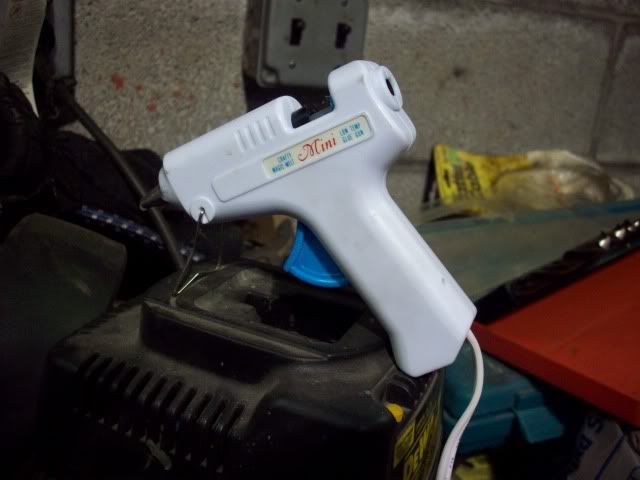
- Hot Glue Gun
- Soldering iron and some solder
- Should have some shrink-rap but you can get away without it.

Step 1:
Remove the HVAC from your car and get it somewhere to work on.
Use MoparNeonMan's tut here if you are unsure how to do this.

Step 2:
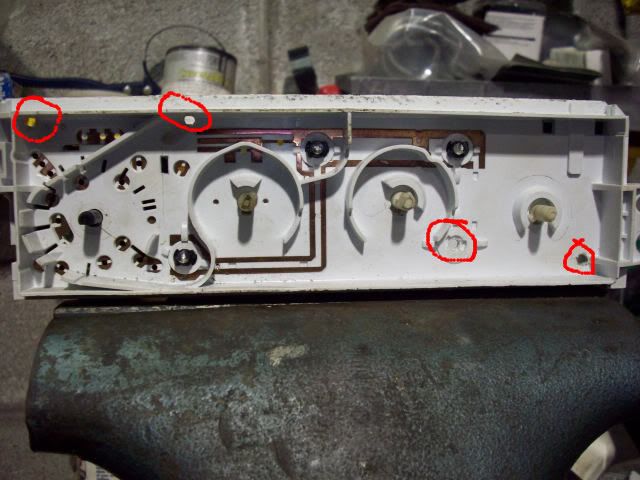
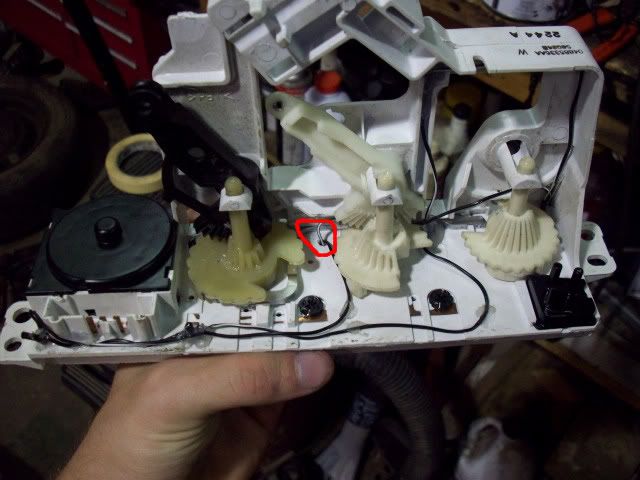
Drill 4 holes to fit your led's into. I drilled mine here
Image

Step 3:
Solder separate wires onto positive and negative leads your first led.

Image

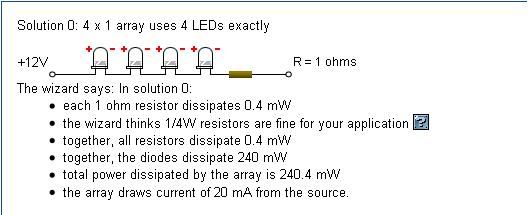
You are going to wire your resisters in a series. Doing this with 4 led's has a recommendation of a 1 ohm resistor but I didn't use one... Here is a diagram that shows you how to wire the led's in a series.
Image

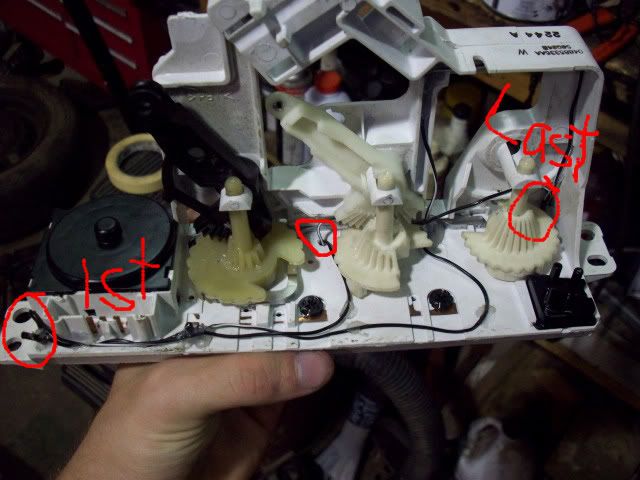
I wired one led at a time. I wired it up and then glued it into the assembly. Make sure you have enough wire soldered on to reach the next led.
Image

So now that you have your first led in place like in the picture above use your glue gun and glue it there.
Image
Image.

Do that for each led making sure to keep your wires neat and out of the way.


Here I have 3 led's done.
Image

Here is how I ran my wire for the 4th light.
Image


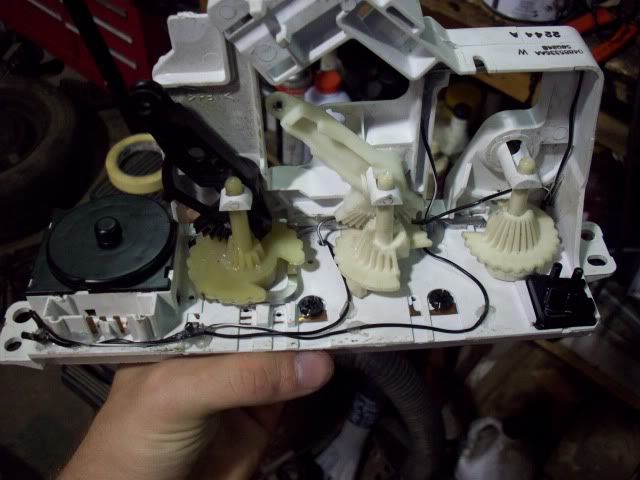
With all your wires and led's in place it should look like this.
Image

Step 4:
Now you have to power the led's. You can find a 12v source from somewhere else and turn them on separately, but I wanted them to work like normal so I wired them into the HVAC.
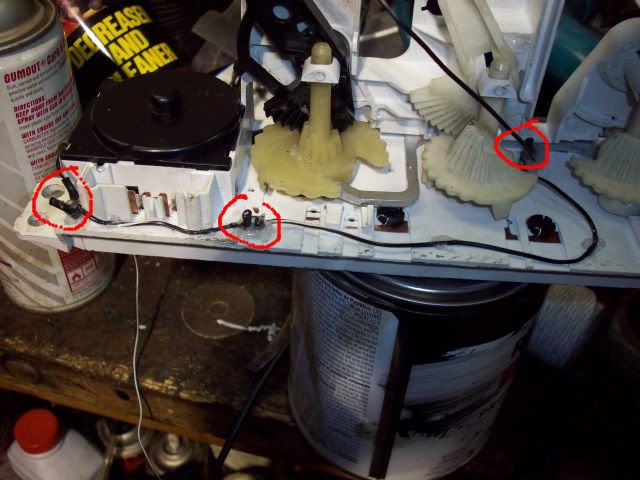
First you need to find a place to run the wires through to get them to the other side of the HVAC. I drilled a hole here.

Image

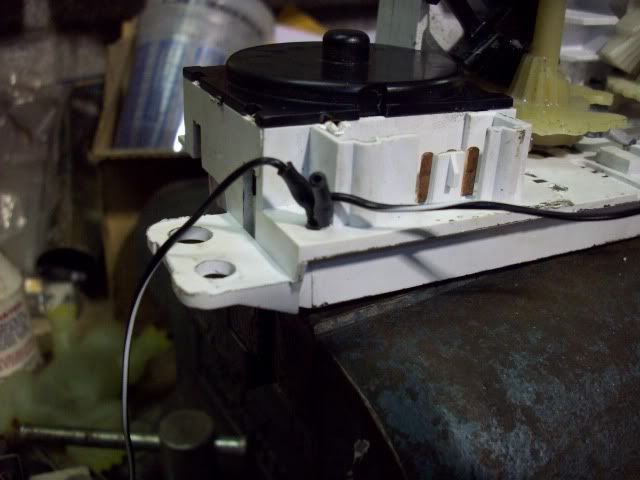
Now run the positive wire from the first led's you glued in, and the negative wire from the last led's you glued in into that whole.
Image

Step 5:
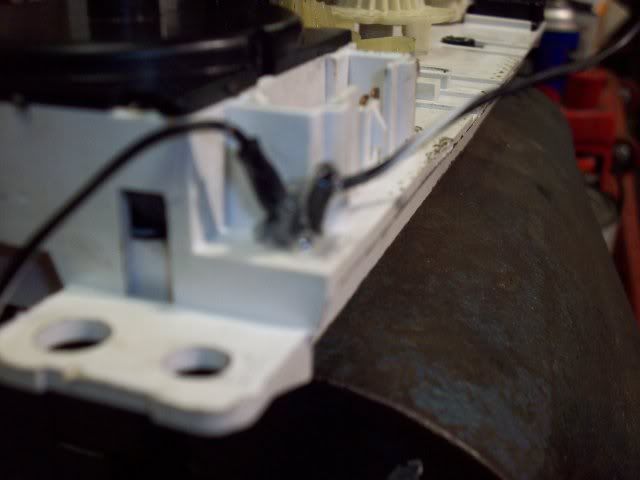
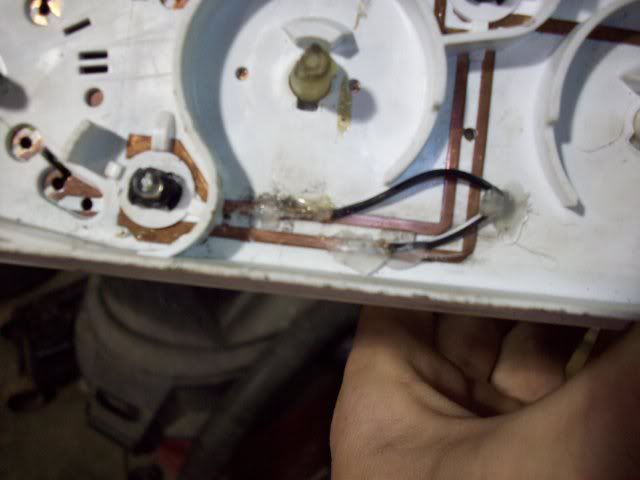
Now comes the hard part. Soldering your wire onto the traces that already powers your stock lights. The top trace is your ground and your bottom trace is your power. Solder your wire from your last led to the top (Ground) trace. Then solder the wire from the first led to the bottom (Power) trace.

I hard a really hard time getting the solder to stick. I cleaned the trace up with 2000 gritt sandpaper and they both barely stuck and then I glued them down to make sure they didn't come off. This can be very tricky to do this and get them to keep contact so be patient and careful. Here is my messy trace job after solder and glue.

Image


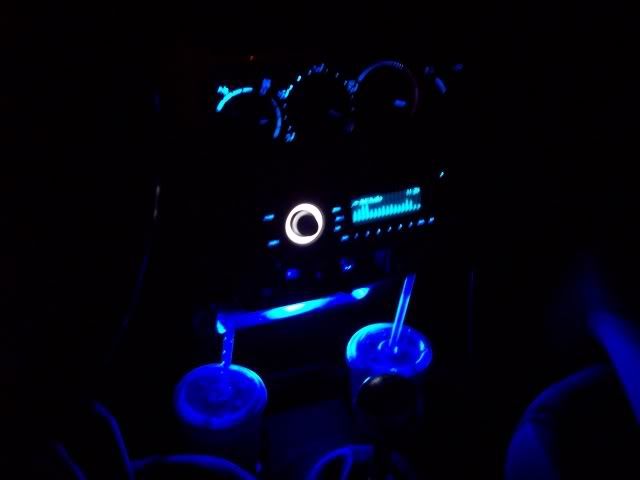
And here is the final thing! I just got it done today so I'll take some pics of it all together tonight.
Image

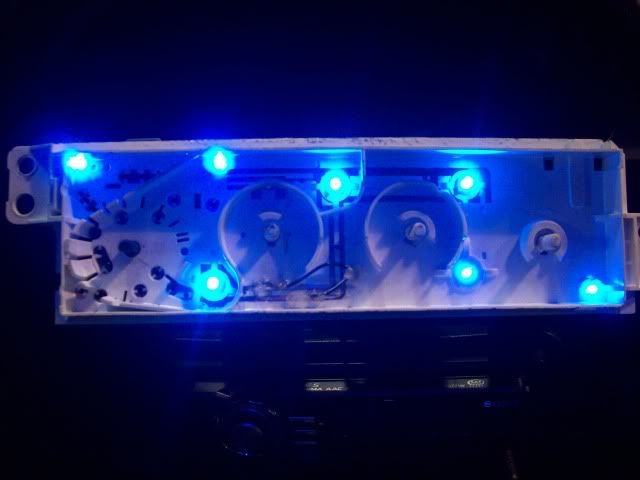
Camera is pretty suck so not a good pic. But it's a little bit brighter. They aren't as light blue as the picture makes them look. The two on the left made the left side a good bit brighter, two on right side didn't do much but I'm happy with how it came out.
Image


If anyone has any questions or see anything wrong feel free to let me know.
Also if there is a reason the 1 ohm resistor should be used or if there is an easier way to get it soldered to the trace let me know.
Last edited by heydockyle on Tue Aug 18, 2009 11:56 am, edited 2 times in total.
Image
05 OB SRT-4 - AGP Stg 3 Delta 44 Turbo w/ Supporting mods
98 Platinum Coupe - 2.4 Swap
98 Flame Red Sedan - DD Slow
98 Sport Coupe - Totaled
05 SXT - Sold

OB
Former Moderator
Posts: 9686
Joined: Tue Nov 15, 2005 9:38 pm
Location: Bay Area, CA

Post by OB » Tue Jul 21, 2009 7:52 pm

So you did this in addition to replacing the factory ones? Cool idea, way too much work for a bit more brightness IMO.
-Derek

|Donate to 2gn|Feedback || OB's | GozziFab | All Business |


heydockyle
2011 Silver Contributor
Posts: 4829
Joined: Mon Jul 14, 2008 6:09 pm
Location: Uniontown, Pennsylvania

Post by heydockyle » Tue Jul 21, 2009 8:14 pm

Yep. Alot of work? Just time consuming really. And i was bored so Ya...
Image
05 OB SRT-4 - AGP Stg 3 Delta 44 Turbo w/ Supporting mods
98 Platinum Coupe - 2.4 Swap
98 Flame Red Sedan - DD Slow
98 Sport Coupe - Totaled
05 SXT - Sold

SOKADAO954
2009 Gold Contributor
Posts: 1768
Joined: Wed Oct 29, 2008 11:58 pm
Location: IM IN MIAMI BITCHHH......
Contact:

Post by SOKADAO954 » Tue Jul 21, 2009 8:33 pm

OB wrote:So you did this in addition to replacing the factory ones? Cool idea, way too much work for a bit more brightness IMO.
:withstupid:
Image
|Danny|
06 VW Jetta 2.5 MTX - 4 Doors fit more whores.

"In search of the perfect beat. I found my soul"

ZeroChad
2009 Gold Contributor
Posts: 3165
Joined: Sat Sep 01, 2007 11:08 pm
Location: Austin, Tx
Contact:

Post by ZeroChad » Tue Jul 21, 2009 9:09 pm

Soldering to those copper traces is absolutely retarded. I don't know what they did to them. I've used like 5 different kinds of flux and none of them worked!

Nice job though. I've been considering this for a lil while.

EDIT: I meant what the factory did to them.
Last edited by ZeroChad on Mon Jul 27, 2009 1:31 am, edited 1 time in total.
Old Neon Log | Feedback

2000 - Corvette Coupe
2002 - Neon SE Fully Built (scrapped)

blueneo03
2GN Member
Posts: 1172
Joined: Mon Feb 02, 2009 4:46 pm
Location: Little Rock, AR

Post by blueneo03 » Wed Jul 22, 2009 2:12 am

i think they used hot glue... or thats what it looks like.. but i would like to do this but too much work..
Image

2003 neon se crashed
1998 neon highline Sold
2005 neon sxtSold
2017 Volkswagen CC Rline Exec. 2.0t


"Sorry you are so scared of a possible mechanical problem that you will drive an ugly transportation appliance. I'll keep living a colorful life." -some guy about a camry

User avatar
MrAngry
2GN Member
Posts: 286
Joined: Thu Jul 02, 2009 2:30 am

Post by MrAngry » Tue Aug 18, 2009 10:53 am

Still no pic installed?
Image

heydockyle
2011 Silver Contributor
Posts: 4829
Joined: Mon Jul 14, 2008 6:09 pm
Location: Uniontown, Pennsylvania

Post by heydockyle » Tue Aug 18, 2009 11:54 am

Kinda forgot to post it up lol. It's there now.
Image
05 OB SRT-4 - AGP Stg 3 Delta 44 Turbo w/ Supporting mods
98 Platinum Coupe - 2.4 Swap
98 Flame Red Sedan - DD Slow
98 Sport Coupe - Totaled
05 SXT - Sold

Franklinnn
2GN Member
Posts: 57
Joined: Wed Nov 04, 2009 12:11 am

Post by Franklinnn » Thu Nov 19, 2009 9:17 pm

I replaced the Hvac lights with the ones from oz and also put in 5mm, and if you put them in the right places it goes a long way.

I didnt get the solder to stick, but the wire was flat, and i just added a touch of superglue, and electrical tape.

i love the blue for all of them, and the purple for the blue A/C part.

also while changing all the lights i would recommend buying an extra of the HVAC lights to go into the defroster, it has the same base.

I used a regular LED and pointed it the right way and it worked very well! also put on in the cubby in the premade hole there.

Post Reply

Return to “HT Interior”