How To: Defrost switch breakdown (for bulb replacement)

Post Reply
OB
Former Moderator
Posts: 9686
Joined: Tue Nov 15, 2005 9:38 pm
Location: Bay Area, CA

How To: Defrost switch breakdown (for bulb replacement)

Post by OB » Tue Feb 16, 2010 2:20 am

After doing some research, I have yet to find someone who has disassembled the rear window defrost switch assembly to determine what kind of bulb it takes. I decided to tackle it and solve the apparent mystery. Here's how it comes apart and what I've found:

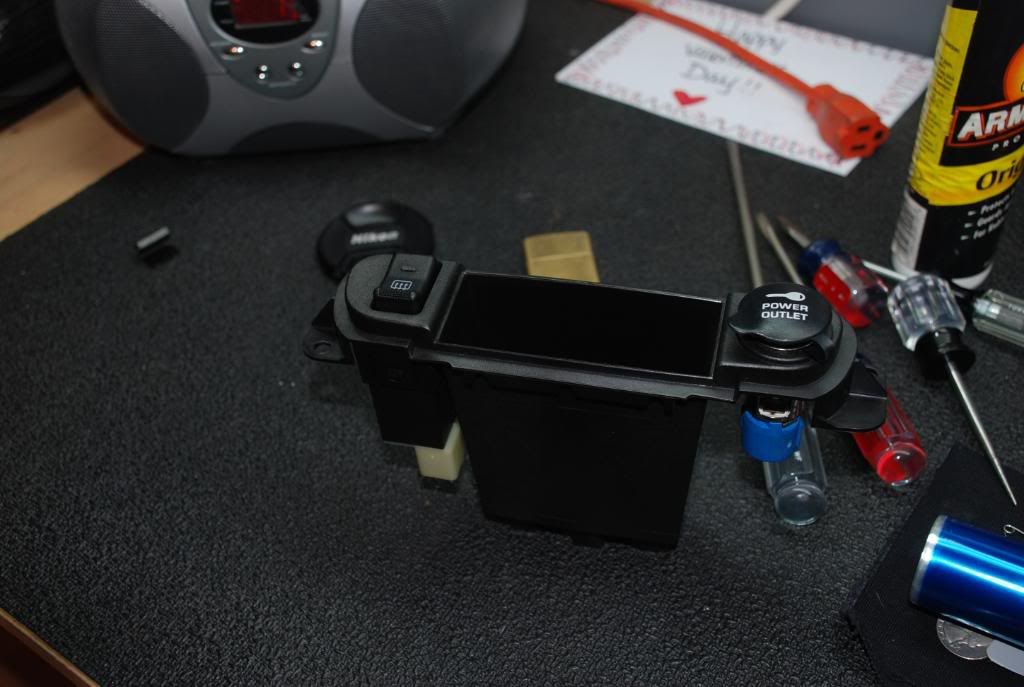
Step 1: Remove Defrost/12V ACC/cubby assembly (below HVAC panel).

Image


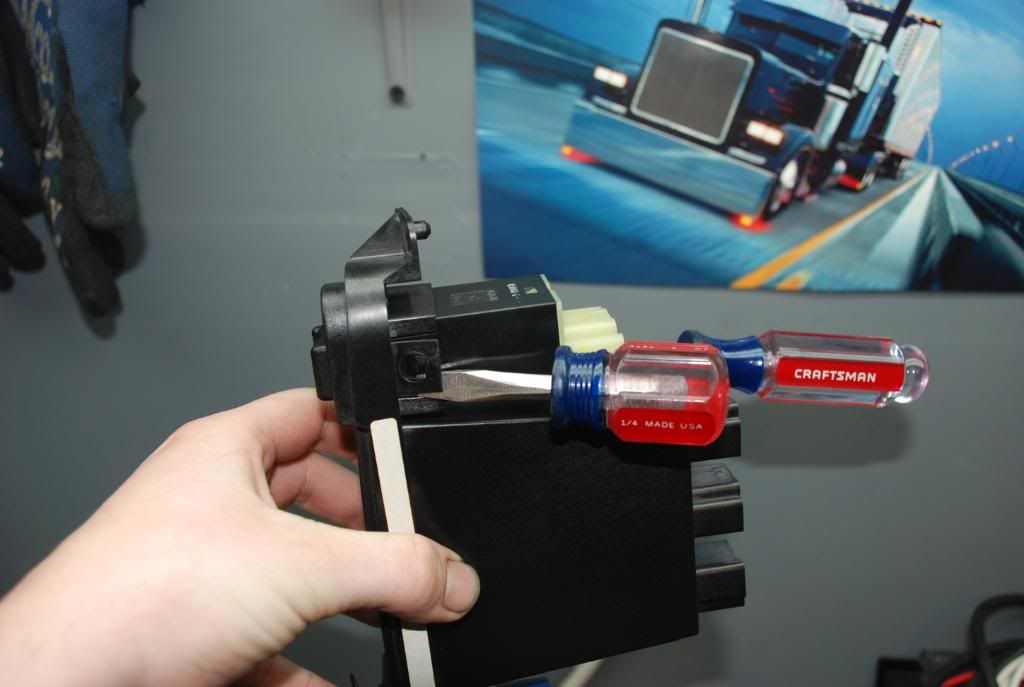
Step 2: Use two flat head screwdrivers to unclip the switch assembly from the body of the cubby assembly.

Image


Step 3: Again, use the screwdrivers to separate the two halves of the defrost switch assembly.

Image


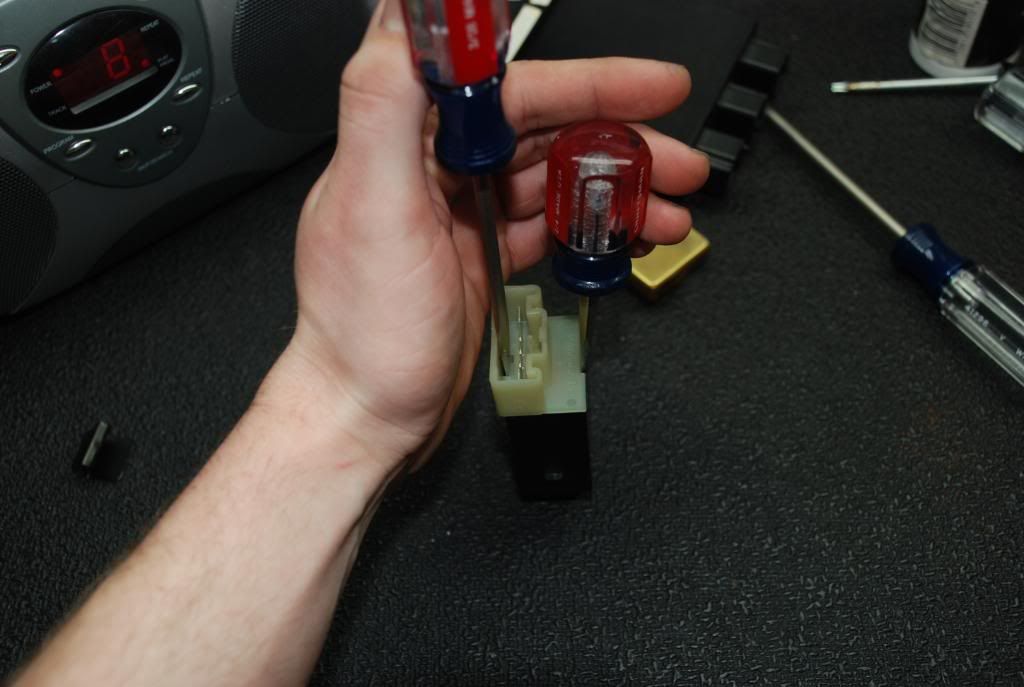
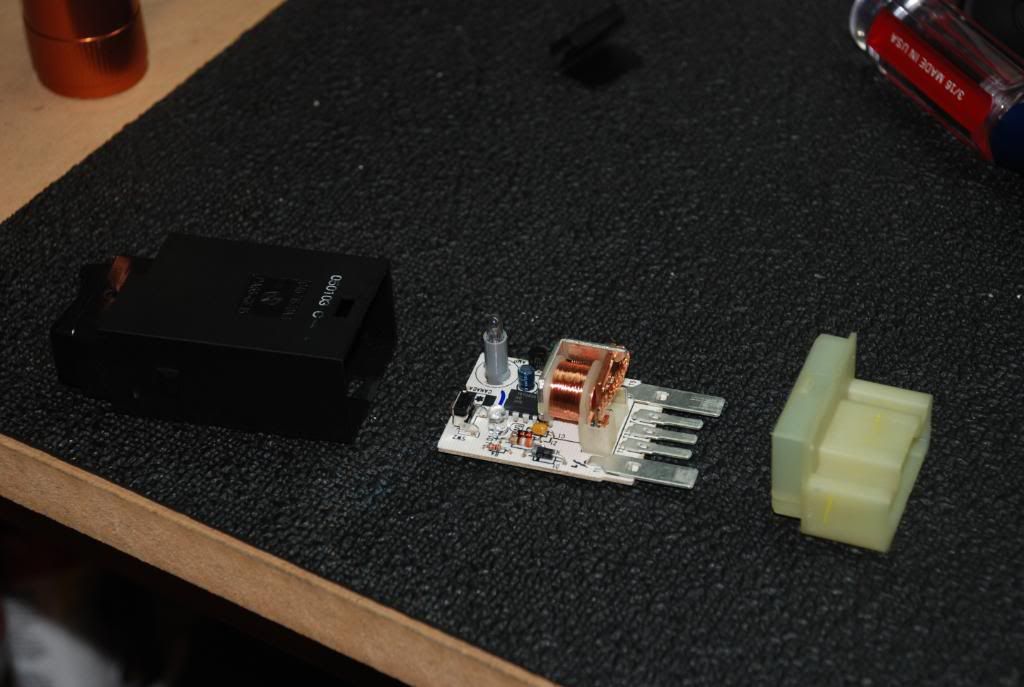
You will end up with the two halves of the switch case, and the printed circuit board that they house.

Image


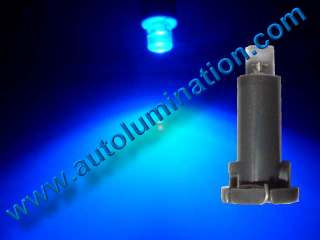
This picture shows the bulb; (blue cap is the cover that gives it it's color/tint). The cover can be removed with a good twist/pull motion, exposing the head of the bulb.

Image


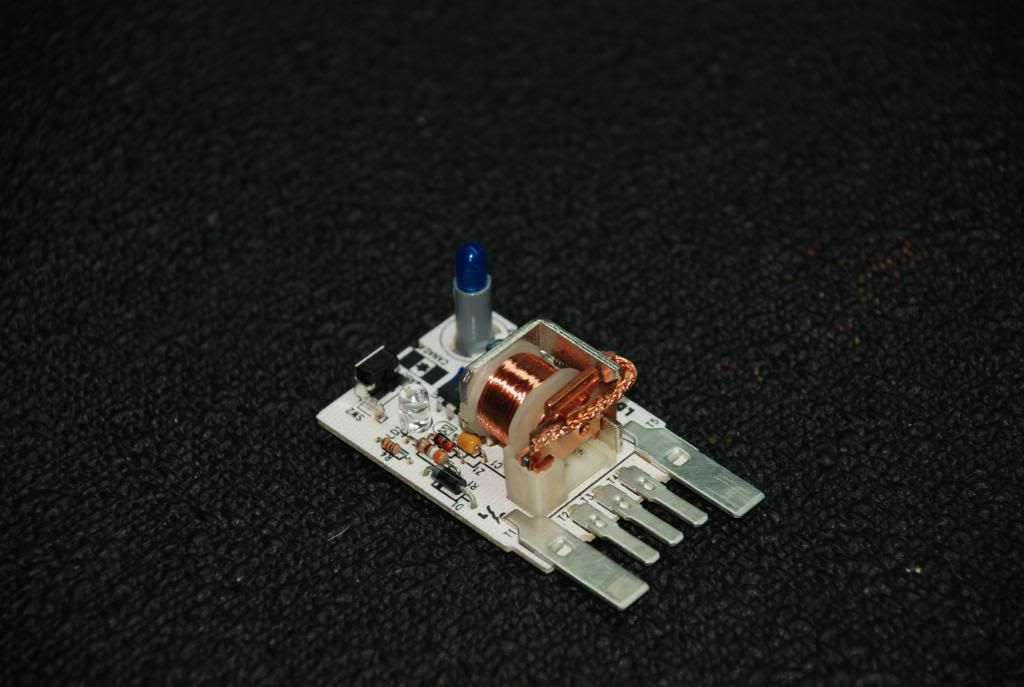
So it looks like the bulb is a wedge type, very similar to those used in the HVAC panel. The only difference is the overall length, which is much taller than a standard wedge bulb. I test fitted a stock wedge and it fit with a little massaging. Trimming the pads on the wedge should make for near perfect fitment. Time to hit up SBL for an LED replacement! Hope this helps those of you who have done the LED swap but haven't figured out the defrost portion. Might also help if you have any other issues with the defrost circuit ;)
-Derek

|Donate to 2gn|Feedback || OB's | GozziFab | All Business |


Jenni
2GN Member
Posts: 2499
Joined: Tue Aug 23, 2005 1:33 pm
Location: Berlin, Germany

Post by Jenni » Tue Feb 16, 2010 3:25 am

you don't have to open the switch to remove the bulb!!!

blueneo03
2GN Member
Posts: 1172
Joined: Mon Feb 02, 2009 4:46 pm
Location: Little Rock, AR

Post by blueneo03 » Tue Feb 16, 2010 12:02 pm

i think he was just showing what it looked like a little.. and craftsman FTW!!
Image

2003 neon se crashed
1998 neon highline Sold
2005 neon sxtSold
2017 Volkswagen CC Rline Exec. 2.0t


"Sorry you are so scared of a possible mechanical problem that you will drive an ugly transportation appliance. I'll keep living a colorful life." -some guy about a camry

RayWolf
2GN Member
Posts: 254
Joined: Wed Nov 04, 2009 1:42 pm
Location: Pittsburgh PA

Post by RayWolf » Tue Feb 16, 2010 1:10 pm

if you dont have to remove the switch to change the bulb what do you do then?
also what bulb size is it?
im planing on doing ultra white leds in my HVAC and Culster to give it that blue glow to it
Quotes to live by

"Try again, fail again. Fail better." Samuel Beckett

"The farther backward you can look, the farther forward you will see." Winston Churchill

"Imagination is more important than knowledge. Knowledge is limited. Imagination encircles the world." Albert Einstein

"Try not. Do or do not." Yoda

Jenni
2GN Member
Posts: 2499
Joined: Tue Aug 23, 2005 1:33 pm
Location: Berlin, Germany

Post by Jenni » Tue Feb 16, 2010 4:26 pm

read!

you don't have to OPEN the switch.
remove the switch and you see an hole in the housing. There sits the bulb.

LED is easy: 3mm and a resistor.
I prefer blue LEDs in switches.
Other than the bulb has the LED to look directly to the front of the switch (bend 90°...).

User avatar
wiggyx
2GN Member
Posts: 686
Joined: Thu Oct 02, 2008 2:04 pm
Location: Cleveland, Ohio

Post by wiggyx » Tue Feb 16, 2010 4:51 pm

Even easier, just switch the bulb. They make tall LED neo wedge bulbs. You don't need to do any soldering or any other bs.

Carsten, we know you prefer blue and don't prefer red already. I think you've stated it a hundred times now :roll:

occasional demons
Junior Admin
Posts: 20306
Joined: Thu May 03, 2007 12:14 pm
Location: Ashland Ohio

Post by occasional demons » Tue Feb 16, 2010 5:30 pm

The bulb is not a wedge, at least it wasn't in mine. It has two long leads, that wrap around the base to make contact. Unless the newer ones have a different base. :(

Edit:

Image

Image

The replacement bulb is not the brightest. I cannot find the bulb in the oem parts either, so if the newer base is different, then I may have to scour the JY for an upgrade. My base looks the same, externally tho.
Bill
Olha Koba, a psychologist in Kyiv, said that “anger and hate in this situation is a normal reaction and important to validate.” But it is important to channel it into something useful, she said, such as making incendiary bombs out of empty bottles.
2000 Neon MTX swap with '02 R/T PCM
1999 neon coupe 2.4 swap
2021 Forester

OB
Former Moderator
Posts: 9686
Joined: Tue Nov 15, 2005 9:38 pm
Location: Bay Area, CA

Post by OB » Tue Feb 16, 2010 6:13 pm

It can indeed be removed without disassembly. I just wanted to check out the circuit board and figure out how it all came apart. I had to use 4mm LEDs for my HVAC BTW. There seem to be several lighting differences from trim and year to year.

Bill - Correct me if I'm wrong, but that second picture shows a wedge bulb. Way different from the first pic. Guess they must have changed the design for the newer cars.

Oh also, does anyone know what LED replaces the #74 in the cupholder lamp?
-Derek

|Donate to 2gn|Feedback || OB's | GozziFab | All Business |


User avatar
Danteneon
Former Moderator
Posts: 9591
Joined: Thu Dec 20, 2007 5:13 pm
Location: Manassas, VA

Post by Danteneon » Tue Feb 16, 2010 6:19 pm

OB wrote:Oh also, does anyone know what LED replaces the #74 in the cupholder lamp?
autolumination wrote:T5mm base to fit standard #74 or #37 sockets
They have multiple bulb widths depending on how much space you have to work with.
If I could just figure out how to meld the Outback and the Neon into one car...

Image

occasional demons
Junior Admin
Posts: 20306
Joined: Thu May 03, 2007 12:14 pm
Location: Ashland Ohio

Post by occasional demons » Tue Feb 16, 2010 6:25 pm

OB wrote:Bill - Correct me if I'm wrong, but that second picture shows a wedge bulb. Way different from the first pic. Guess they must have changed the design for the newer cars.


The second pic is the bulb installed into the base. The base has two small holes the wires need to be threaded into. They then wrap around the bottom twist lock to make contact with the board. I couldn't get a close enough shot of the wires.
Bill
Olha Koba, a psychologist in Kyiv, said that “anger and hate in this situation is a normal reaction and important to validate.” But it is important to channel it into something useful, she said, such as making incendiary bombs out of empty bottles.
2000 Neon MTX swap with '02 R/T PCM
1999 neon coupe 2.4 swap
2021 Forester

OB
Former Moderator
Posts: 9686
Joined: Tue Nov 15, 2005 9:38 pm
Location: Bay Area, CA

Post by OB » Tue Feb 16, 2010 6:33 pm

Ahh. So you just replaced the actual bulb in the wedge base then?
-Derek

|Donate to 2gn|Feedback || OB's | GozziFab | All Business |


occasional demons
Junior Admin
Posts: 20306
Joined: Thu May 03, 2007 12:14 pm
Location: Ashland Ohio

Post by occasional demons » Tue Feb 16, 2010 6:39 pm

In the part that screws onto the board, if that's what you mean. By the "base" I mean the gray stand that the light fits into. Mine has no contacts other than the wires coming from the bulb. I had to strip the insulation off of the RS unit to make it work. So does yours have the standard wedge socket inside the gray stand/extension w/e you want to call it?
Bill
Olha Koba, a psychologist in Kyiv, said that “anger and hate in this situation is a normal reaction and important to validate.” But it is important to channel it into something useful, she said, such as making incendiary bombs out of empty bottles.
2000 Neon MTX swap with '02 R/T PCM
1999 neon coupe 2.4 swap
2021 Forester

OB
Former Moderator
Posts: 9686
Joined: Tue Nov 15, 2005 9:38 pm
Location: Bay Area, CA

Post by OB » Tue Feb 16, 2010 6:43 pm

I assumed the gray base was what made it a 'wedge'... Based on the way it fits on the printed board with the twist. AFAIK all bulbs of that type have the bulb with the leads coming out of them, and they wrap around the base for contact. Some are soldered, like on the newer models. Some LED companies make just the drop in bulb complete with base, while others sell the inner actual bulb part with the leads. I've seen both.
-Derek

|Donate to 2gn|Feedback || OB's | GozziFab | All Business |


occasional demons
Junior Admin
Posts: 20306
Joined: Thu May 03, 2007 12:14 pm
Location: Ashland Ohio

Post by occasional demons » Tue Feb 16, 2010 6:46 pm

:twisted: Ha! So you didn't remove it. It is teh Suck! Even the RS one was a little big for it, but I made it work. An LED would prolly be better, as the wires for the bulb were stranded. A 3mm would prolly be best.
Bill
Olha Koba, a psychologist in Kyiv, said that “anger and hate in this situation is a normal reaction and important to validate.” But it is important to channel it into something useful, she said, such as making incendiary bombs out of empty bottles.
2000 Neon MTX swap with '02 R/T PCM
1999 neon coupe 2.4 swap
2021 Forester

User avatar
Danteneon
Former Moderator
Posts: 9591
Joined: Thu Dec 20, 2007 5:13 pm
Location: Manassas, VA

Post by Danteneon » Tue Feb 16, 2010 6:48 pm

Image

Image

If that is the right sized base (10mm), but methinks it is too big :-k
If I could just figure out how to meld the Outback and the Neon into one car...

Image

occasional demons
Junior Admin
Posts: 20306
Joined: Thu May 03, 2007 12:14 pm
Location: Ashland Ohio

Post by occasional demons » Tue Feb 16, 2010 8:01 pm

That may just be it. Judging from my pic above, a dime is 18mm, so the very bottom of the base looks about right, and the 19mm length looks very close to the dime's diameter.

Me thinks you haz a winner! :rockon:
Bill
Olha Koba, a psychologist in Kyiv, said that “anger and hate in this situation is a normal reaction and important to validate.” But it is important to channel it into something useful, she said, such as making incendiary bombs out of empty bottles.
2000 Neon MTX swap with '02 R/T PCM
1999 neon coupe 2.4 swap
2021 Forester

Jenni
2GN Member
Posts: 2499
Joined: Tue Aug 23, 2005 1:33 pm
Location: Berlin, Germany

Post by Jenni » Wed Feb 17, 2010 2:45 am

the problem with that led is: the angle is wrong.
Sure it is the same as in the stock bulb.
but the stock bulb has a very wide lighting angle (almost all-round) on the contrary the led lights up punctual.
So with shown led you will very nice light up the housing but not the defroster sign.
So you have to bend the led at the top end 90° that it shines directly to the defroster symbol.


Unfortunately i cannot remove the defroster switch in my car (that screen comes really not off that easy) but here is my way:

- find out + and -
- remove the bulb
- cut the wedge socket in 2 pieces (remove the long grey "tube")
- stick the resistor through one hole into the wedge base (from the bulb side!
- bend the resistor wire like the bulb wire was before
- stick one of the LED pins through the other hole and bend it also
- LED lengt should be here the same as the bulb used to be!!!
- solder other side of resitor to other pin from the LED
- testfit (especially for polarisation)
- bend the LED 90° that it looks directly to the front of the switch
- test if you have any shadows left in the defroster symbol.
if: correct the led.

User avatar
wiggyx
2GN Member
Posts: 686
Joined: Thu Oct 02, 2008 2:04 pm
Location: Cleveland, Ohio

Post by wiggyx » Wed Feb 17, 2010 7:52 am

The best solution that I've found (without doing a lot of work) is to simply use the normal, shorter style SMD LED neo wedges in the defrost switch. It puts the bulb far enough back to give the light a chance to shine through to the button.

occasional demons
Junior Admin
Posts: 20306
Joined: Thu May 03, 2007 12:14 pm
Location: Ashland Ohio

Post by occasional demons » Wed Feb 17, 2010 12:01 pm

The LED the Dante has shown is an inverted style, so it throws the light out the sides also. It is plug and play.

I imagine it is also rated for 12v, as there is no way to install a resistor in the oem light adapter. You can see in the Autolumenation pic how the leads from the LED wrap around the base flange to make the contact.

Edit: Like Wiggy said the normal one will work, it really doesn't take a lot of light. Unless you like very brightly lit stuff, it would be just fine.
Bill
Olha Koba, a psychologist in Kyiv, said that “anger and hate in this situation is a normal reaction and important to validate.” But it is important to channel it into something useful, she said, such as making incendiary bombs out of empty bottles.
2000 Neon MTX swap with '02 R/T PCM
1999 neon coupe 2.4 swap
2021 Forester

OB
Former Moderator
Posts: 9686
Joined: Tue Nov 15, 2005 9:38 pm
Location: Bay Area, CA

Post by OB » Thu Feb 18, 2010 3:16 pm

Yeah if you look into the housing, there is a mirror in there to reflect the light to the button. It's the only way it will work based on the way the board is setup in relation to the switch.
-Derek

|Donate to 2gn|Feedback || OB's | GozziFab | All Business |


OB
Former Moderator
Posts: 9686
Joined: Tue Nov 15, 2005 9:38 pm
Location: Bay Area, CA

Post by OB » Fri Mar 12, 2010 12:46 am

Ok, so it looks like the NEO4 LED from SBL is the correct replacement size for the defrost bulb. I ordered the NEO3 and it was way too small. The NEO4 base is dead-on the same as the stock bulb.

Also looks like I'm going to need a resistor for the Cupholder lamp LED I ordered; it pops 20A fuses like they're going out of style.
-Derek

|Donate to 2gn|Feedback || OB's | GozziFab | All Business |


RayWolf
2GN Member
Posts: 254
Joined: Wed Nov 04, 2009 1:42 pm
Location: Pittsburgh PA

Post by RayWolf » Sat Apr 10, 2010 4:23 am

i just took apart my defrost switch and removed the blue cover. now ii will not light up, but everything else works. im stumped.
i tried messing with the contacts and switchign the bulb base back and forth. still noting.
i could use anyones insight to help fix this problem.
Thanks
Ray
Quotes to live by

"Try again, fail again. Fail better." Samuel Beckett

"The farther backward you can look, the farther forward you will see." Winston Churchill

"Imagination is more important than knowledge. Knowledge is limited. Imagination encircles the world." Albert Einstein

"Try not. Do or do not." Yoda

occasional demons
Junior Admin
Posts: 20306
Joined: Thu May 03, 2007 12:14 pm
Location: Ashland Ohio

Post by occasional demons » Sat Apr 10, 2010 8:12 am

Possibly the wire going into the bulb broke, when you pulled off the cover?
Bill
Olha Koba, a psychologist in Kyiv, said that “anger and hate in this situation is a normal reaction and important to validate.” But it is important to channel it into something useful, she said, such as making incendiary bombs out of empty bottles.
2000 Neon MTX swap with '02 R/T PCM
1999 neon coupe 2.4 swap
2021 Forester

RayWolf
2GN Member
Posts: 254
Joined: Wed Nov 04, 2009 1:42 pm
Location: Pittsburgh PA

Post by RayWolf » Sun Apr 11, 2010 12:25 am

maybe its the wire in the tube im guessing.
going to the Junk Yard tomorrow, so i will pick up a new one and cut the cover off not pull it off this time.
Quotes to live by

"Try again, fail again. Fail better." Samuel Beckett

"The farther backward you can look, the farther forward you will see." Winston Churchill

"Imagination is more important than knowledge. Knowledge is limited. Imagination encircles the world." Albert Einstein

"Try not. Do or do not." Yoda

OB
Former Moderator
Posts: 9686
Joined: Tue Nov 15, 2005 9:38 pm
Location: Bay Area, CA

Post by OB » Sun Apr 11, 2010 12:33 am

The bulb may be polarized, if that's the case flip it around and try it. That's how a lot of LEDs are, including the one I used to replace my defrost switch bulb ;)
-Derek

|Donate to 2gn|Feedback || OB's | GozziFab | All Business |


RayWolf
2GN Member
Posts: 254
Joined: Wed Nov 04, 2009 1:42 pm
Location: Pittsburgh PA

Post by RayWolf » Sun Apr 11, 2010 2:58 pm

well its the stock bulb and have tried the flipping, and still not working.

did look into an led repacment at radio shack but its like 5 bucks for one led. way to much for me right now. but well see later on.
Quotes to live by

"Try again, fail again. Fail better." Samuel Beckett

"The farther backward you can look, the farther forward you will see." Winston Churchill

"Imagination is more important than knowledge. Knowledge is limited. Imagination encircles the world." Albert Einstein

"Try not. Do or do not." Yoda

Post Reply

Return to “HT Interior”