hey all
i just got my gauges in from glowshift and they look sweet i will be doing the install around the 12th of march so keep watching this post for the how to and pics i have some teaser pics that are going to be on later tonight .
install oil pressure, volt, and vacuum gauges from glowshift
-
orangeneon05

- 2GN Member
- Posts: 606
- Joined: Mon Feb 23, 2009 12:44 pm
- Location: TOLEDO


Shibby!
I put a vacuum gauge in mine back in November for my roadtrip to MA and back. Can you tell us where you plan on mounting? A pillar pod or are you switching things up?
I put a vacuum gauge in mine back in November for my roadtrip to MA and back. Can you tell us where you plan on mounting? A pillar pod or are you switching things up?
FortMyersRacing.net - SwflRacing.com
2005 Neon SXT - 5 Speed, Fully adjustable Tokio Struts, 2" drop springs, stock 17" SRT rims w/ 215/50 series, f&r sway bars, f&r Strut tower bars, solid motor mounts, gutted, CAI, short throw, exhaust - built for the track but doing double duty
-
orangeneon05
- 2GN Member
- Posts: 606
- Joined: Mon Feb 23, 2009 12:44 pm
- Location: TOLEDO


-
orangeneon05
- 2GN Member
- Posts: 606
- Joined: Mon Feb 23, 2009 12:44 pm
- Location: TOLEDO
yea its an overlay it has 4 screws that you screw on to hold it together. in the picture i dont have it screwed in i just have it sitting there and being held by the dash and the weather seal on the door frame. this coming friday the 12th ill be starting so there will be plenty of pics being put up with a good written how-to that weekend.
-
orangeneon05
- 2GN Member
- Posts: 606
- Joined: Mon Feb 23, 2009 12:44 pm
- Location: TOLEDO
-
orangeneon05
- 2GN Member
- Posts: 606
- Joined: Mon Feb 23, 2009 12:44 pm
- Location: TOLEDO
-
orangeneon05
- 2GN Member
- Posts: 606
- Joined: Mon Feb 23, 2009 12:44 pm
- Location: TOLEDO
Ok here goes my first write up and i have been kinda busy so its going to take a while to have all the pics and words added. this will probably not be as wordy as some might think but explained the best way i can.
ok step one go to http://www.glowshiftdirect.com and purchase the 00-05 dodge neon and neon srt three pod kit. (heres the link directly(http://www.glowshiftdirect.com/00-05-do ... ckage.aspx)or you can mix and match from the site)
step two when it comes check everything to make sure it is in good shape because they have a 14 day return policy that is kinda stupid but no way to beat it.
these are the back of the gauges i purchased
volt

oil pressure

vacuum

(the pictures are a bit blurry because i didnt use a flash to take them)
after i checked my gauges the next morning i put them in the pillar and test fitted them in my car

ok the engine bay installation starting with the oil pressure flange that i bought with the kit
from left to right:
LEFT: is the brass fitting that holds the plate onto the stock threads of the filter mount.
CENTER: the 1" flange that was purchased in the glowshift kit.
RIGHT: the pressure sender

the flange came with two plugs that i teflon taped and put in the two holes on the flat side and the sender on the left side whole with teflon

i placed the flange and the sender on the stock filter mount and had the sender pointing to the left side because there was more space that way.

and finally the filter placed back on the motor

in the kit they give you three sender wires all heat wrapped together the green goes to the G post on the sender and i used the brown as a ground which goes on the W post i believe and the blue i just taped up and left it attached to the others.
for the running of the wire i looked up by the filter and zip-tied it to some hoses but not too tightly so the hoses can still function
closest to bottom of car

hose by the EGR

tucked up by the space where the master break cylinder

to send the wires and the vacuum hose into the interior i used the hood latch grommet and pulled them through with a streched out coat hanger.
i attached the ground to the bolt next to the radiator where there was already oem grounds

last but not least the t fitting for the vacuum line i took the elbow off the vacuum assist for the breaks and placed the T in the 45 degree elbow and then got another 45 degree elbow and placed it back on the other end of the T and back to stock location. i put the supplied vacuum line onto the T with the little bras insert and ran it into the car.

ok thats the engine part of it ill write the interior later when i have more pictures from that install up.
ok step one go to http://www.glowshiftdirect.com and purchase the 00-05 dodge neon and neon srt three pod kit. (heres the link directly(http://www.glowshiftdirect.com/00-05-do ... ckage.aspx)or you can mix and match from the site)
step two when it comes check everything to make sure it is in good shape because they have a 14 day return policy that is kinda stupid but no way to beat it.
these are the back of the gauges i purchased
volt
oil pressure
vacuum
(the pictures are a bit blurry because i didnt use a flash to take them)
after i checked my gauges the next morning i put them in the pillar and test fitted them in my car
ok the engine bay installation starting with the oil pressure flange that i bought with the kit
from left to right:
LEFT: is the brass fitting that holds the plate onto the stock threads of the filter mount.
CENTER: the 1" flange that was purchased in the glowshift kit.
RIGHT: the pressure sender
the flange came with two plugs that i teflon taped and put in the two holes on the flat side and the sender on the left side whole with teflon
i placed the flange and the sender on the stock filter mount and had the sender pointing to the left side because there was more space that way.
and finally the filter placed back on the motor
in the kit they give you three sender wires all heat wrapped together the green goes to the G post on the sender and i used the brown as a ground which goes on the W post i believe and the blue i just taped up and left it attached to the others.
for the running of the wire i looked up by the filter and zip-tied it to some hoses but not too tightly so the hoses can still function
closest to bottom of car
hose by the EGR
tucked up by the space where the master break cylinder
to send the wires and the vacuum hose into the interior i used the hood latch grommet and pulled them through with a streched out coat hanger.
i attached the ground to the bolt next to the radiator where there was already oem grounds
last but not least the t fitting for the vacuum line i took the elbow off the vacuum assist for the breaks and placed the T in the 45 degree elbow and then got another 45 degree elbow and placed it back on the other end of the T and back to stock location. i put the supplied vacuum line onto the T with the little bras insert and ran it into the car.
ok thats the engine part of it ill write the interior later when i have more pictures from that install up.
Nice pics, can you buy that flange separately? because i have the gauges just no flange for the oil sender to mount. I'm getting ready to do mine so this def helps!
Justin
[02 R/T sold][00 Highline sold][04 r/t scrapped][95 NYG Sport coupe][01 r/t DD]
http://www.cardomain.com/ride/2931823
[02 R/T sold][00 Highline sold][04 r/t scrapped][95 NYG Sport coupe][01 r/t DD]
http://www.cardomain.com/ride/2931823
-
occasional demons
- Junior Admin
- Posts: 20306
- Joined: Thu May 03, 2007 12:14 pm
- Location: Ashland Ohio
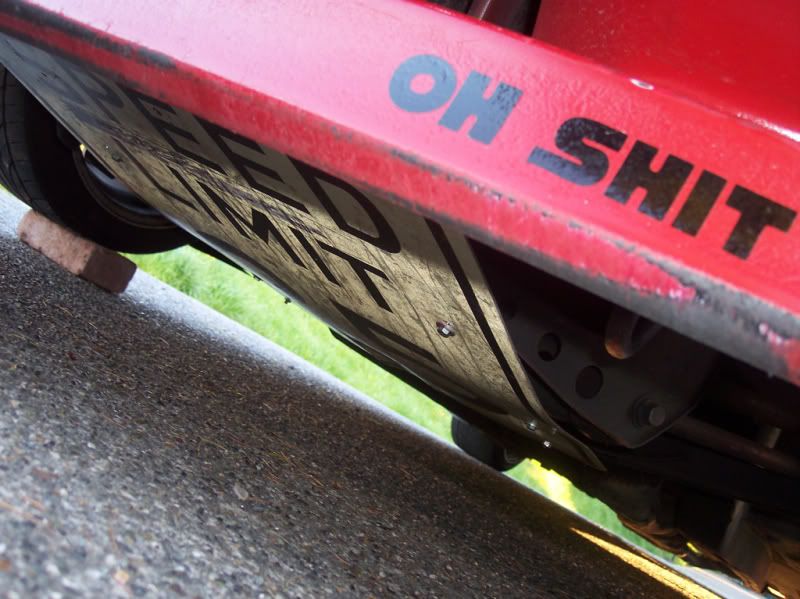
Now you just need a skid plate for the oil filter.
Bill
1999 neon coupe 2.4 swap
2021 Forester
2000 Neon MTX swap with '02 R/T PCMOlha Koba, a psychologist in Kyiv, said that “anger and hate in this situation is a normal reaction and important to validate.” But it is important to channel it into something useful, she said, such as making incendiary bombs out of empty bottles.
1999 neon coupe 2.4 swap
2021 Forester
-
orangeneon05
- 2GN Member
- Posts: 606
- Joined: Mon Feb 23, 2009 12:44 pm
- Location: TOLEDO
yes you can it is the GS-AF2 here is the link to that particular part.r/tguy02 wrote:Nice pics, can you buy that flange separately? because i have the gauges just no flange for the oil sender to mount. I'm getting ready to do mine so this def helps!
http://www.glowshiftdirect.com/oilfilte ... nf-16.aspx
that is not necessary because the filter top is tight inline with the bottom of the oil pan if not a little higher up then the bottom of the pan[/quote]occasional demons wrote:Now you just need a skid plate for the oil filter
-
orangeneon05
- 2GN Member
- Posts: 606
- Joined: Mon Feb 23, 2009 12:44 pm
- Location: TOLEDO
-
orangeneon05
- 2GN Member
- Posts: 606
- Joined: Mon Feb 23, 2009 12:44 pm
- Location: TOLEDO
-
orangeneon05
- 2GN Member
- Posts: 606
- Joined: Mon Feb 23, 2009 12:44 pm
- Location: TOLEDO
here are all the colors my gauges put out and some other pics of them
Blue:

Green:

Red:

Light Blue:

Yellow: (i know its not that yellow)

Purple:

White: (again not that noticeable)

and a close up:

ok here you go guys and galls its done for now. if you feel like i skipped somehing you would like to know just ask and ill get back to it ASAP!
Blue:
Green:
Red:
Light Blue:
Yellow: (i know its not that yellow)
Purple:
White: (again not that noticeable)
and a close up:
ok here you go guys and galls its done for now. if you feel like i skipped somehing you would like to know just ask and ill get back to it ASAP!
-
orangeneon05
- 2GN Member
- Posts: 606
- Joined: Mon Feb 23, 2009 12:44 pm
- Location: TOLEDO
-
orangeneon05
- 2GN Member
- Posts: 606
- Joined: Mon Feb 23, 2009 12:44 pm
- Location: TOLEDO
-
theTeejmiester
- 2GN Member
- Posts: 2107
- Joined: Thu Dec 20, 2007 5:05 pm
- Location: klamath falls oregon
just get a nice DIY skid plate like this one, should be easy to findneonslg09 wrote:They look great mang, makes me wanna get some gauges back up on a pillar again. Did you ever get around to taking the picture of the oil filter clearance?
Ziptie's come in handy when a prostitute gets mouthy or reluctant
*eye twitches*
I like people who BUY a 10 sec car and then brag about it. Thats like hiring someone to bang your wife and then bragging about the kid
*eye twitches*
I like people who BUY a 10 sec car and then brag about it. Thats like hiring someone to bang your wife and then bragging about the kid
-
orangeneon05
- 2GN Member
- Posts: 606
- Joined: Mon Feb 23, 2009 12:44 pm
- Location: TOLEDO

 Sam-I-Am
-
orangeneon05
- 2GN Member
- Posts: 606
- Joined: Mon Feb 23, 2009 12:44 pm
- Location: TOLEDO
-
orangeneon05
- 2GN Member
- Posts: 606
- Joined: Mon Feb 23, 2009 12:44 pm
- Location: TOLEDO
^^^^^^^neonslg09 this is the filter adapter ^^^^^^^orangeneon05 wrote:
yes you can it is the GS-AF2 here is the link to that particular part.
http://www.glowshiftdirect.com/oilfilte ... nf-16.aspx
here are the mounted pics of it mounted and they are as level as i could make the camera toward the filter and pan


-
orangeneon05
- 2GN Member
- Posts: 606
- Joined: Mon Feb 23, 2009 12:44 pm
- Location: TOLEDO
look through this quoteorangeneon05 wrote:Ok here goes my first write up and i have been kinda busy so its going to take a while to have all the pics and words added. this will probably not be as wordy as some might think but explained the best way i can.
ok step one go to http://www.glowshiftdirect.com and purchase the 00-05 dodge neon and neon srt three pod kit. (heres the link directly(http://www.glowshiftdirect.com/00-05-do ... ckage.aspx)or you can mix and match from the site)
step two when it comes check everything to make sure it is in good shape because they have a 14 day return policy that is kinda stupid but no way to beat it.
these are the back of the gauges i purchased
volt
oil pressure
vacuum
(the pictures are a bit blurry because i didnt use a flash to take them)
after i checked my gauges the next morning i put them in the pillar and test fitted them in my car
ok the engine bay installation starting with the oil pressure flange that i bought with the kit
from left to right:
LEFT: is the brass fitting that holds the plate onto the stock threads of the filter mount.
CENTER: the 1" flange that was purchased in the glowshift kit.
RIGHT: the pressure sender
the flange came with two plugs that i teflon taped and put in the two holes on the flat side and the sender on the left side whole with teflon
i placed the flange and the sender on the stock filter mount and had the sender pointing to the left side because there was more space that way.
and finally the filter placed back on the motor
in the kit they give you three sender wires all heat wrapped together the green goes to the G post on the sender and i used the brown as a ground which goes on the W post i believe and the blue i just taped up and left it attached to the others.
for the running of the wire i looked up by the filter and zip-tied it to some hoses but not too tightly so the hoses can still function
closest to bottom of car
hose by the EGR
tucked up by the space where the master break cylinder
to send the wires and the vacuum hose into the interior i used the hood latch grommet and pulled them through with a streched out coat hanger.
i attached the ground to the bolt next to the radiator where there was already oem grounds
last but not least the t fitting for the vacuum line i took the elbow off the vacuum assist for the breaks and placed the T in the 45 degree elbow and then got another 45 degree elbow and placed it back on the other end of the T and back to stock location. i put the supplied vacuum line onto the T with the little bras insert and ran it into the car.
ok thats the engine part of it ill write the interior later when i have more pictures from that install up.