Does the car pull a little more without the a/c in there? I'm wondering, if it does, about buying a second belt to swap in during the winter. And then put the other belt back on when it gets warm. Just wondering if it feels different without the UDP wrapped around another pulley and just the p/s (and alternator).
Car looks good though! Gotta clean that MSD wiring mess.... lol.
D-Railed-updates 7/30
-
2005.Neon.SXT

- 2GN Member
- Posts: 2177
- Joined: Mon Feb 04, 2008 2:16 am
- Location: Raleigh, NC

-
D-Railed_Neon

- 2011 Bronze Contributor
- Posts: 723
- Joined: Sun Oct 23, 2011 8:39 pm
- Location: Bellevue, NE
Its just a marginal bump in how hard she pulls but it does seem to rev a little faster and picked up a mpg or two as well. The belt you need is a 418k4 like the one pictured and can be run with the compressor still on the car. Lol I know, better than the wiring was but gonna redo it all when I relocate the battery to the trunk 
MY PROJECT LOG My Old 2002 ES AND My 2003 SXT
It is not that we cannot be friends, it's that you are a zombie, and I am almost out of ammo. -Someone
It is not that we cannot be friends, it's that you are a zombie, and I am almost out of ammo. -Someone
-
2005.Neon.SXT
- 2GN Member
- Posts: 2177
- Joined: Mon Feb 04, 2008 2:16 am
- Location: Raleigh, NC
-
D-Railed_Neon
- 2011 Bronze Contributor
- Posts: 723
- Joined: Sun Oct 23, 2011 8:39 pm
- Location: Bellevue, NE
^Exactly, I worked at AutoZone and they didn't have one in the district so I bought mine from O'reillys for like $10.992005.Neon.SXT wrote:Belt probably doesn't cost more than $10, and takes like 5 minutes to change.
Gonna use OB's method for the battery relocate (found here-> viewtopic.php?t=26455&highlight=battery+relocation) to start but, I wanna build a false floor for the trunk first. I plan to frame out the floor so I can keep the spare right where its at, place the battery in a semi recessed portion on the passengers rear side, (I am a rather large guy, lol) have a small storage cubby with door on the drivers side, and a area for the amp between the back of the rear seats and the spare tire compartment. Will be pretty sweet me thinks but, funds keep the project at bay for the time being
MY PROJECT LOG My Old 2002 ES AND My 2003 SXT
It is not that we cannot be friends, it's that you are a zombie, and I am almost out of ammo. -Someone
It is not that we cannot be friends, it's that you are a zombie, and I am almost out of ammo. -Someone
-
D-Railed_Neon
- 2011 Bronze Contributor
- Posts: 723
- Joined: Sun Oct 23, 2011 8:39 pm
- Location: Bellevue, NE
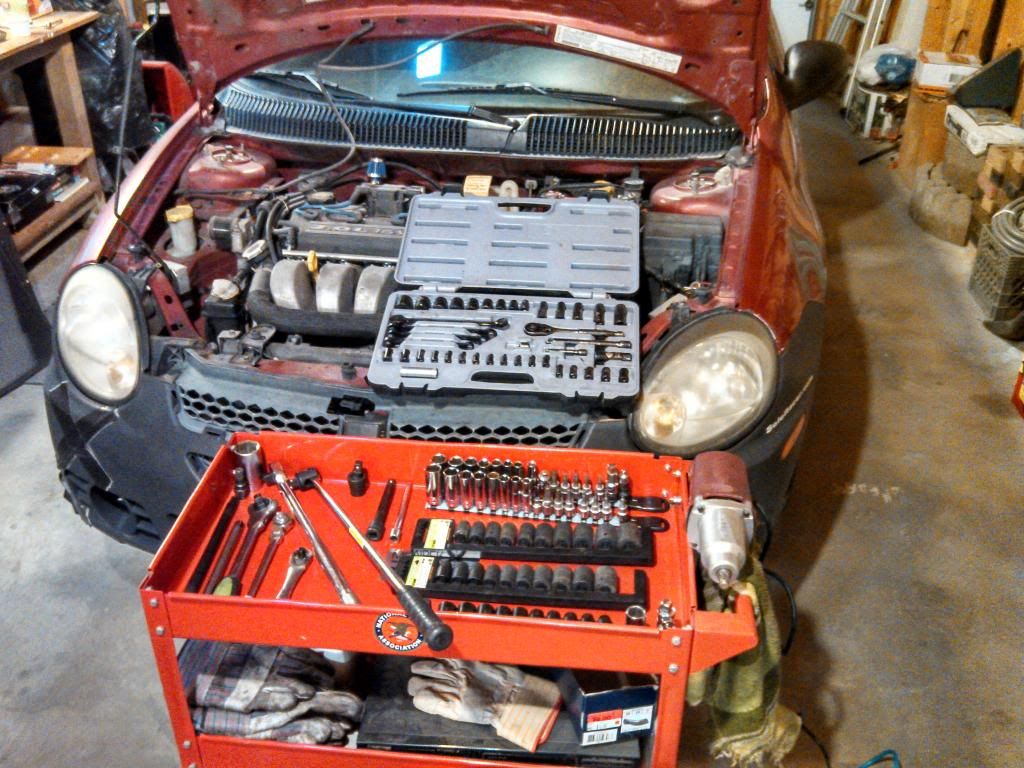
Well if anyone still uses the boards or cares, I figured Id throw up the updates. For starters I have been broke as hell and of course in the coldest part of winter the car decided to take a shit on me. Got hit with a double wammy this time and had to replace the clutch and the fuel pump shortly after. Paid a shop to do the pump but decided it was a smart idea to do the clutch myself........ 
On to pics..
New clutch going in..
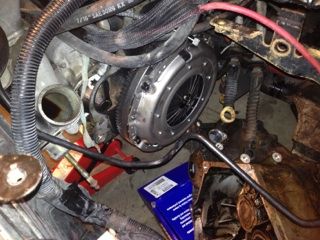
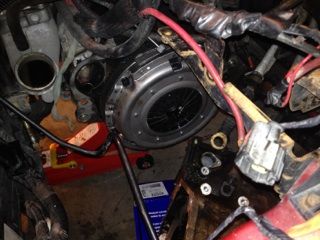
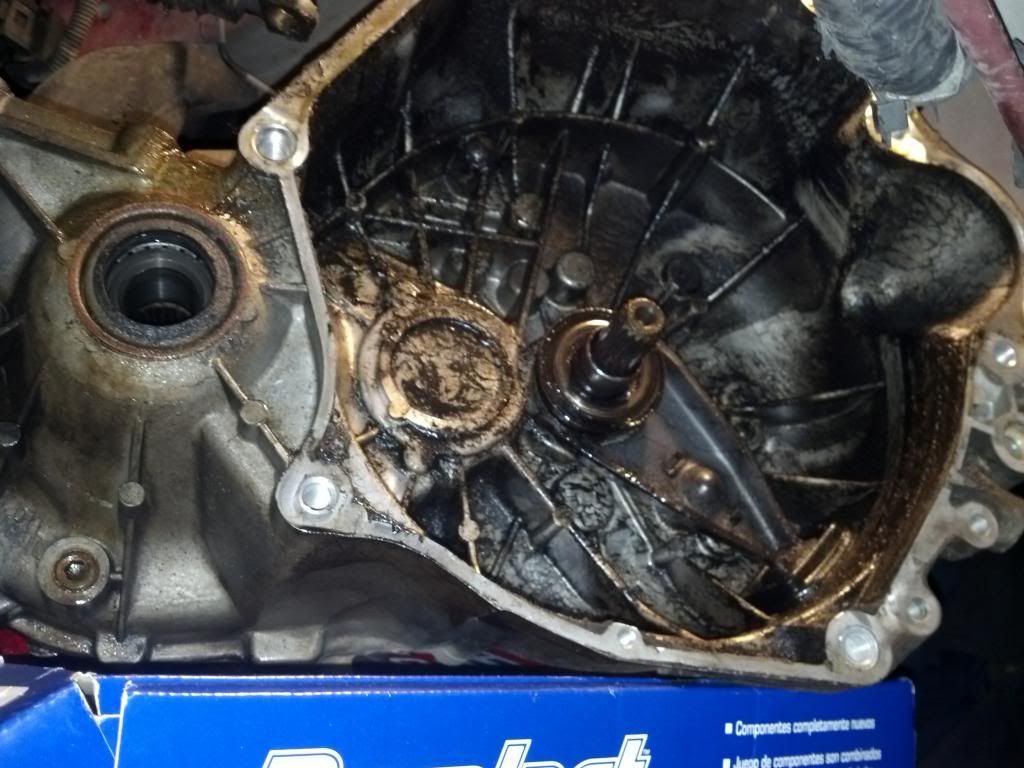
^ this one has me confused as to where the leak is coming from. The rear main seal seems to be holding as there was no fluid on the flywheel but, the old clutch, TOB, and inside the bellhousing were covered in shit. Oh well, thats a project for the future.
I should mention this project took me about 4 days. The garage we were working in had no heat and no insulation. On top of that, the average temp here in NE during the week we were doing this was bordering on the 10 degree mark with wind. Needless to say it was a fun project I am not looking forward to repeating again for a long time.
Having the clutch replaced I now have about 300 miles on it and have stopped babying it. The last 2 days I have been beating it pretty hard (lol) and have been happy with it. Definitely holds much better than the old one and I notice slightly better gas mileage as well.
THE FUEL PUMP....
Well, after spending almost a week freezing my ass off, grunting, cussing and spitting I finally get the car back on the road. Drove great for three days then out of nowhere it started to just randomly die for no reason. In gear, out of gear....didn't matter just died. At first I thought I might have done something wrong with the clutch and after being left stranded twice in between paychecks I finally called a tow truck.
that was a 2 hour nightmare as it was of course freezing and the car wouldn't fit on the wrecker bc it was lowered. Instead, I had to wait in a cold ass parking lot for the flat bed to show up.....who was late!

So anywho, the next day I get a call from the shop and they tell me she is leaning out and shutting down. Fuel pressure was in the low 40s and the pumps voltage was all over the place. It had been whining pretty bad for the last couple of months so I knew it would go out eventually but at a tune of $478 between tow, diag, part, and labor a week after the $250 for the clutch, trans fluid, and odds and ends, it really came as a knock to the old family jewels. On the bright side, I now know that the clutch and the fuel pump are good to go for hopefully another 50K or until I go boost. The downside is I was one broke SOB all through December and now leading into January.
Other notes:...
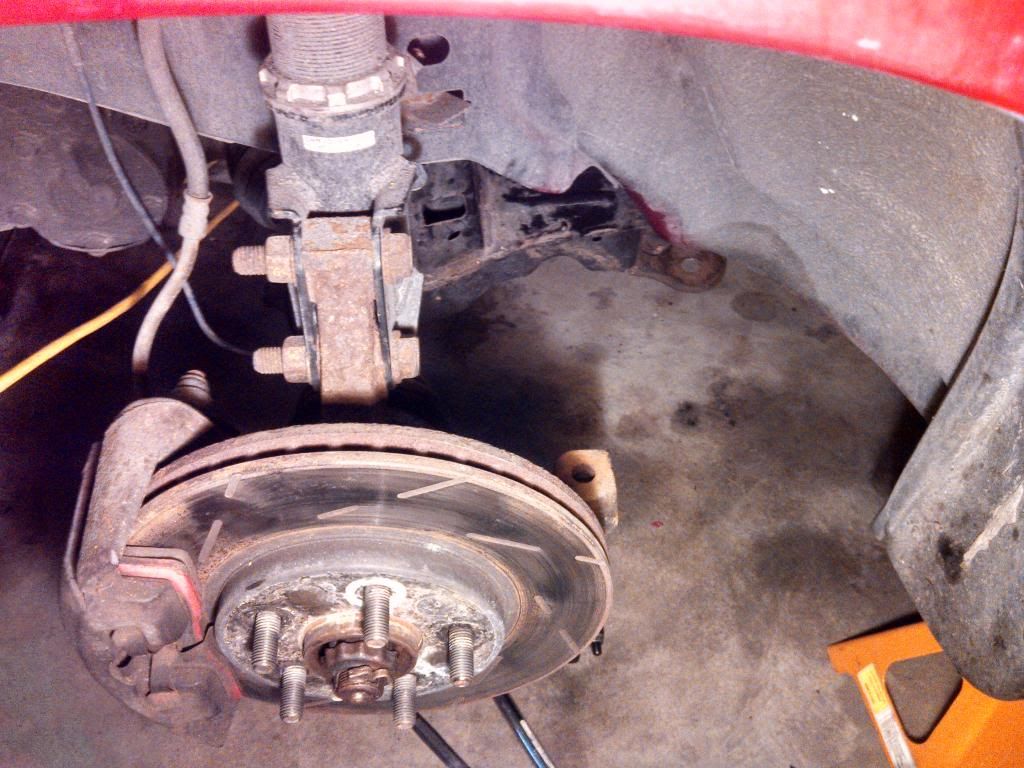
Another positive thing about doing this clutch was finding all the other things wrong with the car that need to be addressed. Luckily they are all small things and should be relatively easy. So, here is my list of future repairs.
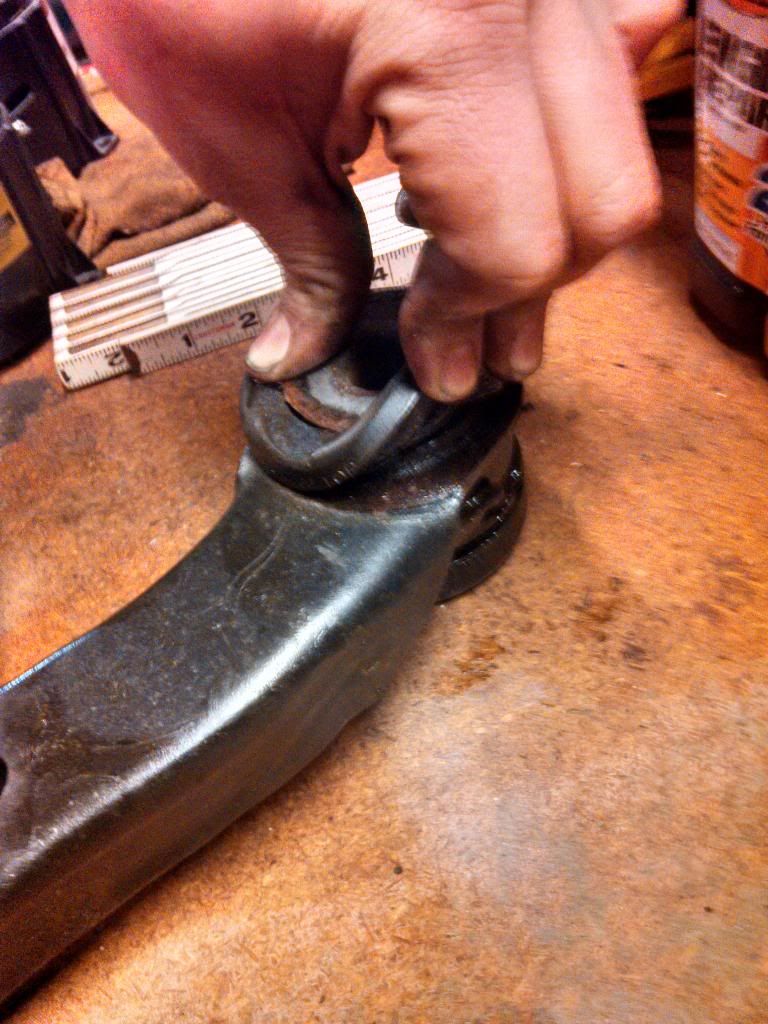
Ball joints-SHOT
Outer Tie Rod ends-Mostly SHOT
Control arm bushings-SEVERELY WORN
Front Sway bar endlinks-SHOT
Rear sway bar endlinks-Mostly SHOT
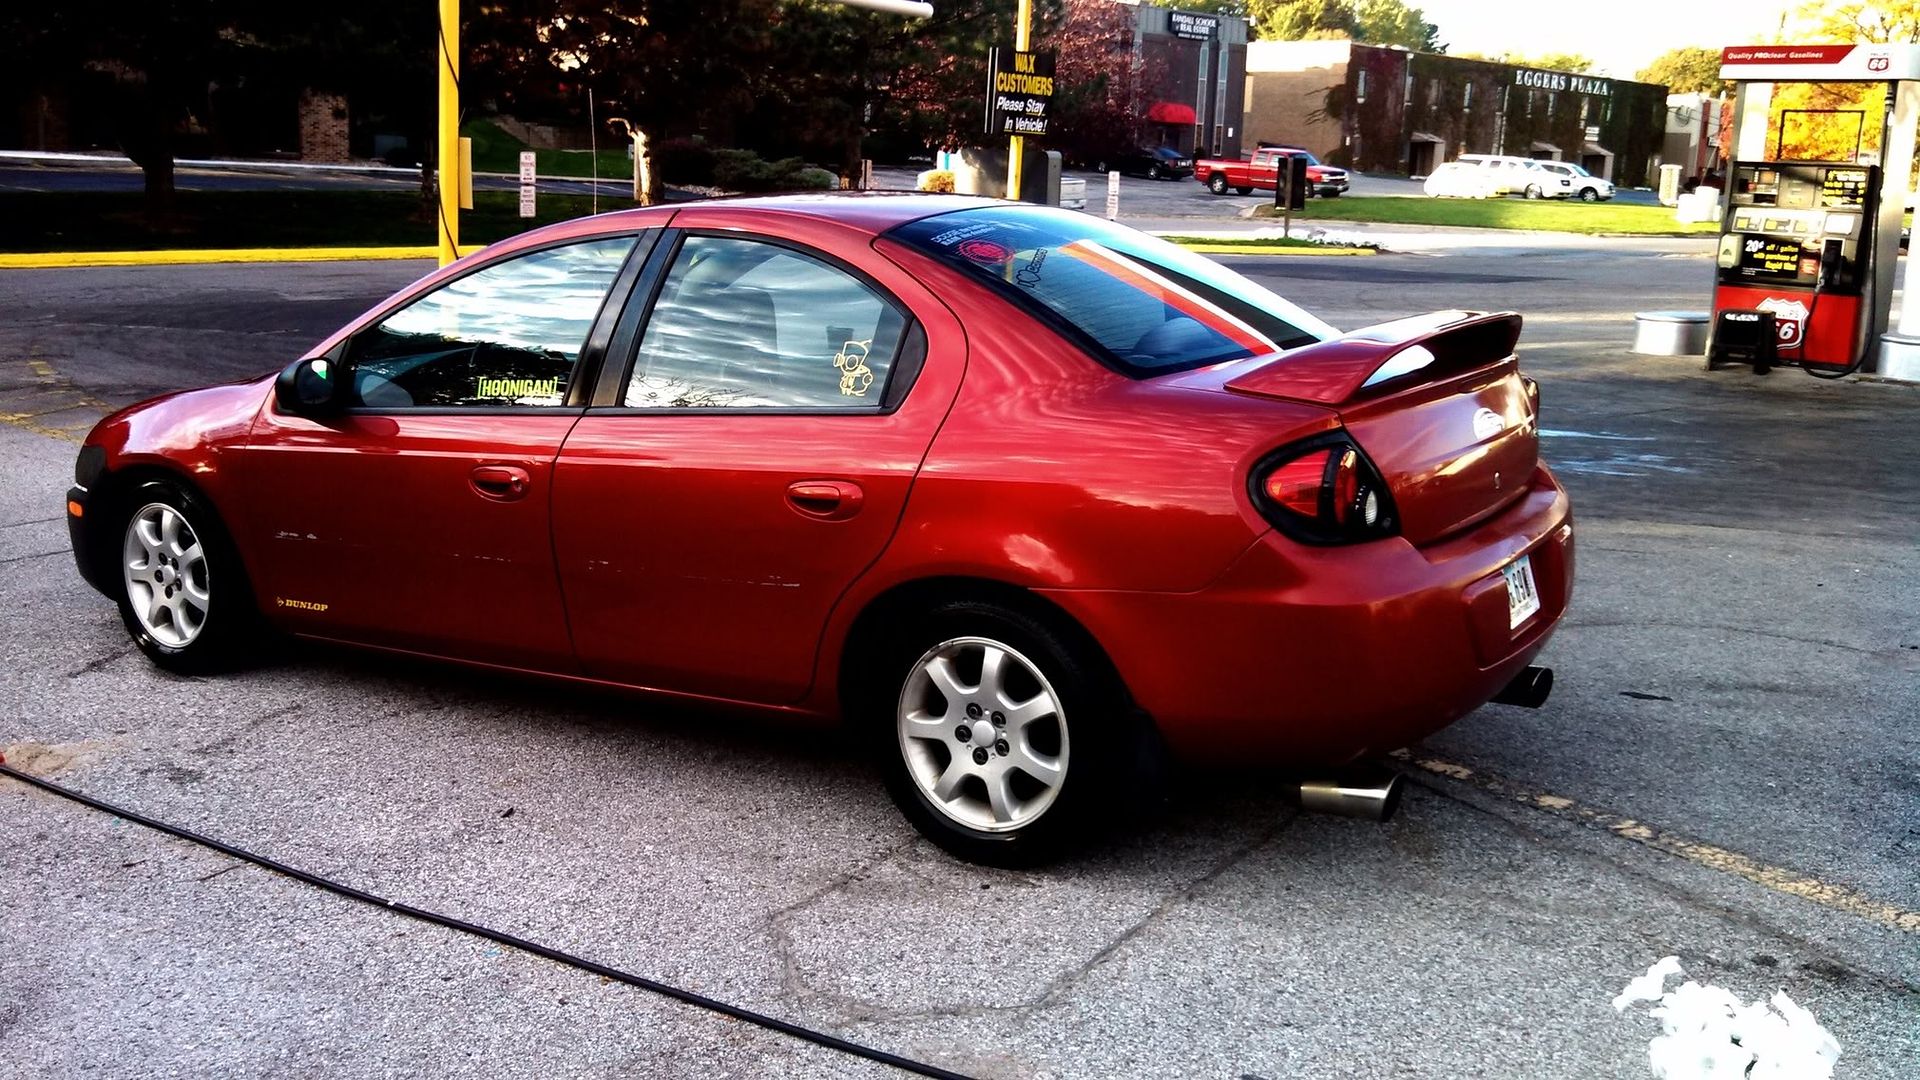
SO thats all I got. The car runs nice now and is mostly still fun to drive, gas mileage is up and my bank account balance is down. Please leave some feedback, thanks for reading, and I will leave you with a clean shot of the car.
On to pics..


New clutch going in..


^ this one has me confused as to where the leak is coming from. The rear main seal seems to be holding as there was no fluid on the flywheel but, the old clutch, TOB, and inside the bellhousing were covered in shit. Oh well, thats a project for the future.
I should mention this project took me about 4 days. The garage we were working in had no heat and no insulation. On top of that, the average temp here in NE during the week we were doing this was bordering on the 10 degree mark with wind. Needless to say it was a fun project I am not looking forward to repeating again for a long time.
Having the clutch replaced I now have about 300 miles on it and have stopped babying it. The last 2 days I have been beating it pretty hard (lol) and have been happy with it. Definitely holds much better than the old one and I notice slightly better gas mileage as well.
THE FUEL PUMP....
Well, after spending almost a week freezing my ass off, grunting, cussing and spitting I finally get the car back on the road. Drove great for three days then out of nowhere it started to just randomly die for no reason. In gear, out of gear....didn't matter just died. At first I thought I might have done something wrong with the clutch and after being left stranded twice in between paychecks I finally called a tow truck.
that was a 2 hour nightmare as it was of course freezing and the car wouldn't fit on the wrecker bc it was lowered. Instead, I had to wait in a cold ass parking lot for the flat bed to show up.....who was late!
So anywho, the next day I get a call from the shop and they tell me she is leaning out and shutting down. Fuel pressure was in the low 40s and the pumps voltage was all over the place. It had been whining pretty bad for the last couple of months so I knew it would go out eventually but at a tune of $478 between tow, diag, part, and labor a week after the $250 for the clutch, trans fluid, and odds and ends, it really came as a knock to the old family jewels. On the bright side, I now know that the clutch and the fuel pump are good to go for hopefully another 50K or until I go boost. The downside is I was one broke SOB all through December and now leading into January.
Other notes:...
Another positive thing about doing this clutch was finding all the other things wrong with the car that need to be addressed. Luckily they are all small things and should be relatively easy. So, here is my list of future repairs.
Ball joints-SHOT
Outer Tie Rod ends-Mostly SHOT
Control arm bushings-SEVERELY WORN
Front Sway bar endlinks-SHOT
Rear sway bar endlinks-Mostly SHOT
SO thats all I got. The car runs nice now and is mostly still fun to drive, gas mileage is up and my bank account balance is down. Please leave some feedback, thanks for reading, and I will leave you with a clean shot of the car.

MY PROJECT LOG My Old 2002 ES AND My 2003 SXT
It is not that we cannot be friends, it's that you are a zombie, and I am almost out of ammo. -Someone
It is not that we cannot be friends, it's that you are a zombie, and I am almost out of ammo. -Someone
-
D-Railed_Neon
- 2011 Bronze Contributor
- Posts: 723
- Joined: Sun Oct 23, 2011 8:39 pm
- Location: Bellevue, NE
Well guys, I have some updates...not that anyone cares but, gonna continue to keep a log going anyways.
Let's see, Since the last update a lot has changed.
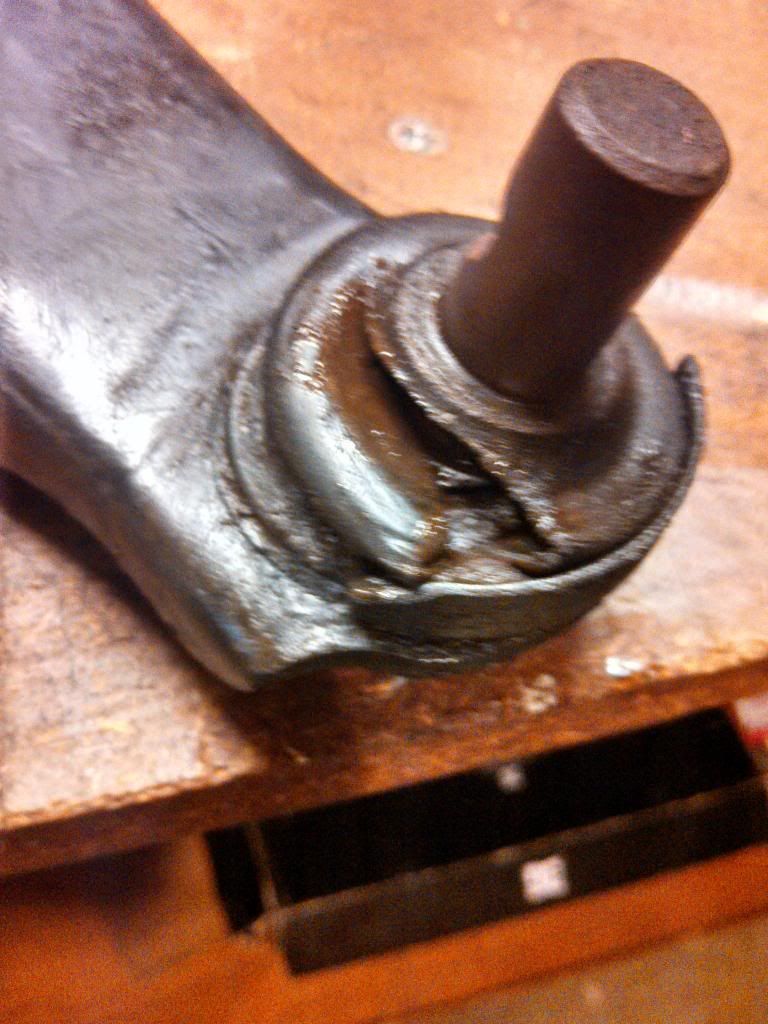
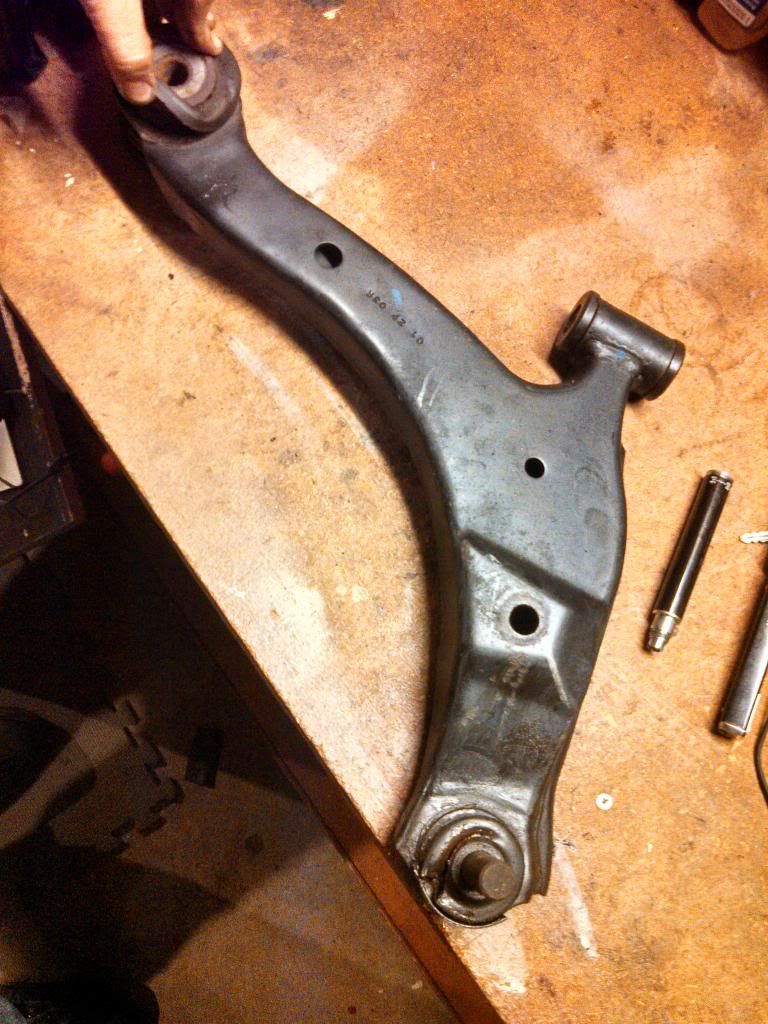
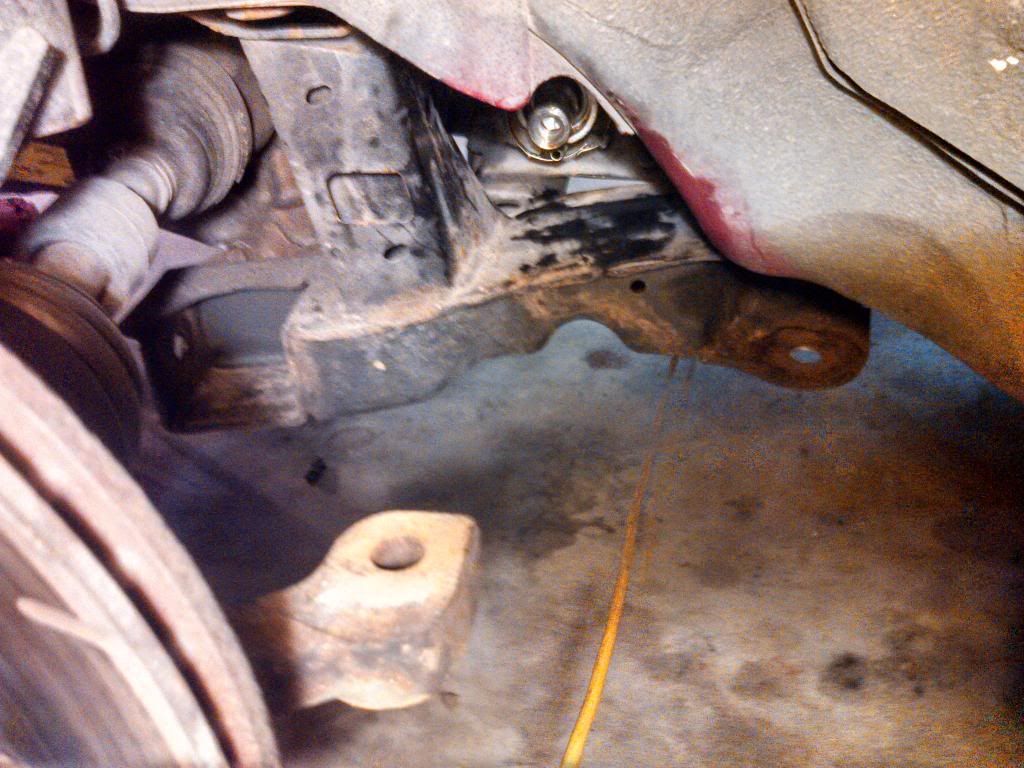
Like I mentioned in my last post the front end suspension and steering was on its way out the door and by last month it was dead again. This is what I pulled out.

"while I was in there" I grabbed the inner and outer Tie rod ends as well. Heads up for anyone thinking about trying this themselves 2 things...
1. Chances are your outer tie rods are so frozen onto the inner rods you will have one hell of a time trying to get em off so you can reuse the boot. I used a BIG ASS set of bolt cutters to simply cut the inner tie rod off and pull off the boot. Then just slip it over the new inner tie rod before installing the jam nut and outer tie rod end.
2. Doing it this way made the process really quick as I just removed the entire tie rod assembly from the inner tie rod side (the rack) These are the tools I needed.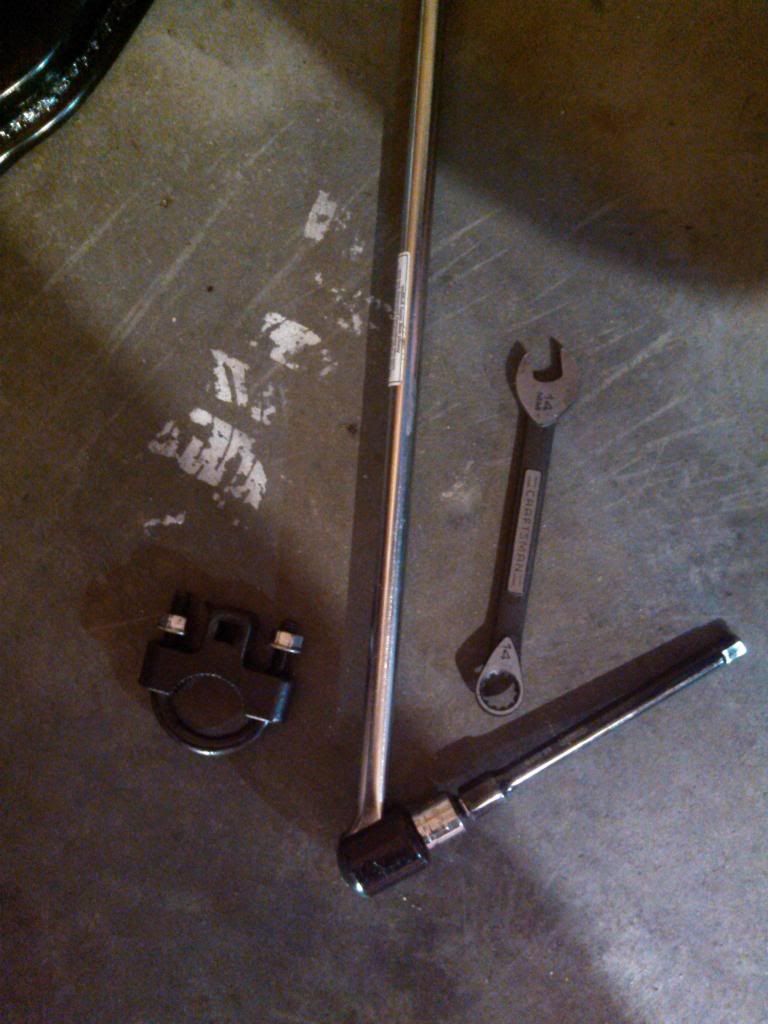
Using this method it only took about 40 minutes to replace both sides. MAKE SURE TO MEASURE the old tie rod assemblies and set the new ones to to the same length or your alignment will be WAAYY OFF.
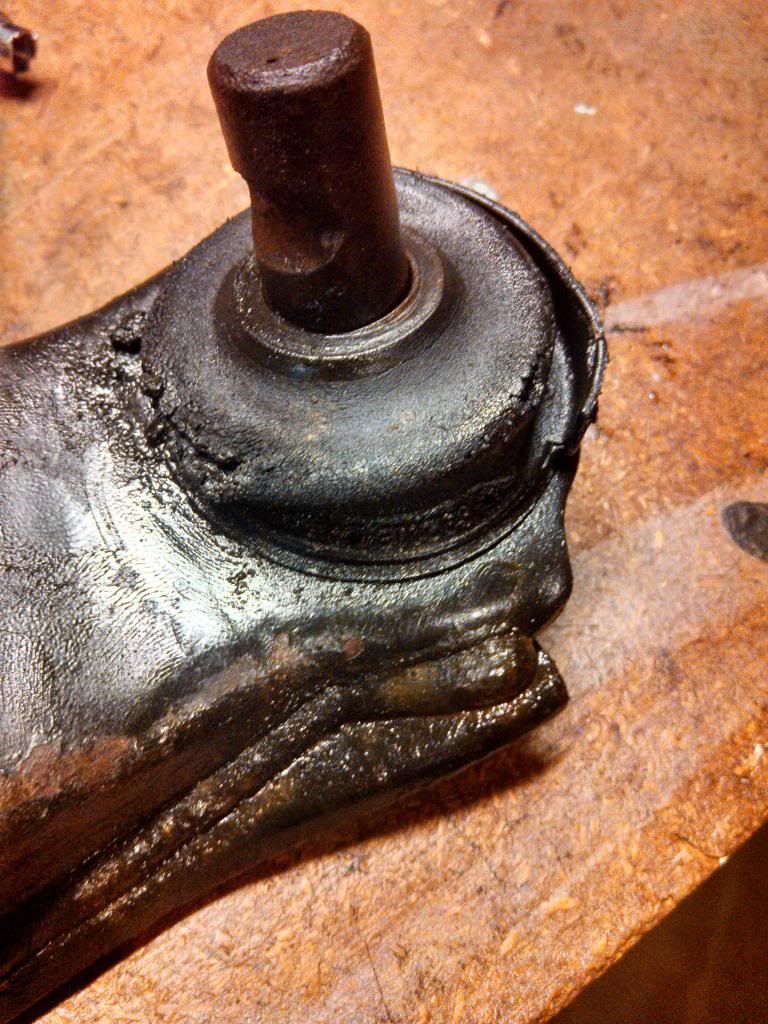
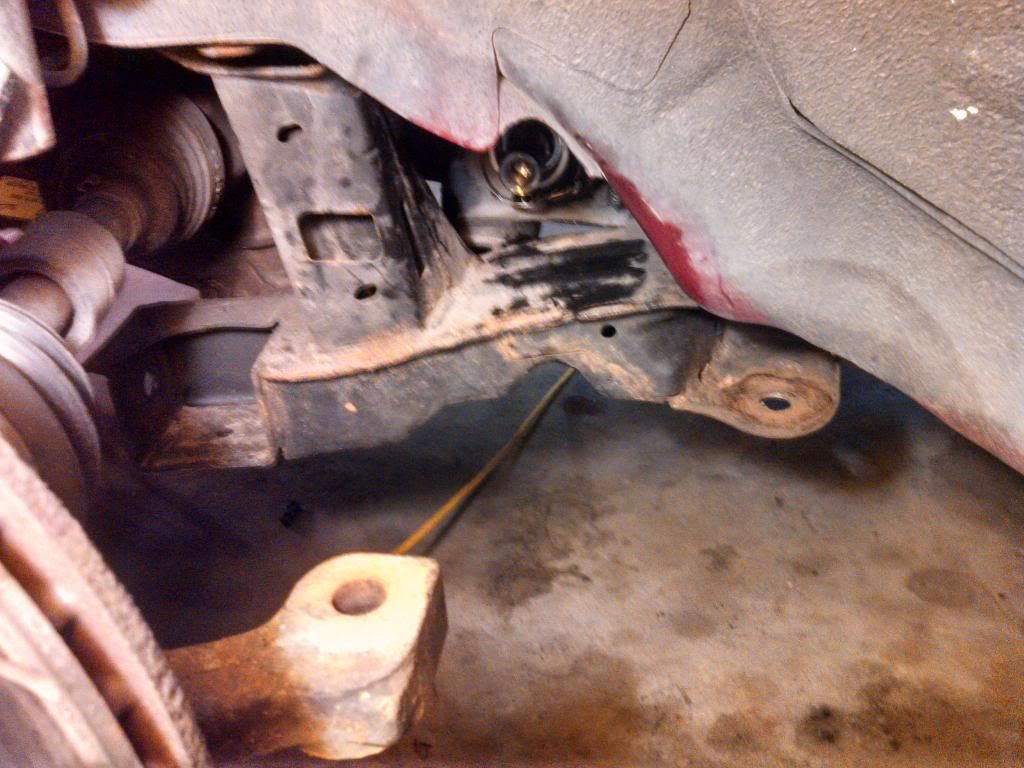
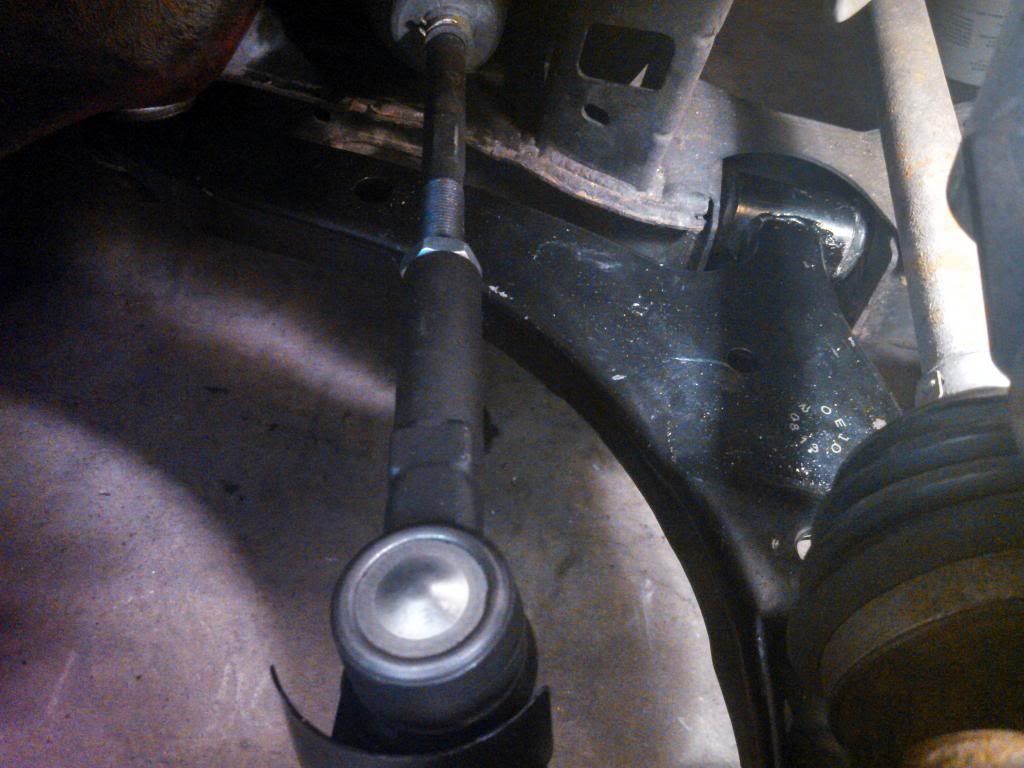
This is what I was left with before parts started going back in.
New Parts in!

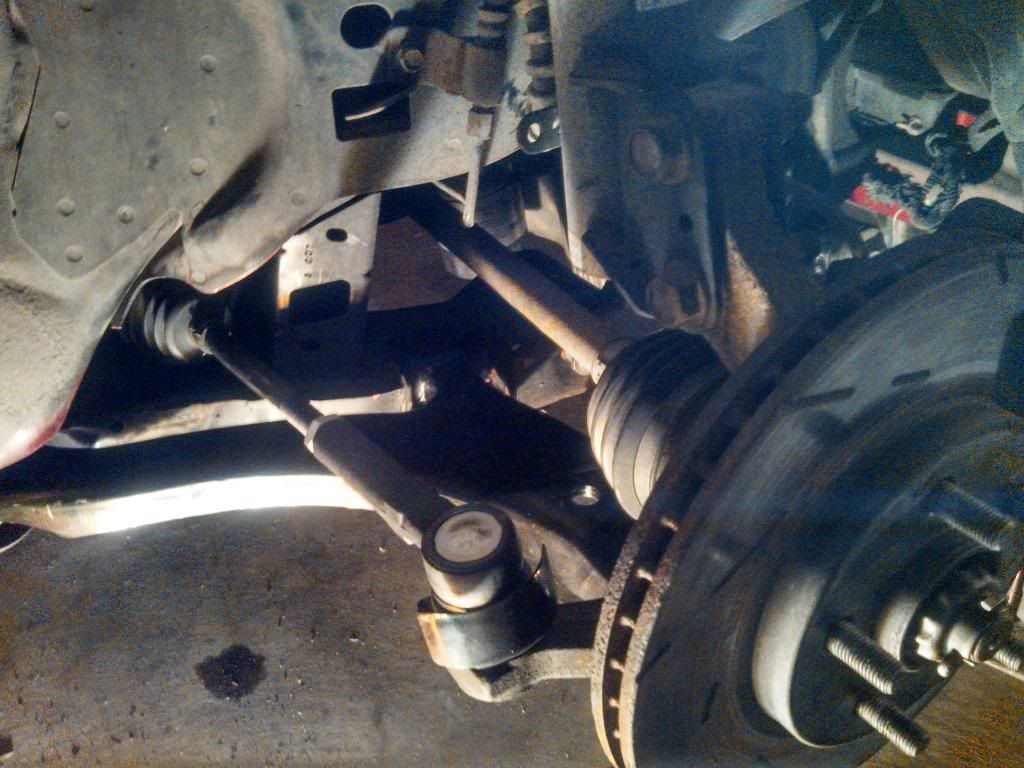
Called it a day for that day and got ready to come back tomorrow for more.
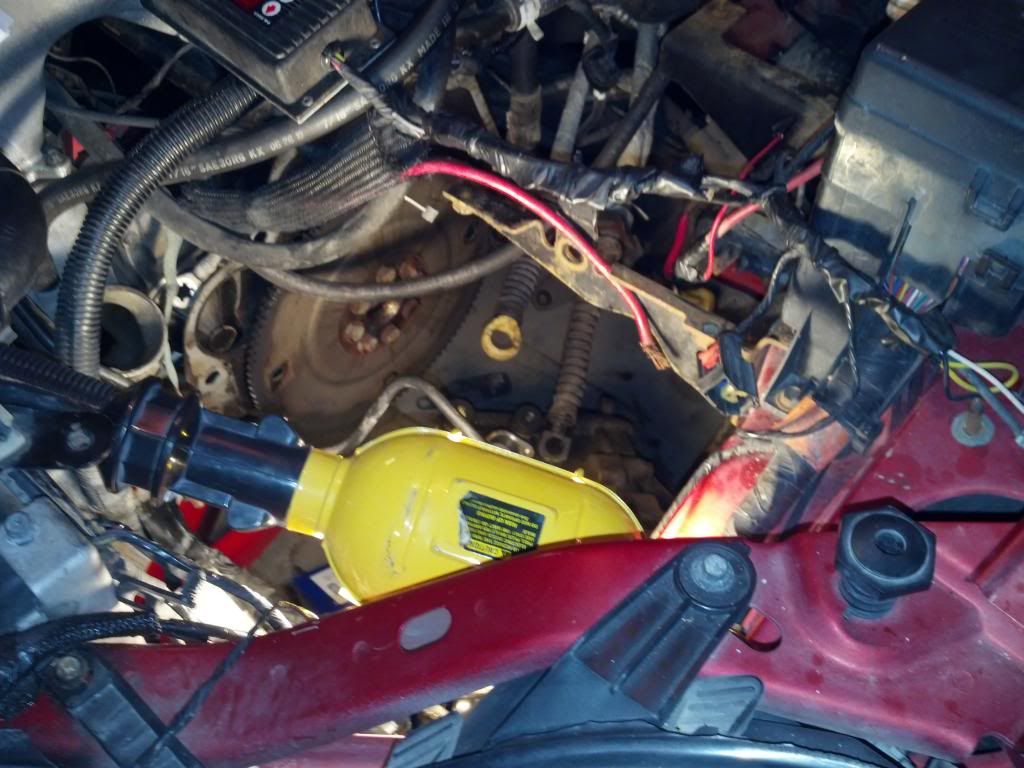
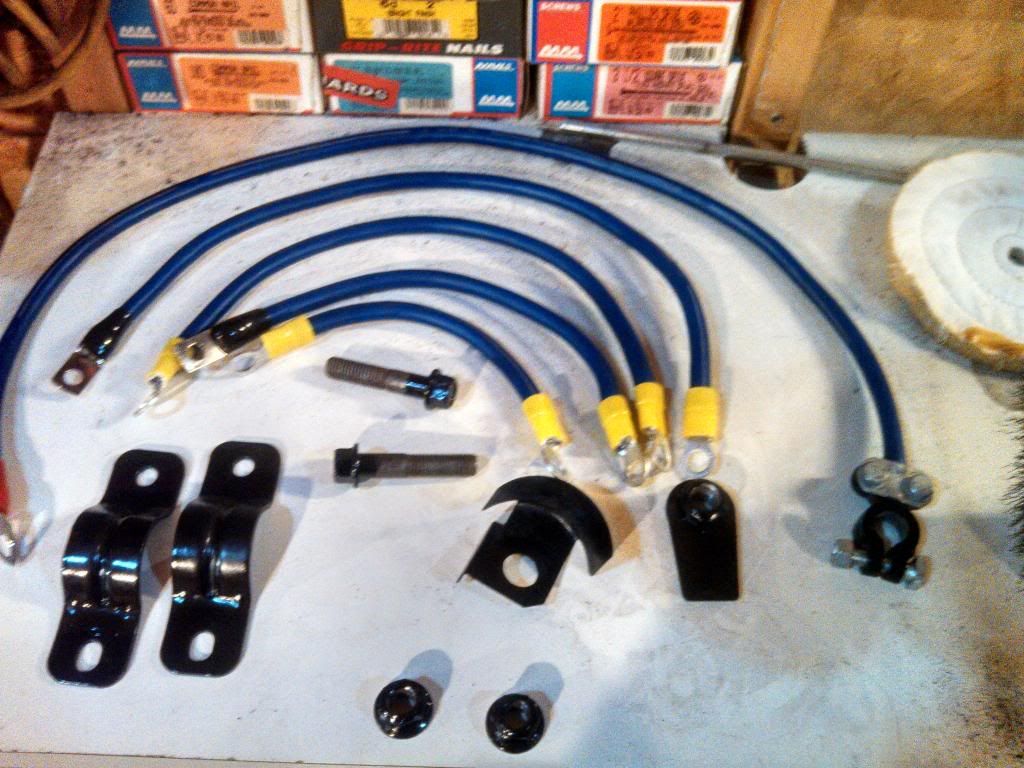
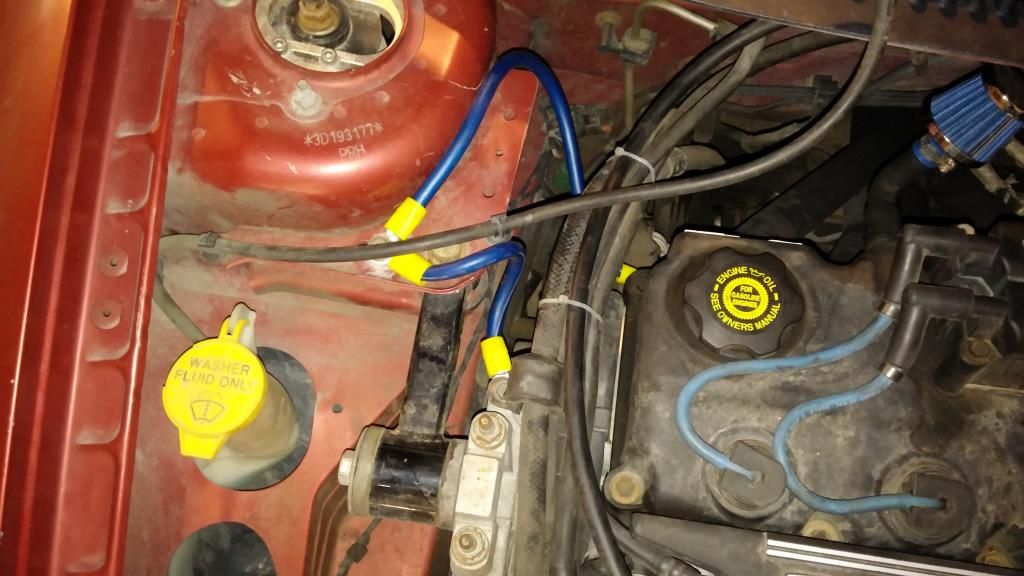
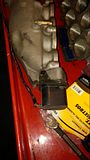
Came back the next day and decided to start tackling some electrical gremlins I have been chasing for a while. I had some 4 gauge wire sitting around doing nothing for the last year so I picked up some cable ends and tried my luck at upgrading the car's grounding system...It looks pretty at least.
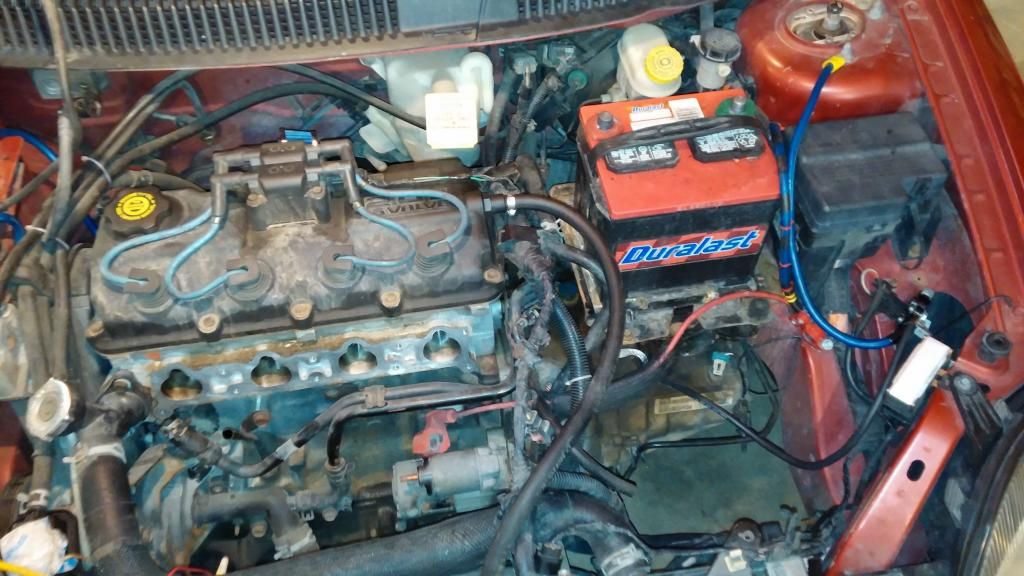

In the process of moving some wiring around I came to the PDC where the main + POS was severely corroded and the wire oxidized. I hacked together this BS and it worked for a couple weeks but, went to start it this morning and no luck

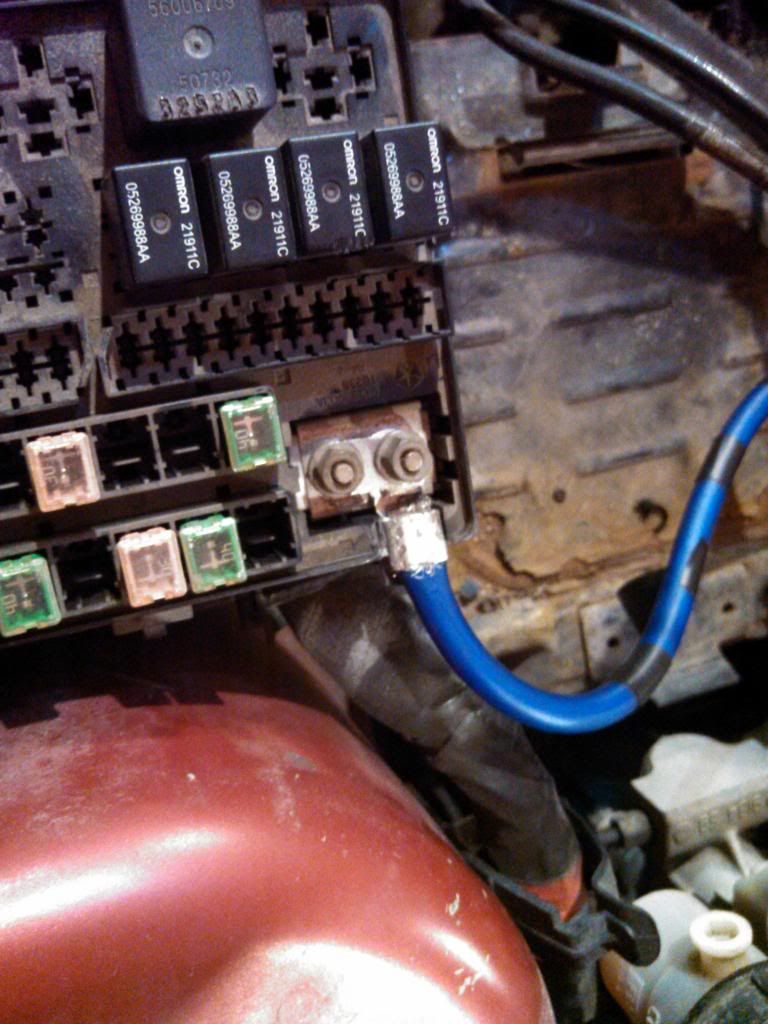
Two days ago I decided I am going into full electrical work over. I added a new SS Braided ground from the battery tray to the transmission instead of the 4 gauge aluminum core wire I had just done and replaced the main battery - NEG to block with 4 gauge insulated copper wire. I also decided I was going to pull the magnum intake manifold, MSD RPM Window switch, relay, and wiring, out as I was wondering if the way I had the MTV wired was causing my power drain issues and I just so happened to have a magnum intake manifold that dtjakten (Dave) had ported and polished for me lying around. This is what I did there.
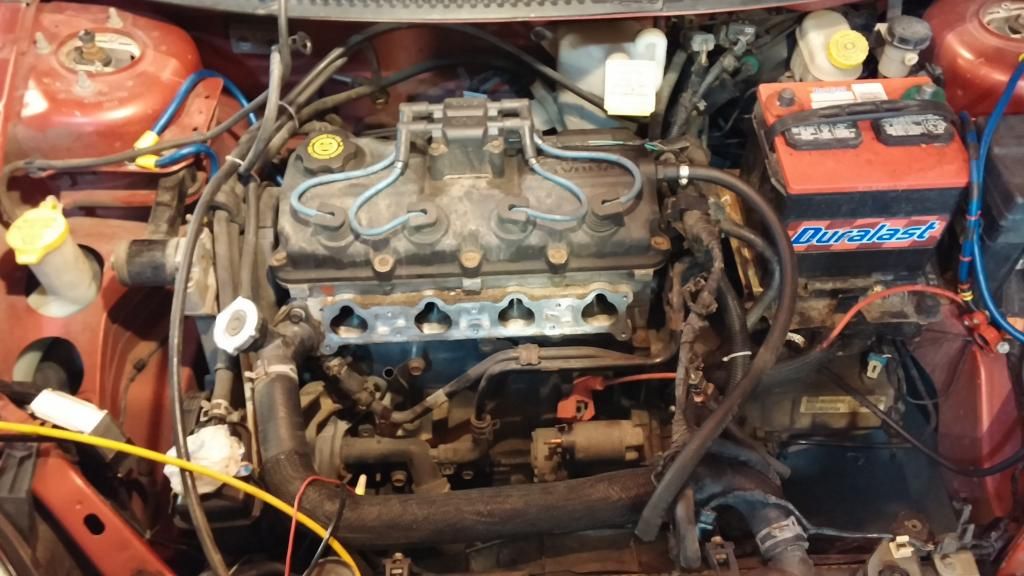
What the intake ports looked like
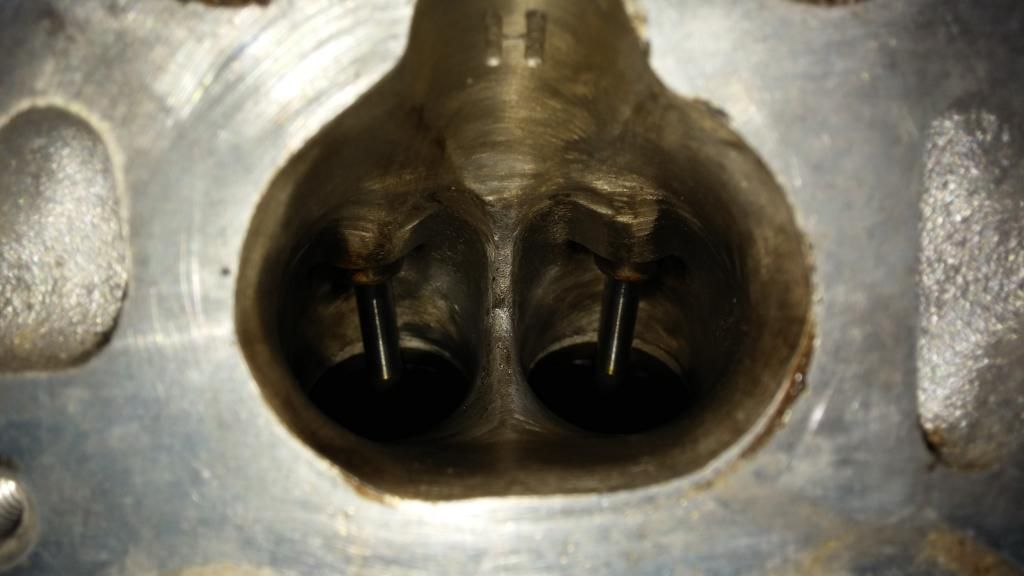
New intake manifold
Finished Product
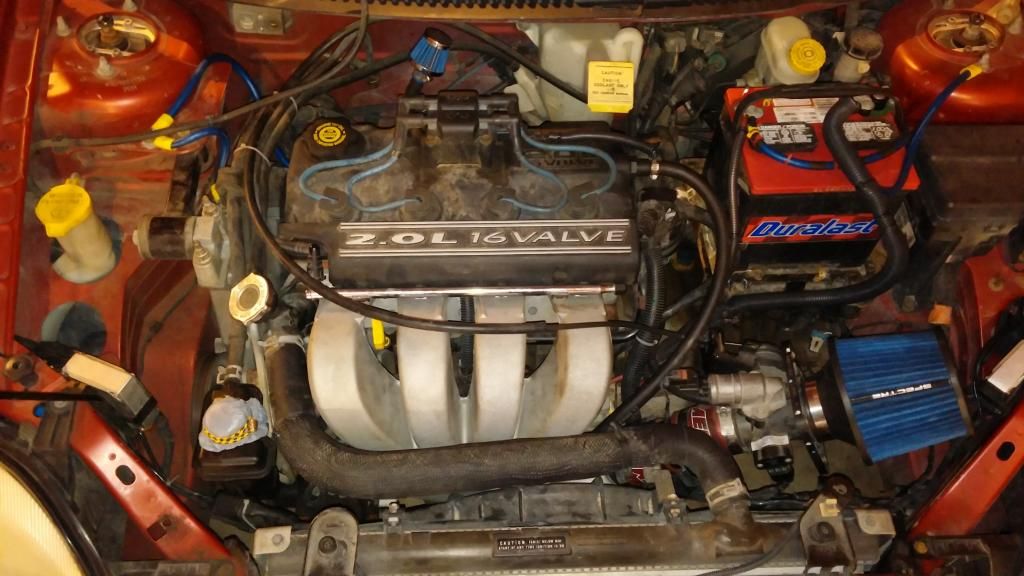
I actually like the way the car pulls now. It seems to actually have a little more in the bottom end and seems no different at the top end. Gotta love a ported mag head and a comp 400 combo
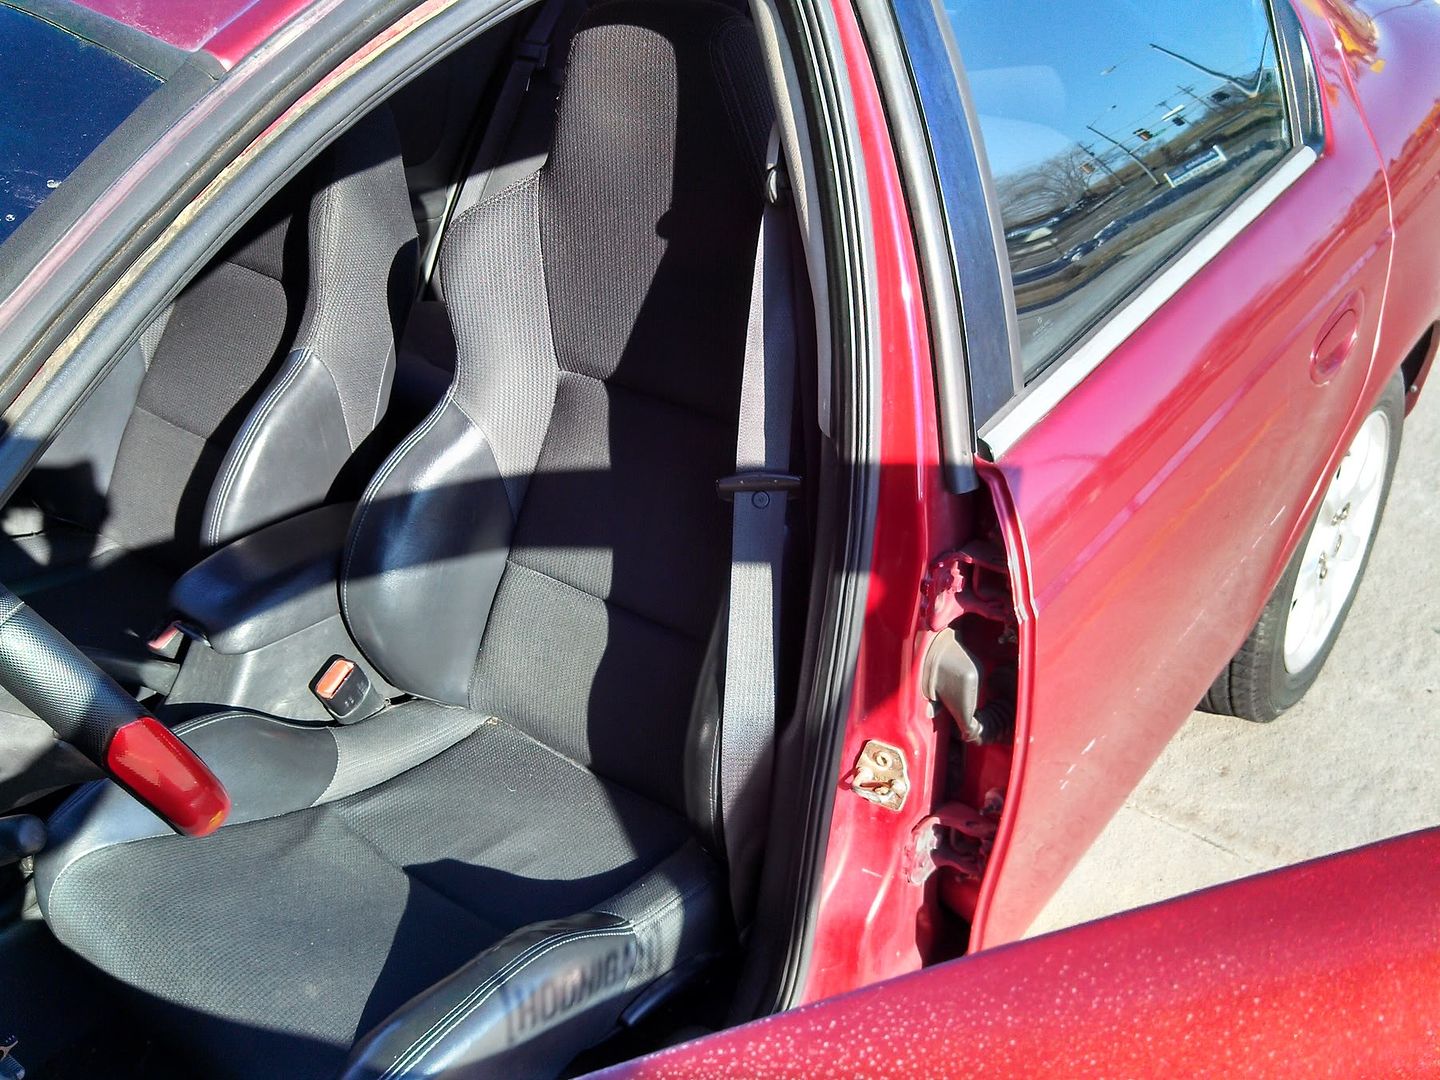
Only other thing I did was switch the Corbeau out for my old SRT Viper seat. The front seats match again!! lol
The last update is more important to me than the car and frankly it is the reason I haven't been around much lately. I found out 10 weeks ago I am bringing a new Mopar lover into the world. BEHOLD!!! My soon to be evil minion clone/ tool holder.

Thanks for looking guys, The car didn't start this morning and is doing the same thing it was before all the power and grounding upgrades. Sometimes I just turn the key and NOTHING. no power PERIOD. no lights, no clicks, not turning....nothing. Come back an hour later and she fires right up. I don't get it. Any help appreciated.
Let's see, Since the last update a lot has changed.
Like I mentioned in my last post the front end suspension and steering was on its way out the door and by last month it was dead again. This is what I pulled out.


"while I was in there" I grabbed the inner and outer Tie rod ends as well. Heads up for anyone thinking about trying this themselves 2 things...
1. Chances are your outer tie rods are so frozen onto the inner rods you will have one hell of a time trying to get em off so you can reuse the boot. I used a BIG ASS set of bolt cutters to simply cut the inner tie rod off and pull off the boot. Then just slip it over the new inner tie rod before installing the jam nut and outer tie rod end.
2. Doing it this way made the process really quick as I just removed the entire tie rod assembly from the inner tie rod side (the rack) These are the tools I needed.

Using this method it only took about 40 minutes to replace both sides. MAKE SURE TO MEASURE the old tie rod assemblies and set the new ones to to the same length or your alignment will be WAAYY OFF.
This is what I was left with before parts started going back in.


New Parts in!


Called it a day for that day and got ready to come back tomorrow for more.

Came back the next day and decided to start tackling some electrical gremlins I have been chasing for a while. I had some 4 gauge wire sitting around doing nothing for the last year so I picked up some cable ends and tried my luck at upgrading the car's grounding system...It looks pretty at least.


In the process of moving some wiring around I came to the PDC where the main + POS was severely corroded and the wire oxidized. I hacked together this BS and it worked for a couple weeks but, went to start it this morning and no luck


Two days ago I decided I am going into full electrical work over. I added a new SS Braided ground from the battery tray to the transmission instead of the 4 gauge aluminum core wire I had just done and replaced the main battery - NEG to block with 4 gauge insulated copper wire. I also decided I was going to pull the magnum intake manifold, MSD RPM Window switch, relay, and wiring, out as I was wondering if the way I had the MTV wired was causing my power drain issues and I just so happened to have a magnum intake manifold that dtjakten (Dave) had ported and polished for me lying around. This is what I did there.


What the intake ports looked like


New intake manifold

Finished Product

I actually like the way the car pulls now. It seems to actually have a little more in the bottom end and seems no different at the top end. Gotta love a ported mag head and a comp 400 combo
Only other thing I did was switch the Corbeau out for my old SRT Viper seat. The front seats match again!! lol

The last update is more important to me than the car and frankly it is the reason I haven't been around much lately. I found out 10 weeks ago I am bringing a new Mopar lover into the world. BEHOLD!!! My soon to be evil minion clone/ tool holder.

Thanks for looking guys, The car didn't start this morning and is doing the same thing it was before all the power and grounding upgrades. Sometimes I just turn the key and NOTHING. no power PERIOD. no lights, no clicks, not turning....nothing. Come back an hour later and she fires right up. I don't get it. Any help appreciated.
MY PROJECT LOG My Old 2002 ES AND My 2003 SXT
It is not that we cannot be friends, it's that you are a zombie, and I am almost out of ammo. -Someone
It is not that we cannot be friends, it's that you are a zombie, and I am almost out of ammo. -Someone
-
ducktapetg
- 2GN Member
- Posts: 180
- Joined: Mon Oct 31, 2011 9:20 pm
- Location: New Hampshire
-
D-Railed_Neon
- 2011 Bronze Contributor
- Posts: 723
- Joined: Sun Oct 23, 2011 8:39 pm
- Location: Bellevue, NE
Thanks Man!!!
MY PROJECT LOG My Old 2002 ES AND My 2003 SXT
It is not that we cannot be friends, it's that you are a zombie, and I am almost out of ammo. -Someone
It is not that we cannot be friends, it's that you are a zombie, and I am almost out of ammo. -Someone
-
D-Railed_Neon
- 2011 Bronze Contributor
- Posts: 723
- Joined: Sun Oct 23, 2011 8:39 pm
- Location: Bellevue, NE
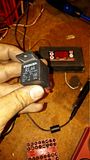
Well having the same power problem that plagued me months ago again. Rethought my grounding system upgrade with the stupid ricer audio aluminum based 4 gauge I used. Bought some stuff today to really seal the deal on the grounding system. Behold!! Copper glory!
Hopefully I will get time to tear into this tomorrow as the car is completely immobile until I do.
Wish me luck and please leave some feedback. Thanks for looking.

Hopefully I will get time to tear into this tomorrow as the car is completely immobile until I do.
Wish me luck and please leave some feedback. Thanks for looking.
MY PROJECT LOG My Old 2002 ES AND My 2003 SXT
It is not that we cannot be friends, it's that you are a zombie, and I am almost out of ammo. -Someone
It is not that we cannot be friends, it's that you are a zombie, and I am almost out of ammo. -Someone
-
renegade83

- 2GN Member
- Posts: 75
- Joined: Sun Mar 23, 2014 2:43 pm
- Location: Pointe Aux Chenes, LA

-
D-Railed_Neon
- 2011 Bronze Contributor
- Posts: 723
- Joined: Sun Oct 23, 2011 8:39 pm
- Location: Bellevue, NE
Thanks man. I just did it and the humidity here in Nebraska wasn't too bad but didn't have the luxury of a garage this time so it was a fun couple of hours.renegade83 wrote:Congrats on the baby and goodluck with the grounding upgrade, I've been wanting to do that to mine for awhile now, probably gonna wait til the fall when it's cooler outside.
So where do I begin here....
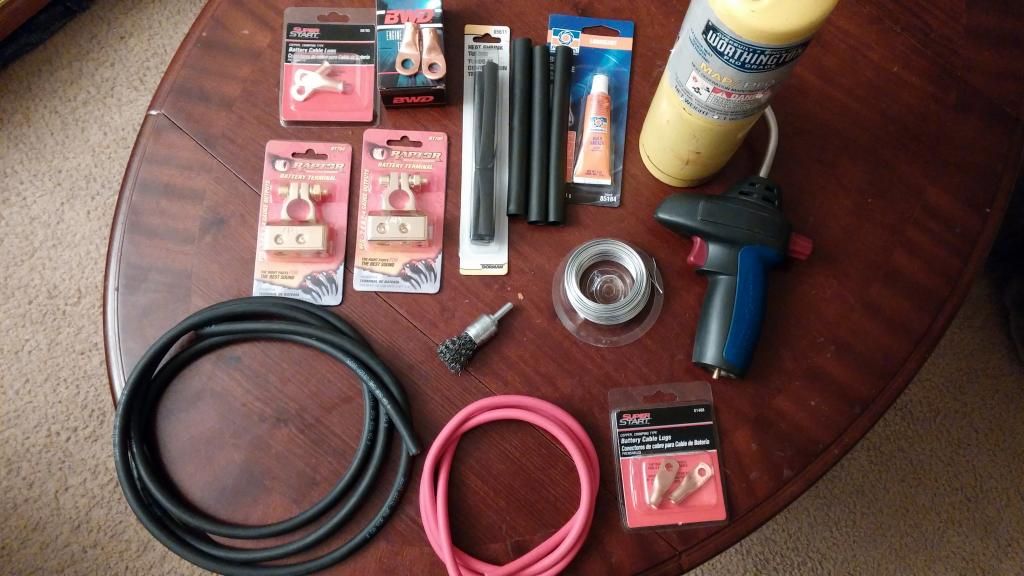
I think I am gonna make a more current Big 3 Upgrade How To here soon that has pictures of everything I did to make my cables and everything that is required to do them correctly but for now, I wanted to share some of the highlights on the way I went about it. For starters I do want to thank lilolneon for this awesome write up (LINK) that I used to build the Big 3 that I was using and installed a month back. His approach is good and I don't blame the technique but I found that the twisted aluminum fine mesh wire of the audio grade 4 gauge coupled with cheap steel eyelet rings did not play well together in the face of high engine bay temps, and the teeth cracking ride of solid bushings, coilovers, big ass sways, and extreme performance summer tire induced vibration. Go figure, right?
Most of the wires would easily pull out of the eyelet terminals with barely any force and some of them kept coming loose on me leading to some serious electrical issues. SO....This time I decided to buy high grade industrial 4 gauge copper stock and copper 4 gauge lugs, and industrial shrink wrap. I used rosin core solder and a vice to hold the lugs as I soldered each lug to the 4 guage-acetone washed cable ends. then fed solder into a small exposed bit between the insulation and the lug until I could feel the heat 8-10 inches up the wire from the lug. also noticed the cable is much stiffer for that 8-10 inches on either side of each cable. Good solder run=good connection.
What I ended up with was these babies!


You can see that I upgraded to full gold plated audio style battery terminals. I bought these because they use hex key for the cable hold down. (I love that BTW) and they support 2-4g 1-8g and 1-6g a piece which allowed me to run all my new stock 4 gauge for the grounds and new 6 gauge for the PDC power wire and little 8 gauge power wire for my HIDs cleanly and neatly. Now, I did run into one small snag with these terminals and it was that they were too large for the standard 26R battery posts. I bought some terminal shims and everything was well with the world.
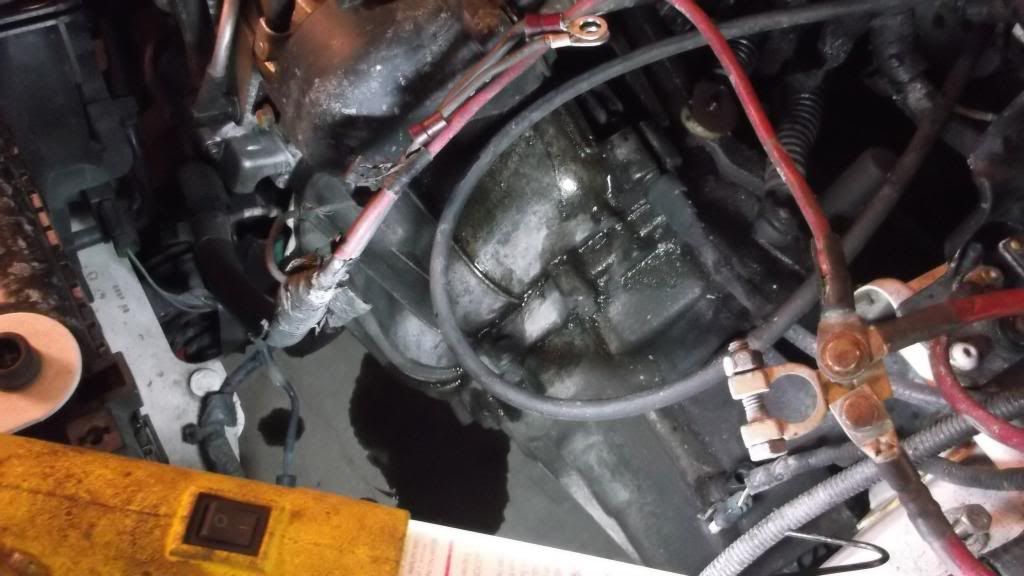
I cut some 6 gauge wire for the PDC and of course soldered a 6 gauge lug to it and replaced the stock power wire to the PDC with it on the terminal closest to the firewall then, put a small copper washer on the other terminal and a piece of flat stock connecting both posts. All connections inside the PDC and wire to battery terminals were given a good rub of old dielectric grease to ensure connection and prevent corrosion.
I took the opportunity to use a wire brush blind cleaner and bring ALL GROUNDING POINTS to a shiny bare metal finish. Wiped em off and applied a good amount of dielectric grease to the hole and installed my ground straps in the OEM locations, covered with more dielectric grease. Oh, and I should mention I gave the lugs a hit with the wire brush to ensure a solid connection.
Less rambling...moar pics!


And Finally the finished product.

Electrical gremlins are gone and the car seems much more responsive. I have minimal light drop from the HID or the interior lights under load, windows roll up and down with no hesitation, the car starts like, Imeadit- fucking-ly now and even some of the hiss from the old 133K mile stock (and beat daily) stereo components is gone now. Overall this project took some time to make all the cables correctly but, I saved a ton over buying pre-made high quality wire and I know the grounding system is solid in the car now and should have no problems ensuring electrical stability down the road when boost and tuning start coming into play. I think the whole install looks sharp as hell, really understated and OEM-like but, let me know what you guys think!
I also took the injectors out and looked at them a few weeks bad and although the injectors themselves were good the O rings were shot to hell so I picked some of those up today and am going to swap those out tomorrow and see if I can't get the idle of this bad ass Cam just a little more subtle. lol Thanks for reading guys and as always feedback is welcome.
MY PROJECT LOG My Old 2002 ES AND My 2003 SXT
It is not that we cannot be friends, it's that you are a zombie, and I am almost out of ammo. -Someone
It is not that we cannot be friends, it's that you are a zombie, and I am almost out of ammo. -Someone

Wow, that is some serious electrical upgrade. Great job. The gold plating should keep it from rusting pretty good. After reading about people having all these issues due to rusty ground connections I took all mine apart and added dielectric grease (there was no rust yet). But this is the next (big) step.
-
Midnight_Rider
- Spam Avenger!
- Posts: 9002
- Joined: Wed Aug 02, 2006 2:49 am
- Location: Kokomo, IN
-
D-Railed_Neon
- 2011 Bronze Contributor
- Posts: 723
- Joined: Sun Oct 23, 2011 8:39 pm
- Location: Bellevue, NE
Thanks man, yeah mine terminals were new and so was the wire, just used cheap materials and got poor results. This upgrade is well worth it and is probably going to last forever. I plan to make a How To on soldering cable lugs and cutting larger gauge wire but depends on how much interest there is learning here on the forum. Time is precious now a days lolthomas_w wrote:Wow, that is some serious electrical upgrade. Great job. The gold plating should keep it from rusting pretty good. After reading about people having all these issues due to rusty ground connections I took all mine apart and added dielectric grease (there was no rust yet). But this is the next (big) step.
Hey Thanks Gramps. I almost thought you had forgotten about meMidnight_Rider wrote:Late to this thread. First, congratulations on the future car key borrower.

The car is coming along. didn't have too much notice on the forums for the last couple big updates but meh, seems the whole site has been slow and thin for a while. Got a crap ton of stuff done over the last six months that's for sure though. The current plan is to hit the exhaust next because...I HATE IT, then I'm rebuilding all four corners. Wheel bearings, hubs, and brakes. If I can afford to in the near future, upgrade to one of the cheaper stainless brake line kits like This One. and then re use the same brands for new front rotors and pads, which I believe is Power Slot and Hawk but I'll have to double check. Then just high quality OEM shoes and drums in the rear...with new hardware and wheel cylinders of course.
After that I am now sure I want to get a set of Racelands with the Mootegi(?) front camber plates and rear adjustable control arms. I would like to be able to still set camber where I want it, ride a little lower, but most importantly now I need the "OEM like" ride quality that everyone rants and raves about. The BCs are awesome but way too stiff for a new born. And the baby will come first. I will be selling the BCs on the car right now to help kinda offset that expenditure and I already put my entire old R/T Intake Manifold Setup for sale
There is a million other things off the top of my head. Ultimately we will be seeing boost in this car but as always, it could be six weeks, it could be six months, could be six years. I will continue updating as I go along. I appreciate the input guys. Keeps me motivated to continue doing things with this beast.
MY PROJECT LOG My Old 2002 ES AND My 2003 SXT
It is not that we cannot be friends, it's that you are a zombie, and I am almost out of ammo. -Someone
It is not that we cannot be friends, it's that you are a zombie, and I am almost out of ammo. -Someone
-
occasional demons
- Junior Admin
- Posts: 20306
- Joined: Thu May 03, 2007 12:14 pm
- Location: Ashland Ohio
We all work at our own pace. Children/grand children seem to have a huge impact on progress.
I will be doing a starter cable and engine to battery upgrade here soon on the 1gn. Just noticed the battery to starter lug was a bit green, and the insulation near it was swelling. Probably won't be long before it won't crank.
I will be doing a starter cable and engine to battery upgrade here soon on the 1gn. Just noticed the battery to starter lug was a bit green, and the insulation near it was swelling. Probably won't be long before it won't crank.
Bill
1999 neon coupe 2.4 swap
2021 Forester
2000 Neon MTX swap with '02 R/T PCMOlha Koba, a psychologist in Kyiv, said that “anger and hate in this situation is a normal reaction and important to validate.” But it is important to channel it into something useful, she said, such as making incendiary bombs out of empty bottles.
1999 neon coupe 2.4 swap
2021 Forester
-
D-Railed_Neon
- 2011 Bronze Contributor
- Posts: 723
- Joined: Sun Oct 23, 2011 8:39 pm
- Location: Bellevue, NE
OD there you are, was starting to think you forgot who I was too! lol I hear ya though, I know this little one is gonna impact progress for many reasons but, at the same time in the near future I will have another free set of hands to hold tools. That and they get to watch daddy build a racecar (something i never had with my father) So I am psyched! Please, please, please let me know how the charging side wiring goes. Dante had posted a pic a while back of how he did his upgraded charging side wiring with two fuses and a break out box to the battery and the starter that looked great but was a little confusing. If you have part numbers for just the positive side OEM harness that would be OK if it was cheap enough but, since I can get copper insulated stock and copper lugs in varying sizes dirt cheap, I would prefer to do somethingoccasional demons wrote:We all work at our own pace. Children/grand children seem to have a huge impact on progress.
I will be doing a starter cable and engine to battery upgrade here soon on the 1gn. Just noticed the battery to starter lug was a bit green, and the insulation near it was swelling. Probably won't be long before it won't crank.
So, update today I got a chance to pull the fuel rail and with a little help from pick set I cut, pulled, and replaced the stock fuel injector o rings and inspect the heads of the units as well. I figure I will just let the pics talk for themselves. Before is first and finished product pics left.


Right away I noticed a much smoother idle, quieter operation, and overall relief with replacing these bad boys and they cost me a whopping $2.47! for those who are interested it takes five minutes to check your injectors, ten minutes to replace them, and cost less than $5 bucks out of pocket. Going to throw a bottle of Lucas Fuel system cleaner in it when I get off work, fill up, see if gas mileage goes up, and just be a happy camper till the next project.....most likely exhaust .As always thanks for the input! and more stuff coming in the future. Here is the part number for those of you interested.

MY PROJECT LOG My Old 2002 ES AND My 2003 SXT
It is not that we cannot be friends, it's that you are a zombie, and I am almost out of ammo. -Someone
It is not that we cannot be friends, it's that you are a zombie, and I am almost out of ammo. -Someone
-
occasional demons
- Junior Admin
- Posts: 20306
- Joined: Thu May 03, 2007 12:14 pm
- Location: Ashland Ohio
I have already upgraded the charging side of it. See my PL "Casper" for that part.
Bill
1999 neon coupe 2.4 swap
2021 Forester
2000 Neon MTX swap with '02 R/T PCMOlha Koba, a psychologist in Kyiv, said that “anger and hate in this situation is a normal reaction and important to validate.” But it is important to channel it into something useful, she said, such as making incendiary bombs out of empty bottles.
1999 neon coupe 2.4 swap
2021 Forester
-
D-Railed_Neon
- 2011 Bronze Contributor
- Posts: 723
- Joined: Sun Oct 23, 2011 8:39 pm
- Location: Bellevue, NE
Totally did, congrats on the progress on that car so far. Lot of hard work and ingenuity / laziness (lol) went into it. Nice Ride ODoccasional demons wrote:I have already upgraded the charging side of it. See my PL "Casper" for that part.
I actually noticed a the pics you posted for the positive side.
This is exactly what I wanted to do! Danteneon used two massive fuses from his pics. One Alternator to battery and you alternator to (i believe) to the starter. Public Disturbance used I think used breakers like the one you owned, and I plan to use. I was curious how and where you wired in your breaker also, I am unsure, are 1gn PDC and 2gn PDC power terminals the same as or is the 1gn PDC different then this one and if not how did you make the best power connection to the PDC?occasional demons wrote:A little update, and why you really should install a new rear main before the engine is installed....
Finished wiring the power cable from the alternator to the battery and PDC. I Installed a 100 amp breaker. Hopefully I never need the rated capacity of the alternator. I don't see a big audio system anytime soon, so chances are slim.
The connections at the battery are only temporary until I figure out exactly what I'm doing there. It works for now, so i can work the rest of the bugs out
Caution: Honda parts!
Got the brake lines completed, and began the alternator to battery wire the other day...
Finished wiring the power cable from the alternator to the battery and PDC. I Installed a 100 amp breaker. Hopefully I never need the rated capacity of the alternator. I don't see a big audio system anytime soon, so chances are slim.
The connections at the battery are only temporary until I figure out exactly what I'm doing there. It works for now, so i can work the rest of the bugs out

I want to upgrade to the 2001 PT Cruiser 100 amp alternator with my current alternator pulley swapped on to it, and run fresh 4 gauge cables made like the grounds I did but run into a breaker and then to all power connections. I would imagine that two breakers or fuses makes sense but, one does seem more efficient. Could you shed some light on it, so I can wrap my head around the best way to go about buying up parts and scheduling some time to get it done.D-Railed_Neon wrote:
Thanks for any input and the help so far
MY PROJECT LOG My Old 2002 ES AND My 2003 SXT
It is not that we cannot be friends, it's that you are a zombie, and I am almost out of ammo. -Someone
It is not that we cannot be friends, it's that you are a zombie, and I am almost out of ammo. -Someone
-
occasional demons
- Junior Admin
- Posts: 20306
- Joined: Thu May 03, 2007 12:14 pm
- Location: Ashland Ohio
The 1gn PDC has essentially the same style connector as the 2gn. I just connected it to one of the lugs. I haven't had any issues with it.
I got the starter cables replaced on the 1gn today - I'll have to get around to updating my PL...
I got the starter cables replaced on the 1gn today - I'll have to get around to updating my PL...
Bill
1999 neon coupe 2.4 swap
2021 Forester
2000 Neon MTX swap with '02 R/T PCMOlha Koba, a psychologist in Kyiv, said that “anger and hate in this situation is a normal reaction and important to validate.” But it is important to channel it into something useful, she said, such as making incendiary bombs out of empty bottles.
1999 neon coupe 2.4 swap
2021 Forester
nice progress man! commenting from a while ago... good job on the clutch. i tried to replace the rear main seal on my 98 and i couldnt get anything back together... it was pretty bad so i just sold it lol lost an srt steering wheel in the process...
The grounds look great ive been wanting to do that for the longest time but i havent had any extra to even do an oil change really.
car is lookin great tho and i feel you on the lack of posting on here too i havent been around but i think a lot of people go on facebook but personally i prefer the layout on here..
keep up the posting!

2003 neon se crashed
1998 neon highline Sold
2005 neon sxtSold
2017 Volkswagen CC Rline Exec. 2.0t
"Sorry you are so scared of a possible mechanical problem that you will drive an ugly transportation appliance. I'll keep living a colorful life." -some guy about a camry
-
D-Railed_Neon
- 2011 Bronze Contributor
- Posts: 723
- Joined: Sun Oct 23, 2011 8:39 pm
- Location: Bellevue, NE
Ok, that is what I thought. I just put a few copper washers on the second post and ran a bar over the two posts with nuts and some dielectric grease. I really like what you have done with the car so far OD and I can't wait to see the new pics for the starter wiring. I did look into the breaker and I think this is the one I am gonna grab as I plan to run a little higher amperage alternator.occasional demons wrote:The 1gn PDC has essentially the same style connector as the 2gn. I just connected it to one of the lugs. I haven't had any issues with it.
I got the starter cables replaced on the 1gn today - I'll have to get around to updating my PL...

Now how the hell do you wire it in!?!
hey, thanks bro! It was a bitch, and it was freezing cold and just...awful. lol but we got it done so, that's cool. Sorry to hear about the rear main seal, that seriously sucks but at least you still got your current ride. I agree with ya about everyone on facebook, I prefer the forum layout as well. The cables are easy enough but all together I spent maybe $55 for all the supplies to make em but, I also already had a vise, torch, solder, and propane so that helped keep costs down. Planning quite a bit more in the future piece by piece so the posts will keep coming! Also was broke as a joke in church on Sunday for well over a year but, I made it through, and you will too. Hang in there buddyblueneo03 wrote:nice progress man! commenting from a while ago... good job on the clutch. i tried to replace the rear main seal on my 98 and i couldnt get anything back together... it was pretty bad so i just sold it lol lost an srt steering wheel in the process...
The grounds look great ive been wanting to do that for the longest time but i havent had any extra to even do an oil change really.
car is lookin great tho and i feel you on the lack of posting on here too i havent been around but i think a lot of people go on facebook but personally i prefer the layout on here..
keep up the posting!
Thanks everyone for the feedback and keep it coming. I will try to make it to all of your project logs and leave some feedback for you guys too.
MY PROJECT LOG My Old 2002 ES AND My 2003 SXT
It is not that we cannot be friends, it's that you are a zombie, and I am almost out of ammo. -Someone
It is not that we cannot be friends, it's that you are a zombie, and I am almost out of ammo. -Someone
-
D-Railed_Neon
- 2011 Bronze Contributor
- Posts: 723
- Joined: Sun Oct 23, 2011 8:39 pm
- Location: Bellevue, NE
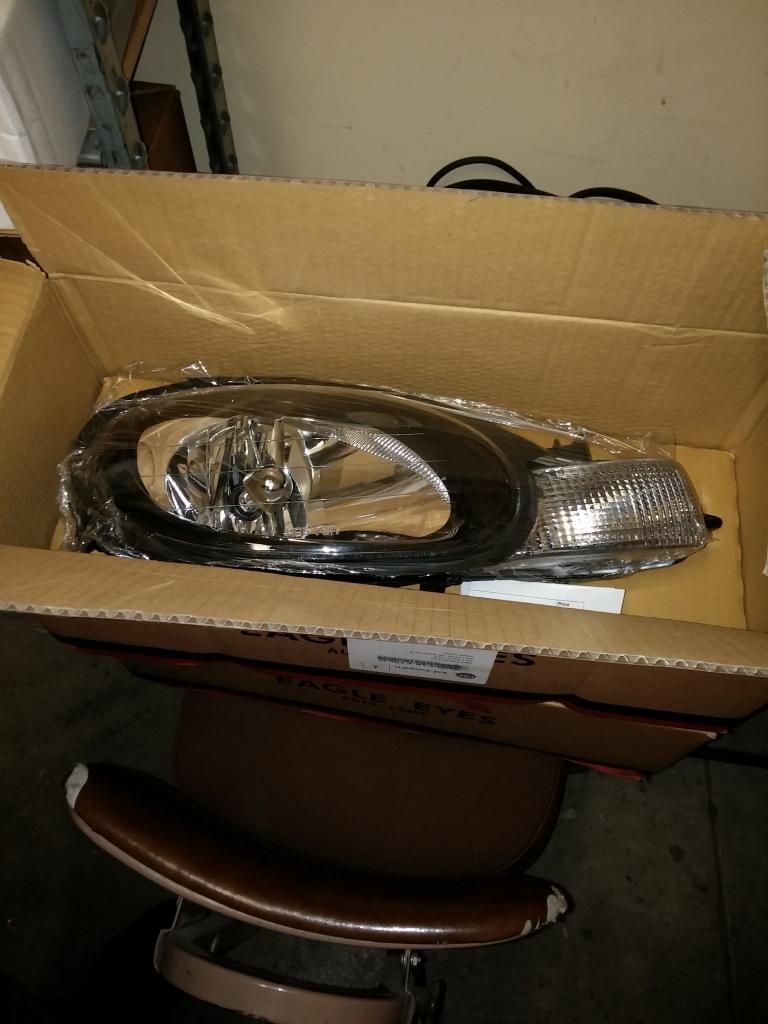
So you remember a few post back last summer when I did my totally super duper bodywork front bumper repair? Well driving down the road today at about 65 and all of a sudden and without warning, the corner of my front bumper decided it would enjoy the ride better if it were placed above the hood line. Luckily it was still attached by the fender and I pulled off at the next exit and removed it safely and without incident. This was the carnage.
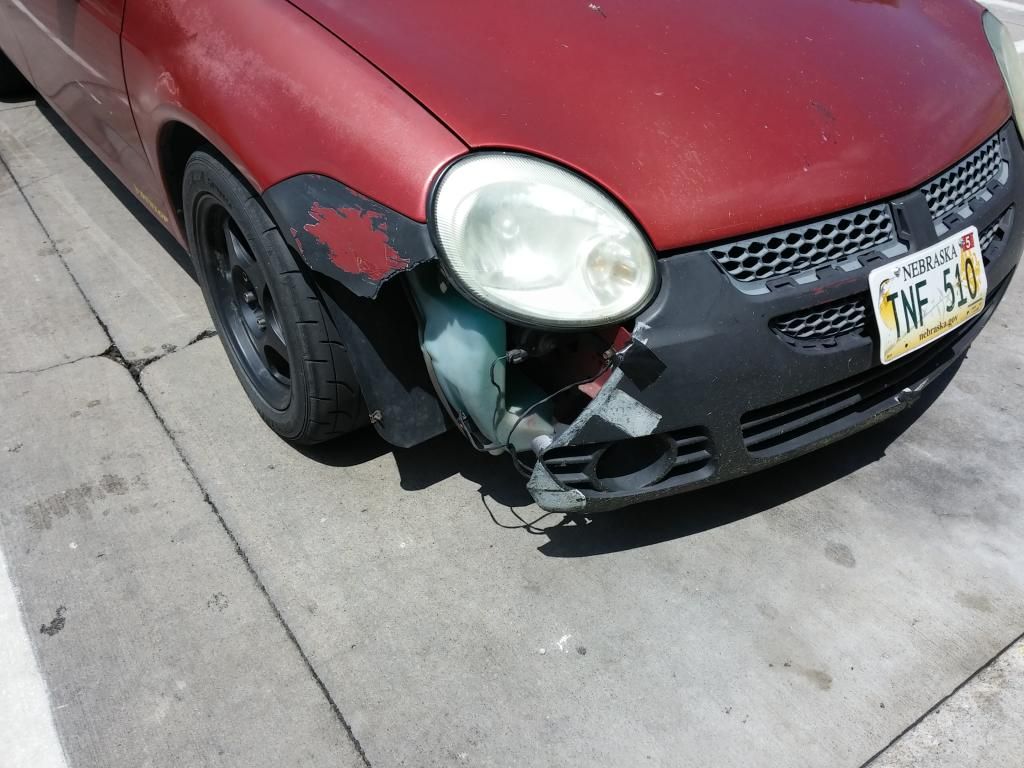

Obviously the bumper has been needed to be addressed for over a year and I simply have not had the cash to redo it the way I wanted. Last summer it was pretty rough but, it was still solid for the majority of the bottom bumper. well as far as I can tell it just ripped like paper all the way down from the headlight to past the grill. I will be going out to Lincoln (about an hour away) to check their location which according to their inventory list, has a 2002. Will call them when I get paid to see if they still have the 02 and if it still has the front clip. If so 125 bucks later and I should have a whole 2002 front end conversion, fingers crossed.


Obviously the bumper has been needed to be addressed for over a year and I simply have not had the cash to redo it the way I wanted. Last summer it was pretty rough but, it was still solid for the majority of the bottom bumper. well as far as I can tell it just ripped like paper all the way down from the headlight to past the grill. I will be going out to Lincoln (about an hour away) to check their location which according to their inventory list, has a 2002. Will call them when I get paid to see if they still have the 02 and if it still has the front clip. If so 125 bucks later and I should have a whole 2002 front end conversion, fingers crossed.
MY PROJECT LOG My Old 2002 ES AND My 2003 SXT
It is not that we cannot be friends, it's that you are a zombie, and I am almost out of ammo. -Someone
It is not that we cannot be friends, it's that you are a zombie, and I am almost out of ammo. -Someone

-
R/T William

- 2GN Member
- Posts: 59
- Joined: Sun Nov 21, 2010 8:21 pm
- Location: Jacksonville, FL
hey man great job so far I hope my build has as many updates as yours I feel your pain with the paint coming off with the side molding same thing happened with my 03 R/T on the passenger side. also congrats on the new neon lover

2003 Red R/T -***SOLD***
2007 Red Mazda RX-8:TurboXS 3" exhst, Gold Rota MXR-R 18x9.5-DD
1998 Black Plymouth Neon Espresso- project car viewtopic.php?t=67988
-
D-Railed_Neon
- 2011 Bronze Contributor
- Posts: 723
- Joined: Sun Oct 23, 2011 8:39 pm
- Location: Bellevue, NE
Thanks for the support guys!
Crap ton of work done over the last week so I figured I should post some updates.
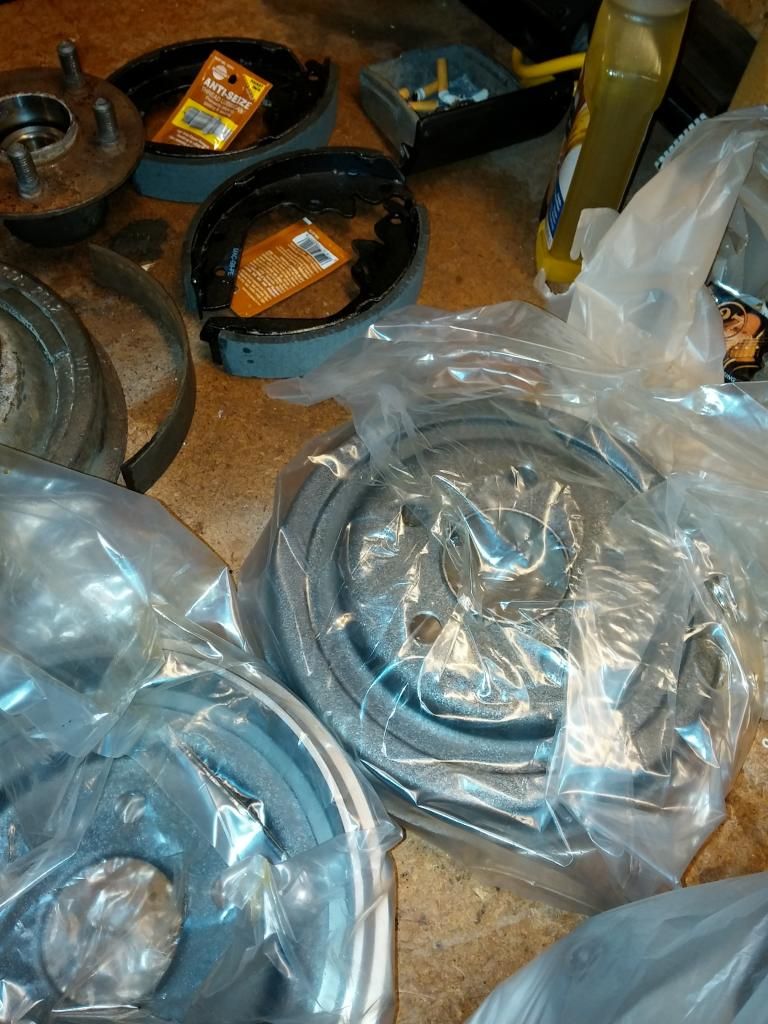
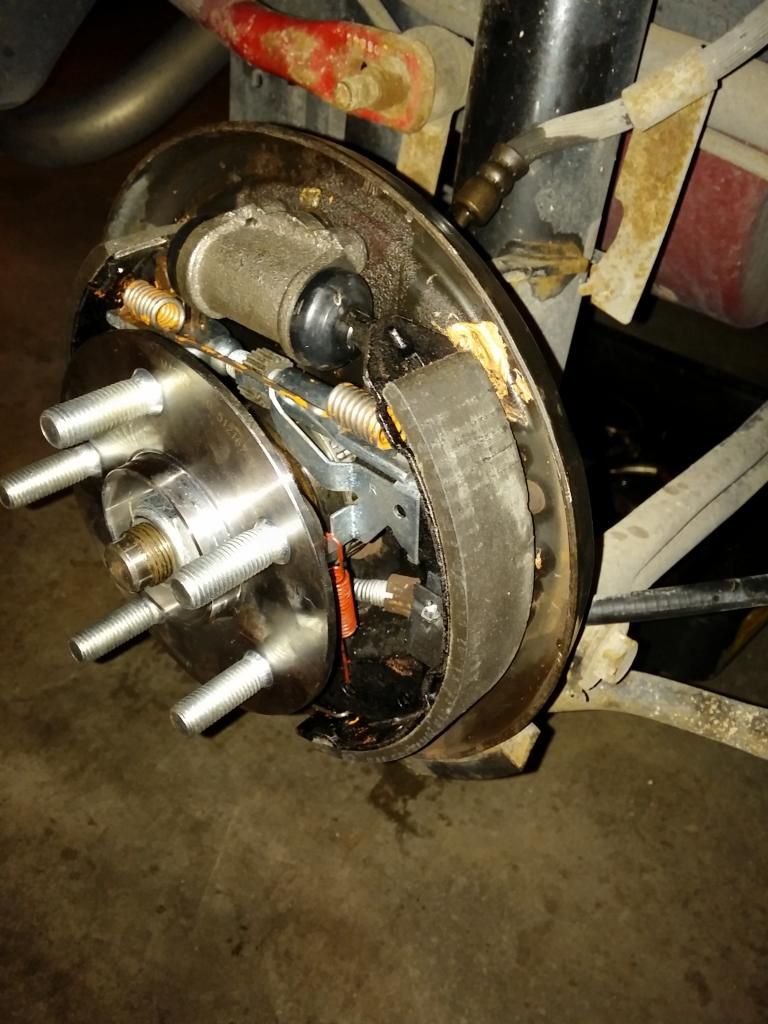
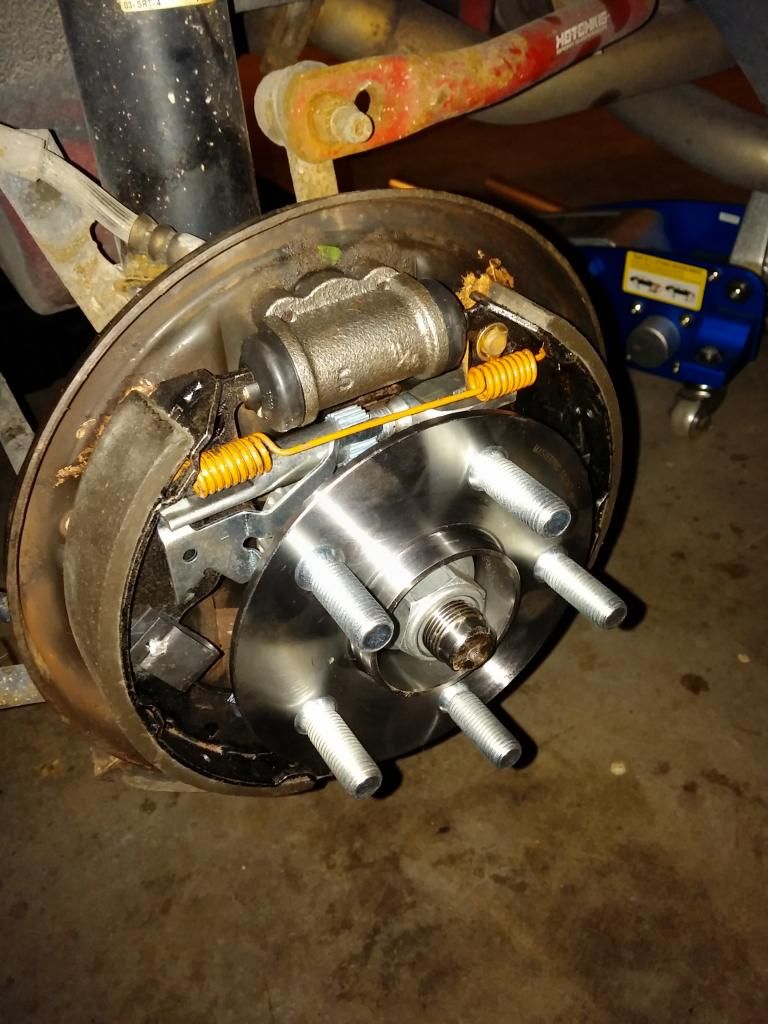
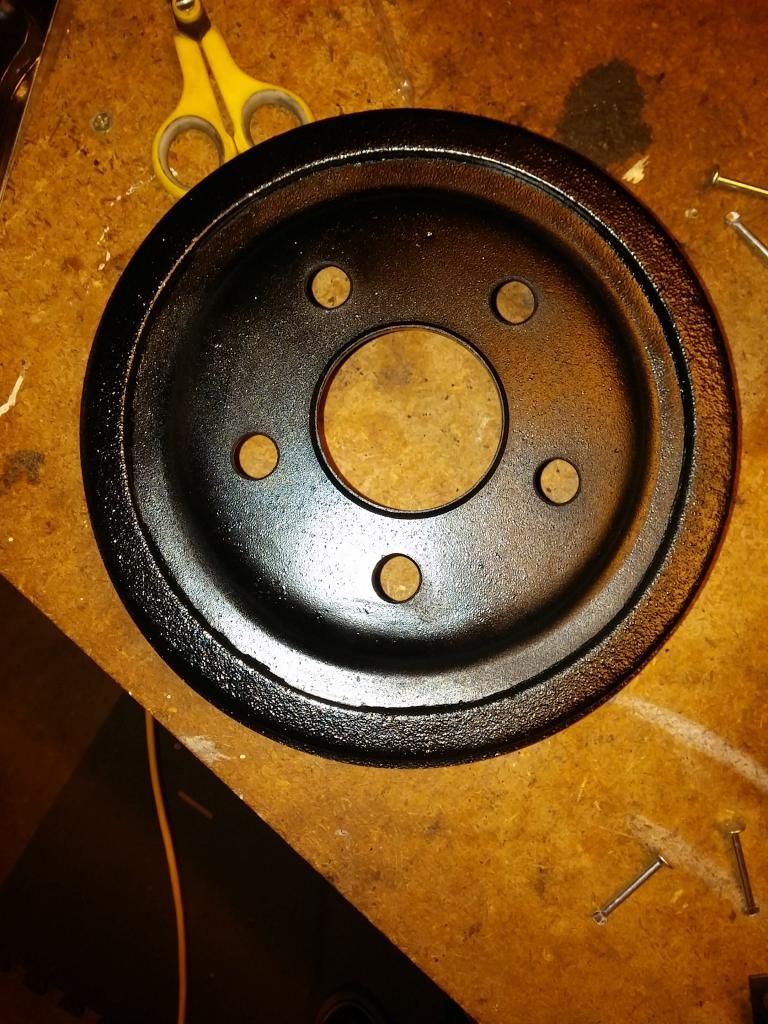
Last week the rear end started to make some interesting noises soo... I bought a new hub for the passenger side. (The one in question) for like 23 bucks with my discount and figured it will be a quick and easy fix. WRONG! lol While removing the drum one of the shoes decided it no longer needed to hold onto its brake material and decided it would be better without it...not good. The other side was worse, I figured since I now had to do brakes I should pull the other drum....which was frozen to the hub, so I pulled the hub and the bearing exploded.....also not good.
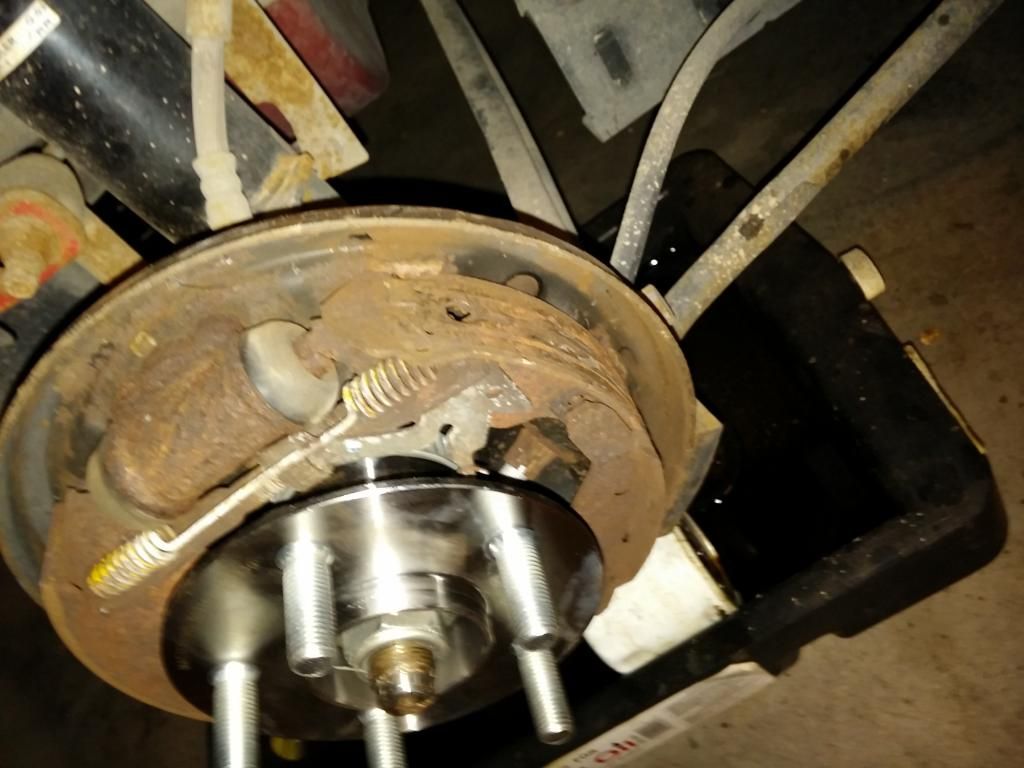
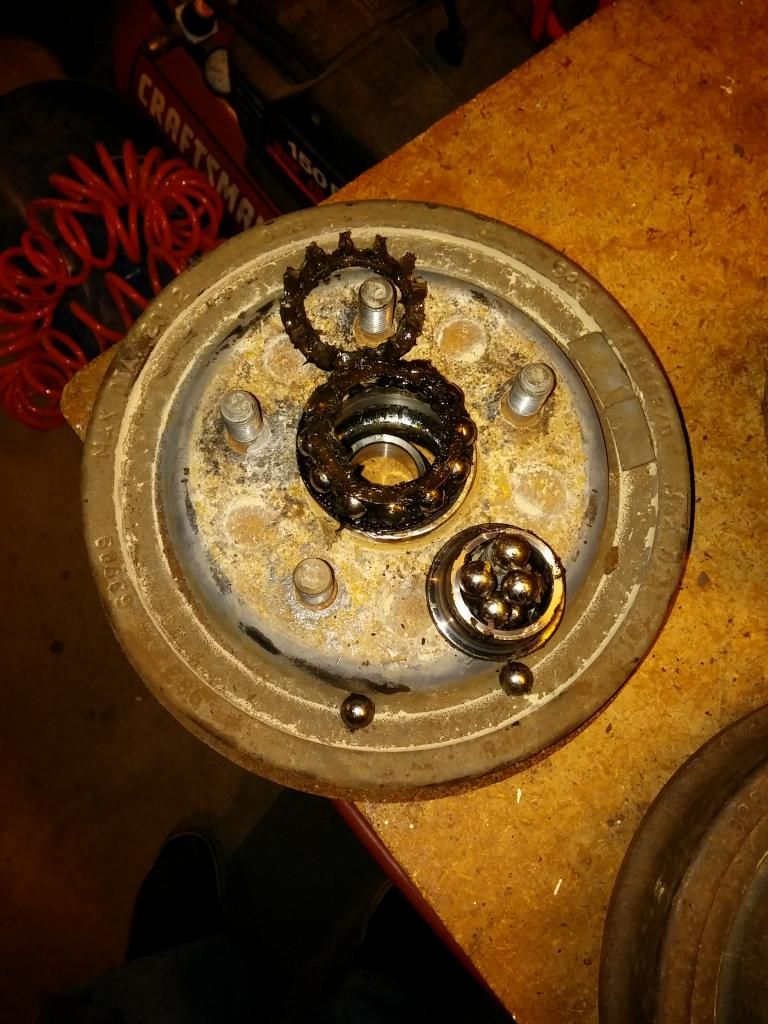
So, after cussing, grunting, cussing, and moaning I had no choice but undergo the dreaded rear drum brake replacement. Wasn't fun but I got it done. "while I was in there"....lol I figured fuck it, and replaced everything. I will let the pics tell the tale from here. After all that is the reason we check out progress logs, right?
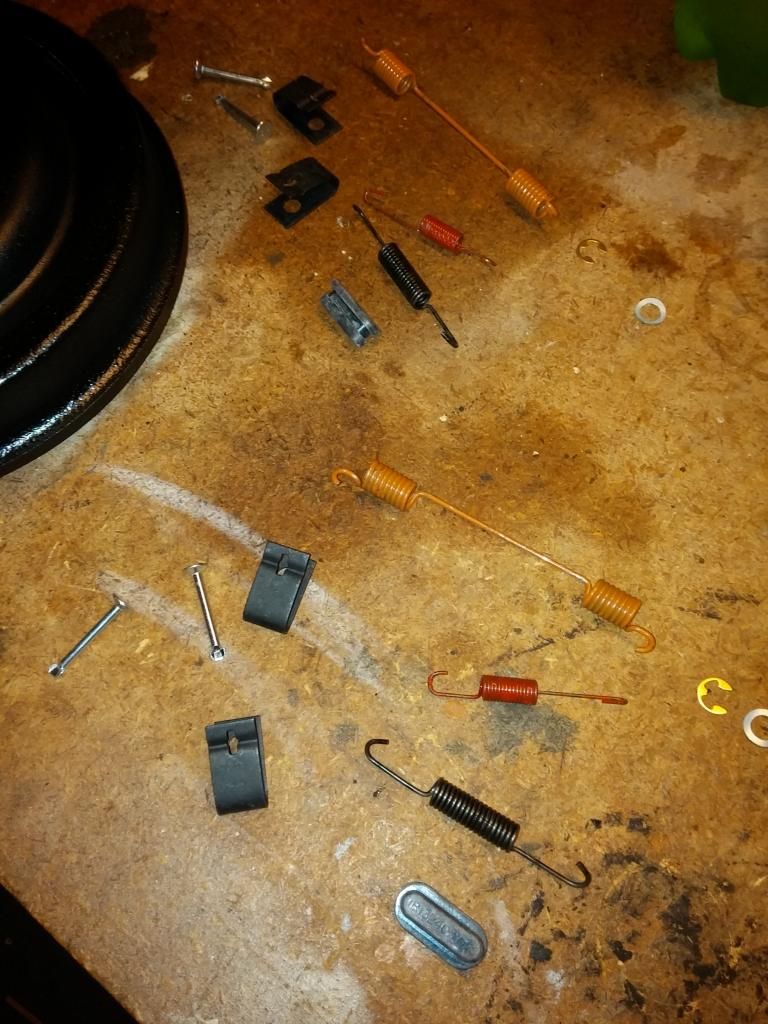

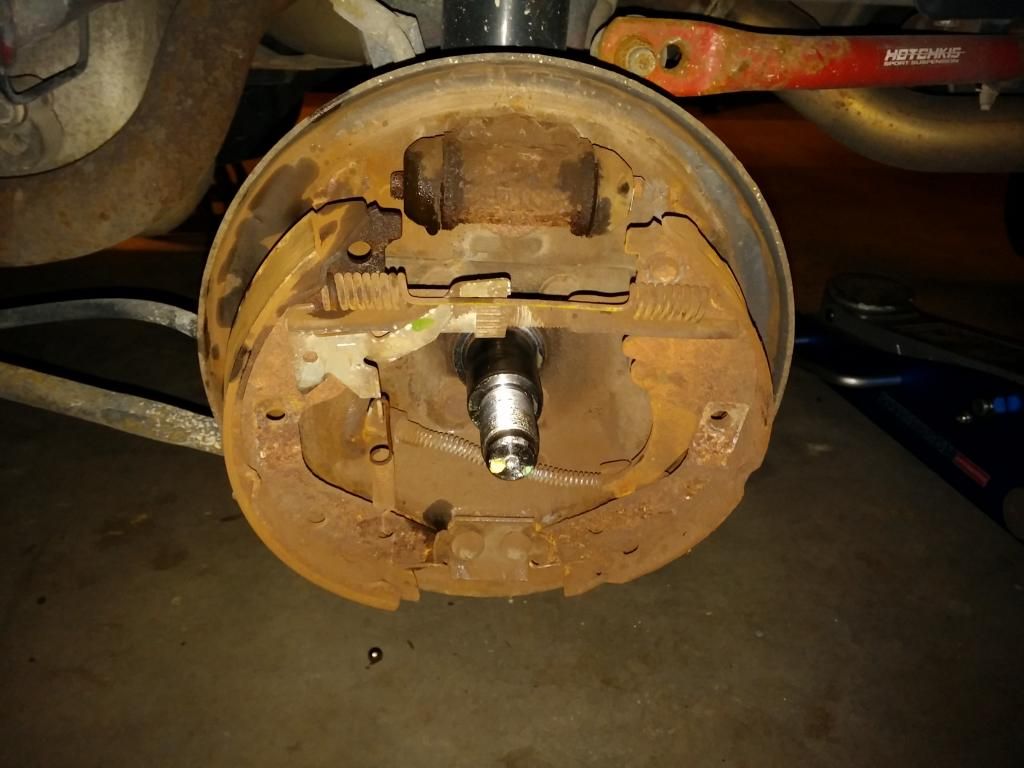
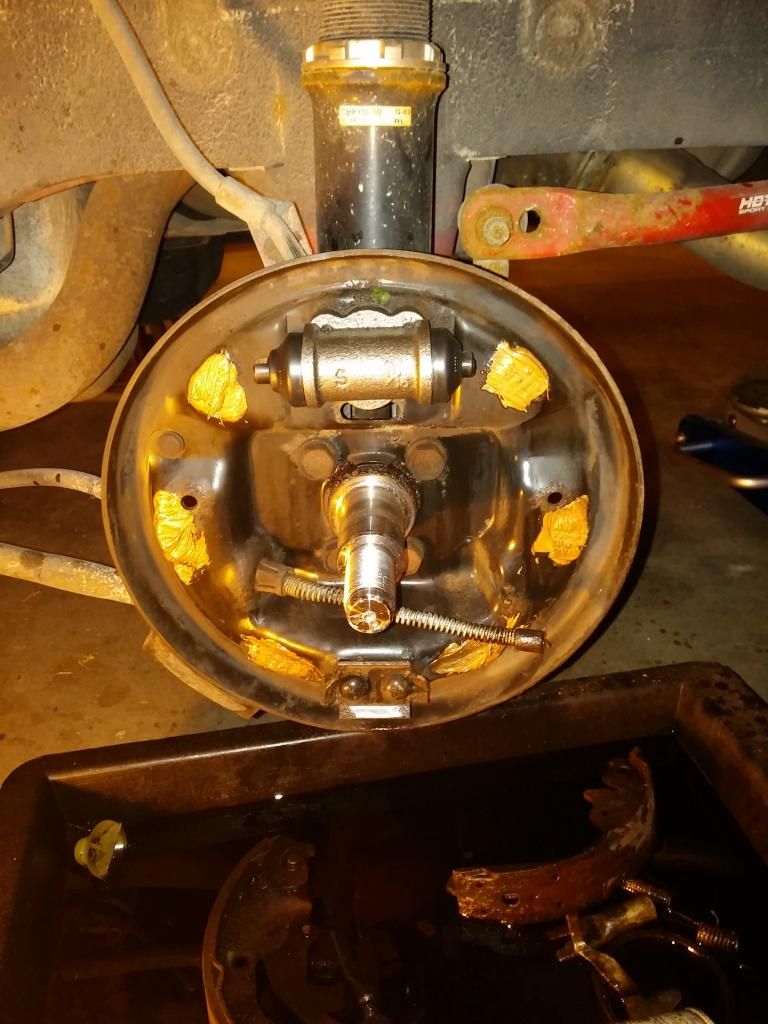
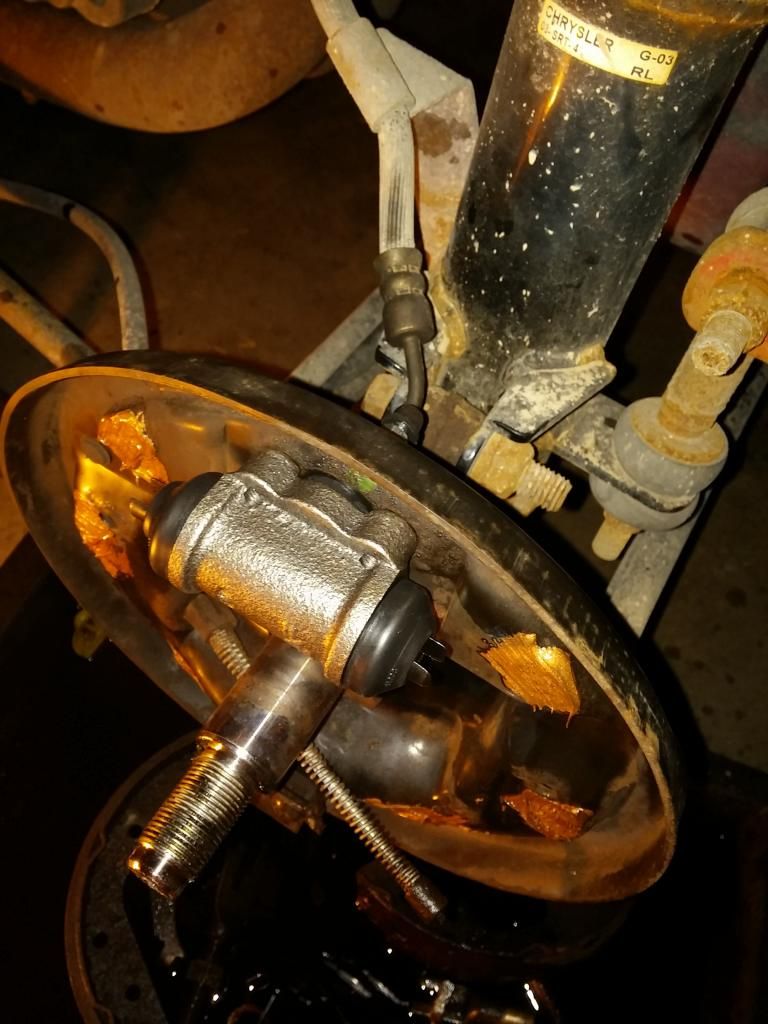
[URL=http://s239.photobucket.com/user/PapaD0 ... 4.jpg.html]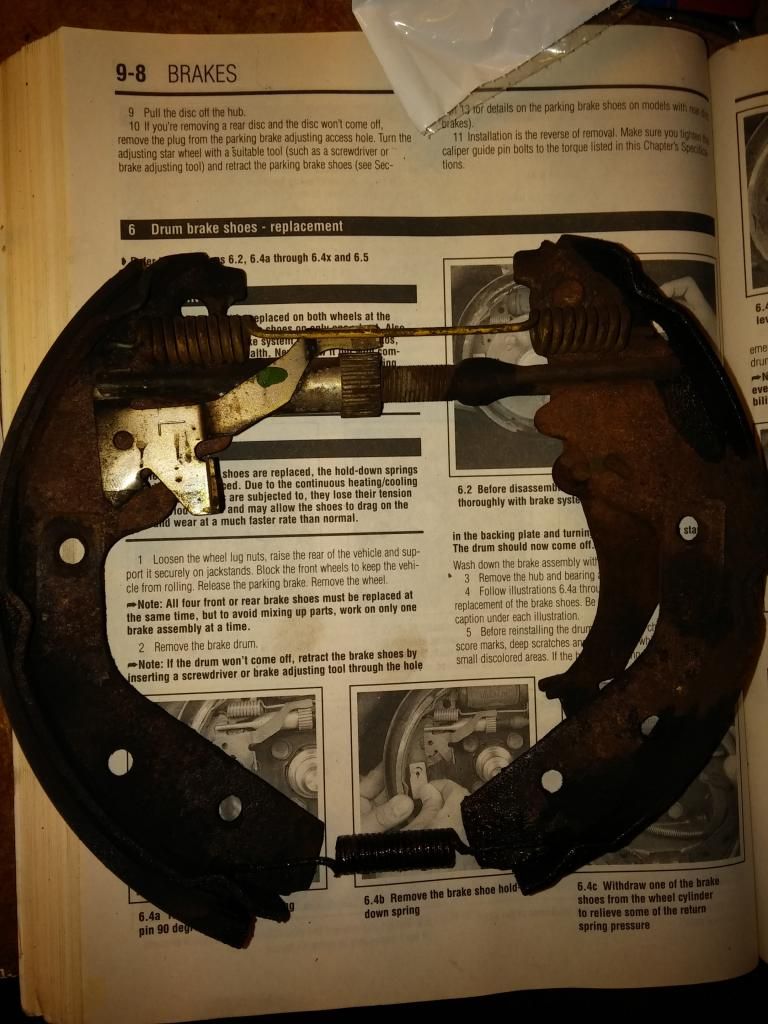
[URL=http://s239.photobucket.com/user/PapaD0 ... 2.jpg.html]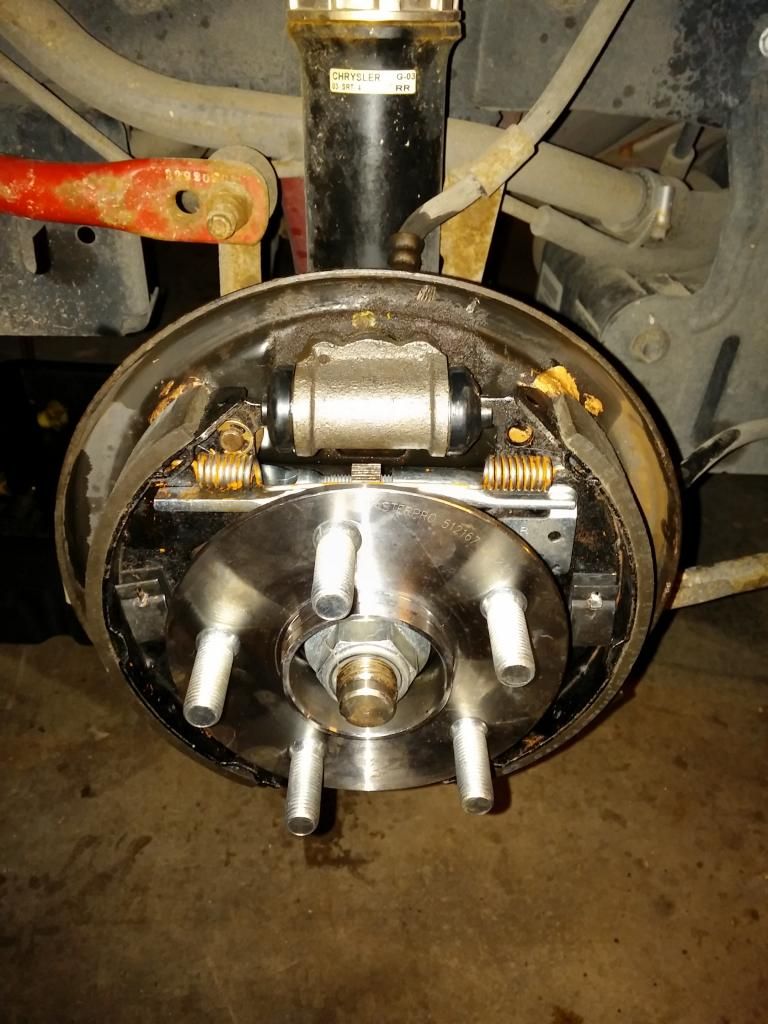
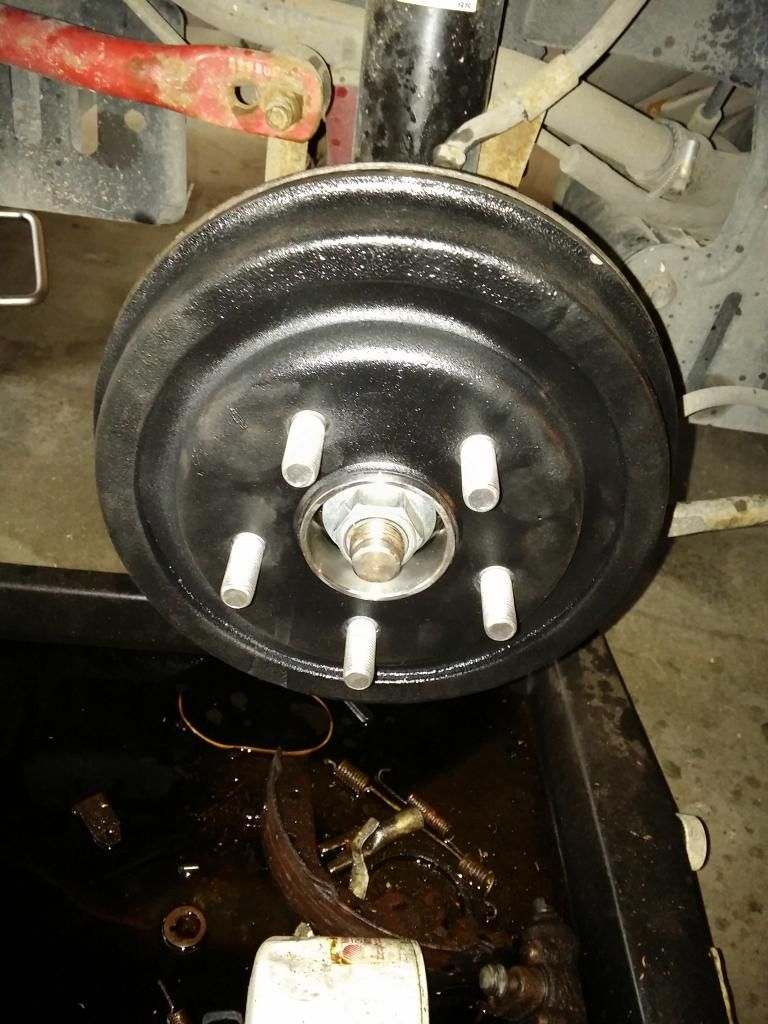
So now the rear end is quiet, smooth, and stops the car nicely...yay!
Also, you guys remember that embarrassing front end issue? I addressed that too! Bought a few things like, these....
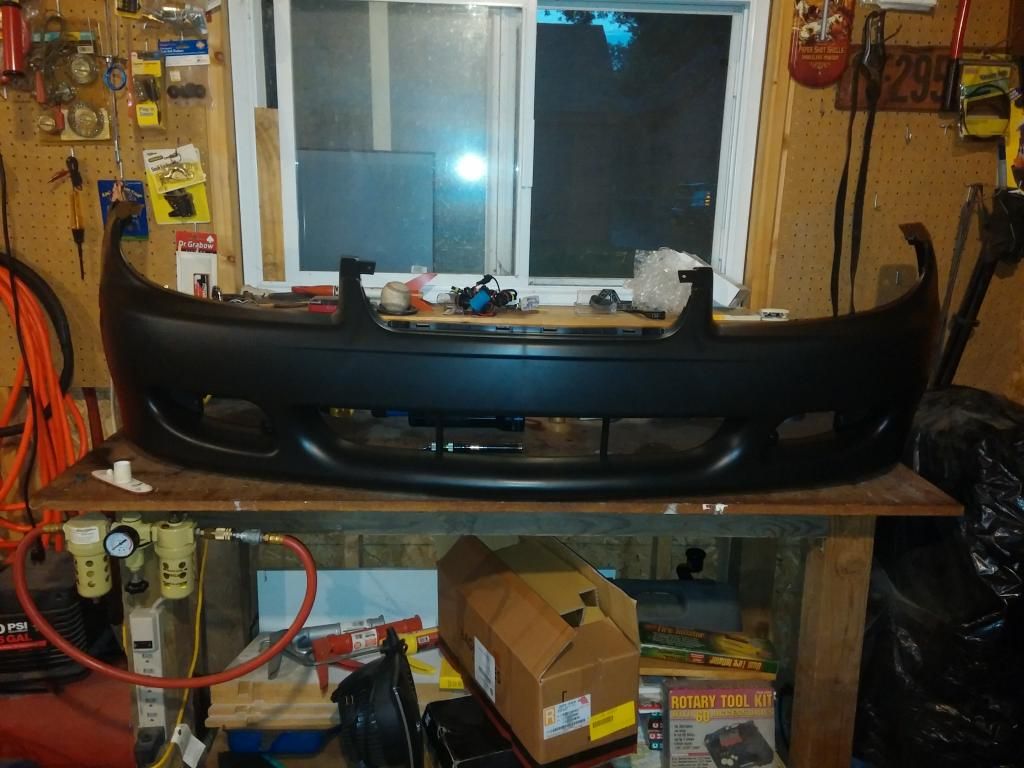
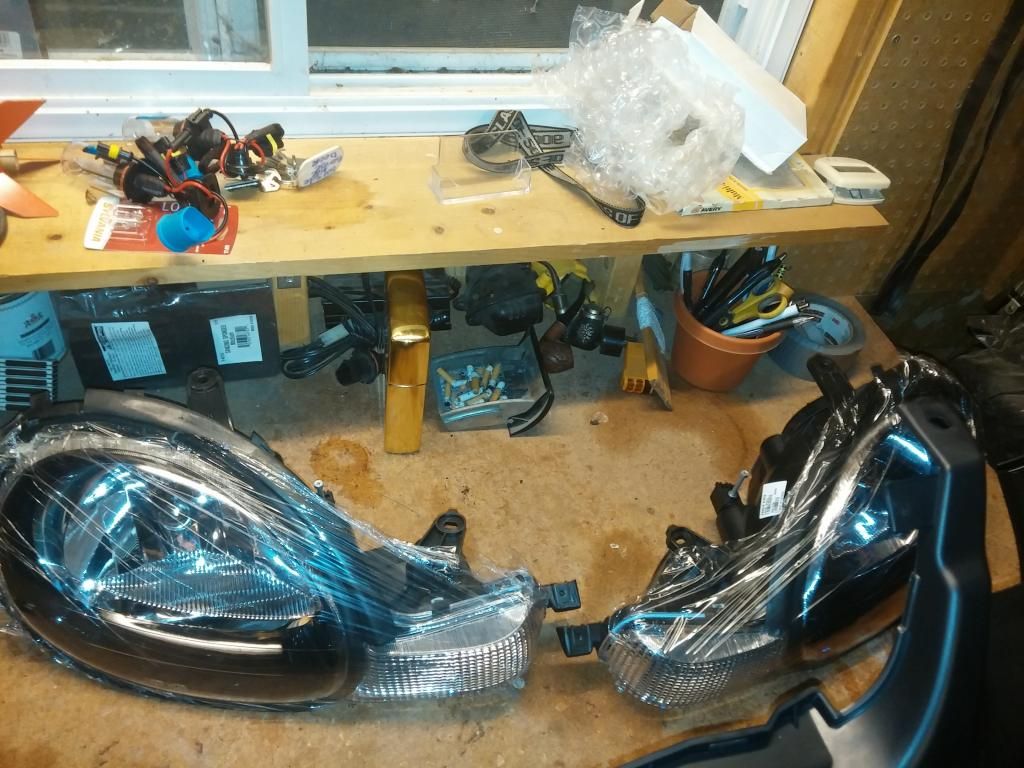
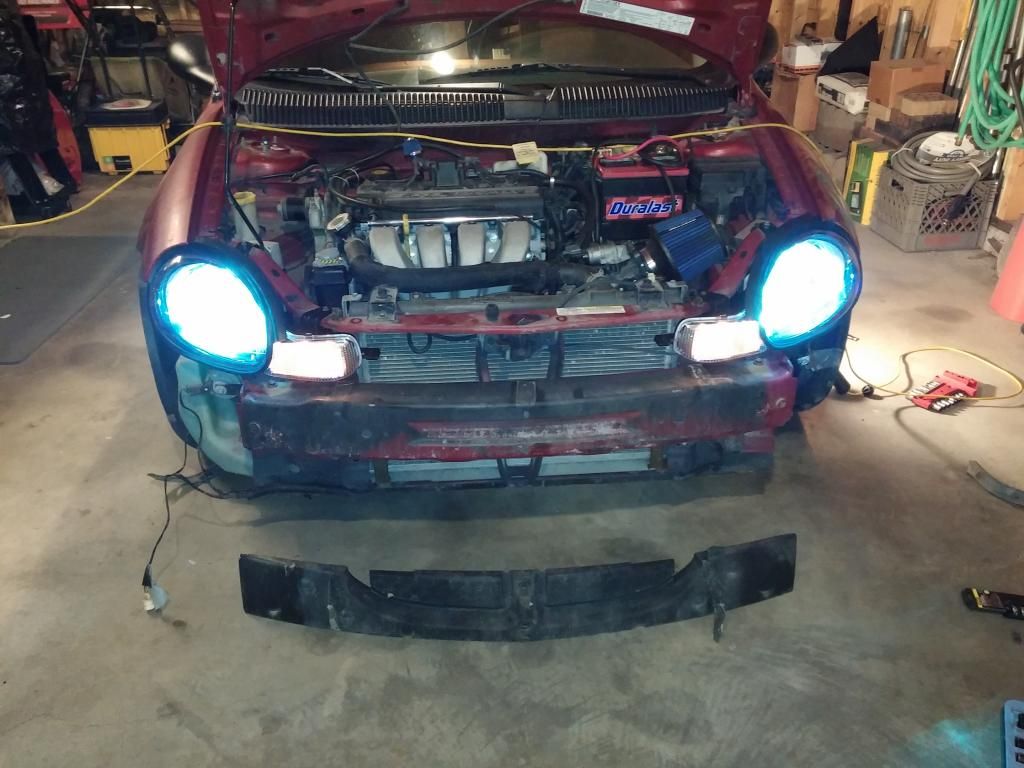
And went from this...
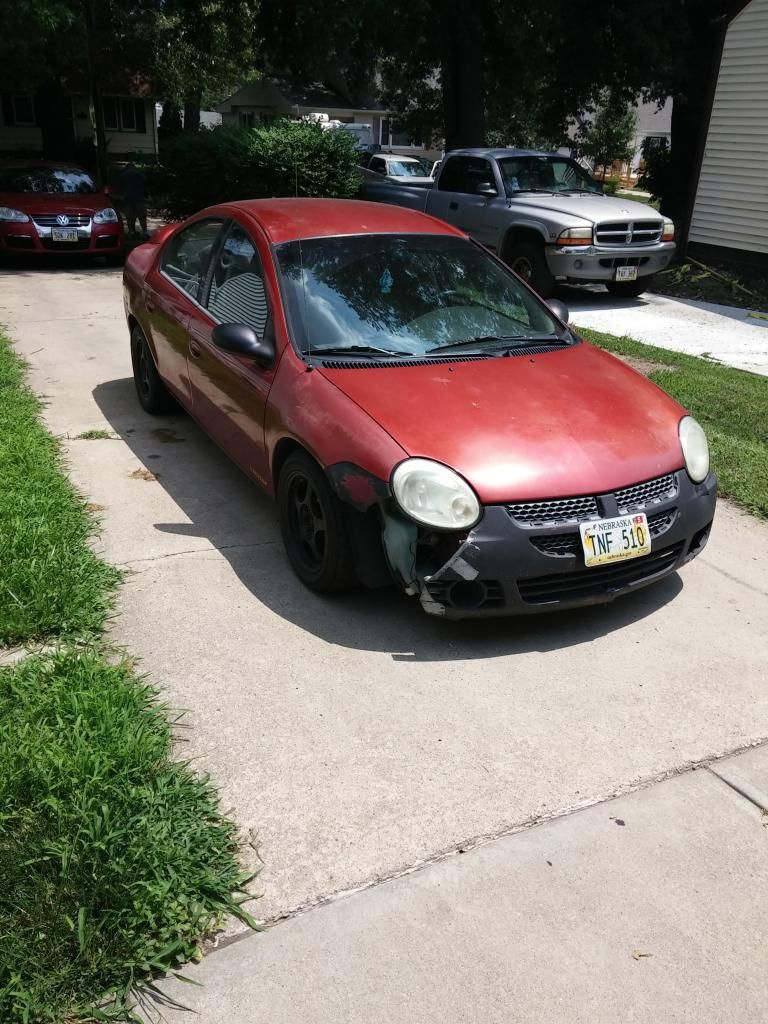
TO THIS!!!
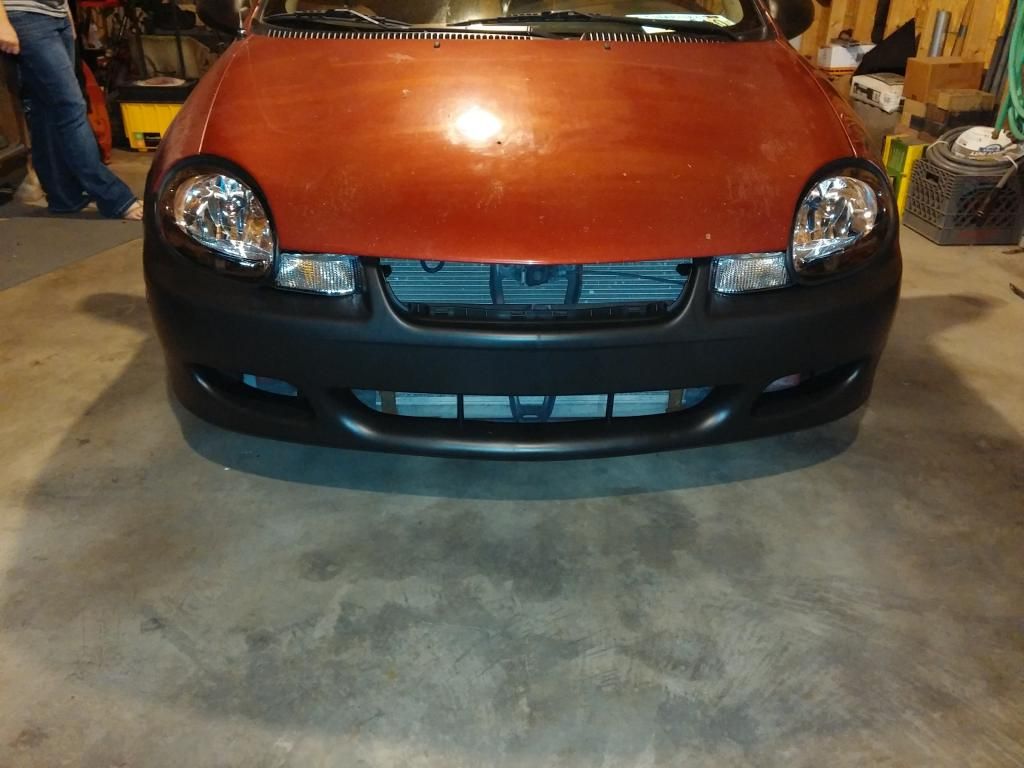
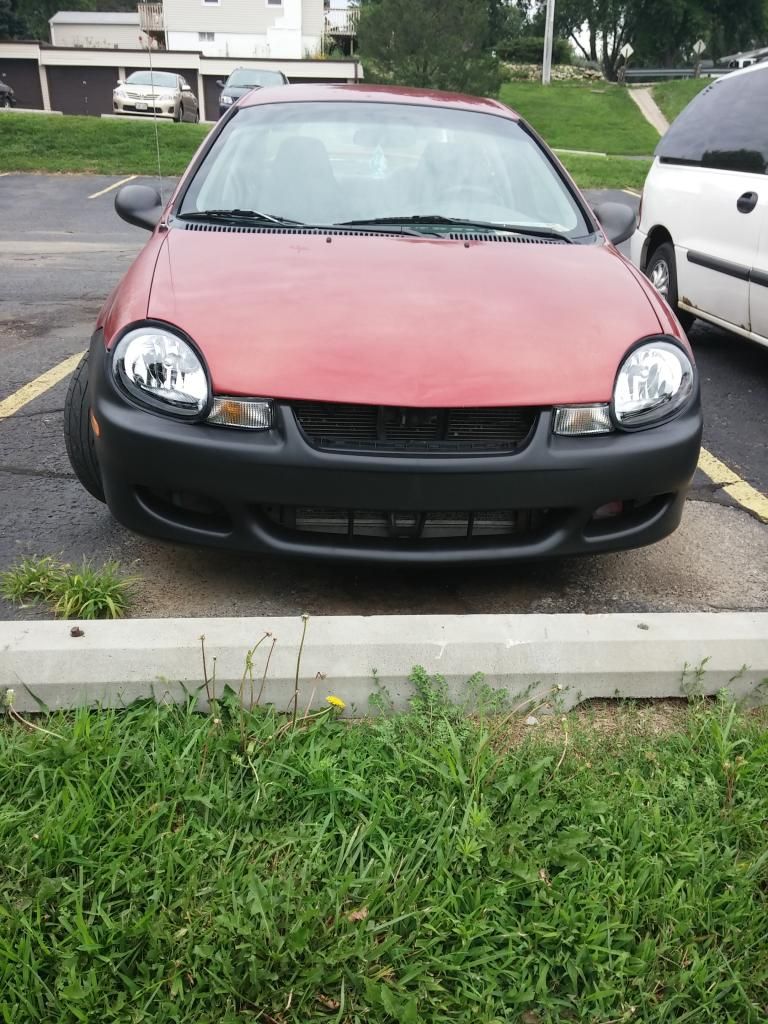
Still needs a few odds and ends, like a grille, and foglights to be complete but, overall I am pretty happy with it and super stoked to be done with the half assed, falling apart grand caravan bumper lol.
I do have one issue though, if anyone can shed some light and help me out. I reattached the parking brake cables in the rear (total pain in the ass by the way) but for some reason my parking brake doesn't work, I double checked to make sure they are still connected and that the adjuster were set (I think) but it goes up and the car rolls freely. Worries and pisses me off
Any help would be greatly appreciated and thanks for the support and input guys!! Keep it coming and thanks for looking
Crap ton of work done over the last week so I figured I should post some updates.
Last week the rear end started to make some interesting noises soo... I bought a new hub for the passenger side. (The one in question) for like 23 bucks with my discount and figured it will be a quick and easy fix. WRONG! lol While removing the drum one of the shoes decided it no longer needed to hold onto its brake material and decided it would be better without it...not good. The other side was worse, I figured since I now had to do brakes I should pull the other drum....which was frozen to the hub, so I pulled the hub and the bearing exploded.....also not good.


So, after cussing, grunting, cussing, and moaning I had no choice but undergo the dreaded rear drum brake replacement. Wasn't fun but I got it done. "while I was in there"....lol I figured fuck it, and replaced everything. I will let the pics tell the tale from here. After all that is the reason we check out progress logs, right?


[URL=http://s239.photobucket.com/user/PapaD0 ... 4.jpg.html]

[URL=http://s239.photobucket.com/user/PapaD0 ... 2.jpg.html]


So now the rear end is quiet, smooth, and stops the car nicely...yay!
Also, you guys remember that embarrassing front end issue? I addressed that too! Bought a few things like, these....


And went from this...

TO THIS!!!


Still needs a few odds and ends, like a grille, and foglights to be complete but, overall I am pretty happy with it and super stoked to be done with the half assed, falling apart grand caravan bumper lol.
I do have one issue though, if anyone can shed some light and help me out. I reattached the parking brake cables in the rear (total pain in the ass by the way) but for some reason my parking brake doesn't work, I double checked to make sure they are still connected and that the adjuster were set (I think) but it goes up and the car rolls freely. Worries and pisses me off
Any help would be greatly appreciated and thanks for the support and input guys!! Keep it coming and thanks for looking
MY PROJECT LOG My Old 2002 ES AND My 2003 SXT
It is not that we cannot be friends, it's that you are a zombie, and I am almost out of ammo. -Someone
It is not that we cannot be friends, it's that you are a zombie, and I am almost out of ammo. -Someone
Looks very nice, the pictures could be helpful for someone doing all this. When I replaced my rear bearings I was glad to see that I did not have to go through replacing the rear brakes. I did replace a wheel cylinder at some point though.
Regarding your e-brake issue it sounds like you need to adjust the rear brakes. They do not necessarily do that on their own that much. If I remember correctly, you can pull the e-brake handle up four notches and then adjust the drum brakes by turning the gear inside the drums through the inspection hole that is covered by that rubber cover. You basically bring the brake shoes toward the drum. Once you release the e-brake it should not rub when you turn the wheel. I think that was the procedure someone on the .org recommended.
Regarding your e-brake issue it sounds like you need to adjust the rear brakes. They do not necessarily do that on their own that much. If I remember correctly, you can pull the e-brake handle up four notches and then adjust the drum brakes by turning the gear inside the drums through the inspection hole that is covered by that rubber cover. You basically bring the brake shoes toward the drum. Once you release the e-brake it should not rub when you turn the wheel. I think that was the procedure someone on the .org recommended.
-
D-Railed_Neon
- 2011 Bronze Contributor
- Posts: 723
- Joined: Sun Oct 23, 2011 8:39 pm
- Location: Bellevue, NE
Hell yes!! I was actually thinking about doing exactly that. It was a tight fit getting the drum back on so I left some slack in the adjusters. Was thinking about getting in there with a screw driver and turning the star bolt down to see if it would help and I think that just might do it. Also, I post a ton of pictures for two reasons. 1. to show off my work which I take pride in and 2. to help other folks thinking about doing the same thing. I really appreciate the feedback man, and will be trying to pull some slack out of the adjusters tomorrow. Thanks so much man, you confirmed what I was thinking.
MY PROJECT LOG My Old 2002 ES AND My 2003 SXT
It is not that we cannot be friends, it's that you are a zombie, and I am almost out of ammo. -Someone
It is not that we cannot be friends, it's that you are a zombie, and I am almost out of ammo. -Someone
-
D-Railed_Neon
- 2011 Bronze Contributor
- Posts: 723
- Joined: Sun Oct 23, 2011 8:39 pm
- Location: Bellevue, NE
Good deal. Had to work early today and I get out late so I will try this tomorrow morning and see if I can't get my parking brake back. Thanks again man!
MY PROJECT LOG My Old 2002 ES AND My 2003 SXT
It is not that we cannot be friends, it's that you are a zombie, and I am almost out of ammo. -Someone
It is not that we cannot be friends, it's that you are a zombie, and I am almost out of ammo. -Someone
-
D-Railed_Neon
- 2011 Bronze Contributor
- Posts: 723
- Joined: Sun Oct 23, 2011 8:39 pm
- Location: Bellevue, NE
Just an update, thanks again Thomas, got some free time last night to get the brakes tweaked and voila! I have a parking brake again! lol. Also adjusted in the new headlights, and jumped under the car to tweak the exhaust, which keeps rattling itself loose. Next project found!
MY PROJECT LOG My Old 2002 ES AND My 2003 SXT
It is not that we cannot be friends, it's that you are a zombie, and I am almost out of ammo. -Someone
It is not that we cannot be friends, it's that you are a zombie, and I am almost out of ammo. -Someone