2GN Rally Neon Build Project

Do you have a project going or will you be starting a project here very soon and just want to keep a log of everything you and when? Share with everyone every step of the way what sort of progress you are making on your project.
User avatar
webkris
2GN Member
Posts: 71
Joined: Tue Aug 10, 2010 7:23 pm

2GN Rally Neon Build Project

Post by webkris » Thu May 19, 2011 4:42 pm

Greets all!
Image
Image
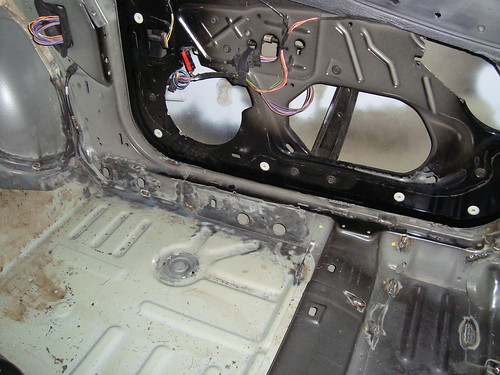
I'm finally starting the build of my second Rally Neon. It's a 2003 Dodge Neon SXT MT which I picked up for cheap and my plan is to prep the car for Open 2WD (That's the 'do anything you want' forced induction class.) Since we're ditching most of the interior and we'll be going with upgraded or custom turbo parts it didn't make much sense to start with an SRT-4 with 90K miles on it. The plan is to get the car caged and ready for rally - test with the 2.0L and finish an event or two and then swap to an SRT-4 motor.

I invite you to follow the progress on our site - http://rallynotes.com (and on the FB page https://www.facebook.com/rallynotesteam)
We're going to be doing some pretty advanced stuff: Cage, Seam welding, re-design radiator support, strengthen (or replace) K-frame, rally suspension, plexi windows, carbon fiber fabrication, fiberglass trunk / hood, electronics, aerodynamics, etc, etc. We just finished taking the 31.2 pounds of sound deadening off the floors and firewall. The car is on a strict diet: http://rallynotes.com/2011/04/the-2gn-g ... -car-diet/

The reason I chose the 2003 SXT was based on what I read here on 2GN.org - You guys are a HUGE resource of info. I want to help that out by documenting the project and questions here.

Image

So I have a couple of questions and would love to hear your input on some of the ideas I want to try.
* Should I scour the earth for an SRT-4 fuse-box engine bay wiring? I'll certainly get the SRT-4 engine harness. The reason I ask is that I am just about to clean up the engine bay wiring now that the 2.0L is out. A former owner bashed the radiator support hard and that jammed wires into the AC compressor. :| No wonder the headlight switch connector melted...
* Rally is unkind to FMIC's. :D I'm looking to do a "side by side" radiator and intercooler. Know anyone who has a successful setup? We'll also be adding venting and fans to pull the air out through the top of the hood (ala Ford Focus WRC style) this will also mean re-routing the turbo piping with a custom exhaust.
* I can find CF and fiberglass hoods, but no fiberglass trunk lids. Any ideas?

Next up - We find seats that fit us, seam welding, and roll cage.
If there is anything at all the I can answer for you guys about stage rally - let me know!

Thanks!
- Kris
Last edited by webkris on Mon Oct 17, 2011 5:48 pm, edited 1 time in total.

honda_zman
2GN Member
Posts: 154
Joined: Thu May 19, 2011 12:09 pm
Location: West Branch, Michigan

Post by honda_zman » Thu May 19, 2011 4:52 pm

my friend ran this years sno*drift rally in his rally cavilier.. huge fan! do work
Image
01 neon low and slow
98 civic turbo'd sohc 11psi

cgneon
2GN Member
Posts: 1734
Joined: Tue May 03, 2005 11:10 pm
Location: JUPITER, FL

Post by cgneon » Thu May 19, 2011 5:12 pm

:/
Image
Official "I'm Going to Drive My Neon till it Dies" Club #000082

User avatar
Danteneon
Former Moderator
Posts: 9591
Joined: Thu Dec 20, 2007 5:13 pm
Location: Manassas, VA

Re: 2GN Rally Neon Build Project

Post by Danteneon » Thu May 19, 2011 5:27 pm

webkris wrote:So I have a couple of questions and would love to hear your input on some of the ideas I want to try.

* Should I scour the earth for an SRT-4 fuse-box engine bay wiring? I'll certainly get the SRT-4 engine harness. The reason I ask is that I am just about to clean up the engine bay wiring now that the 2.0L is out. A former owner bashed the radiator support hard and that jammed wires into the AC compressor. :| No wonder the headlight switch connector melted...

You could use the SXT harness and fuse box assby, but you would need to add a few SRT specific circuits. It really shouldn't be too hard to find a SRT harness. They do pop up from time to time (there is a SRT part-out in the FS threads now IIRC)

* Rally is unkind to FMIC's. :D I'm looking to do a "side by side" radiator and intercooler. Know anyone who has a successful setup? We'll also be adding venting and fans to pull the air out through the top of the hood (ala Ford Focus WRC style) this will also mean re-routing the turbo piping with a custom exhaust.

I have nothing to offer for this one, but I would think it could be done if you are doing your own core support mods though. Hybrid's 1st gen build is using a half sized aluminum radiator that leaves a lot of room for a side mounted intercooler.

* I can find CF and fiberglass hoods, but no fiberglass trunk lids. Any ideas?

Carbon by Design offers their decklid in FG, CF, and Race CF. On the pull down menu you can select the material. It's cheaper in FG too :D

http://www.carbonbydesign.com/proddetai ... cf%5Ftrunk
If I could just figure out how to meld the Outback and the Neon into one car...

Image

User avatar
webkris
2GN Member
Posts: 71
Joined: Tue Aug 10, 2010 7:23 pm

Post by webkris » Thu May 19, 2011 6:05 pm

Thanks Danteneon -

Fuse box wiring - Adding a few circuits doesn't sound too bad - considering what I'll be adding for lights and rally computer, etc. I take it it's a couple of solenoids / sensors for boost, BOV, intake air temp, etc. ?

Side by Side Rad / IC - To add to this complexity I want to keep the AC :D Rallies often have long transits to the stages and since we are in SoCal I'm going to try to keep it to keep the co-driver (read: wife) happy. I don't think a smaller condenser is going to be that much of a detriment to the AC system - so I'll be scouring the junkyards for a smaller one that matches whatever custom radiator we do.

Fiberglass trunk - Carbon by Design is 20 miles from my office. +1 for living in SoCal.

ZeroChad
2009 Gold Contributor
Posts: 3165
Joined: Sat Sep 01, 2007 11:08 pm
Location: Austin, Tx
Contact:

Post by ZeroChad » Fri May 20, 2011 12:56 am

Love. love. love it.

I have a feeling I'm going to forget to check your blog. Would you mind throwing new posts on here too when you make more?


What do you mean by seam welding? Are you talking about the pinch welds or the interior where that funky foam glue stuff is all around?

do you still have some of the stuff laying around that you've taken out? I think it would be cool to weigh some of the parts and create a weight reduction thread!

Also, what is the ballsack shaped thing on the ebrake?


I took the “wiring trough” that sits on the dash out and went through the harness. I wrapped everything remaining up with zip-ties and removed a lot of the sticky tape. You certainly don’t want bundles of exposed wires, but if you need to fix an electrical problem, you don’t want to spend an hour on the side of the road identifying and unwrapping wires
I completely agree with this. I'm going the same route with my car as well. Right on target with the wire taps and butt connectors too. I started using those on my cars 4yr ago before I new better. Never again.
Old Neon Log | Feedback

2000 - Corvette Coupe
2002 - Neon SE Fully Built (scrapped)

User avatar
webkris
2GN Member
Posts: 71
Joined: Tue Aug 10, 2010 7:23 pm

seam or stitch welding

Post by webkris » Fri May 20, 2011 11:14 am

ZeroChad wrote:Love. love. love it.
I have a feeling I'm going to forget to check your blog. Would you mind throwing new posts on here too when you make more?
Sure - as long as the mods are cool with it - I'm not doing this for profit.

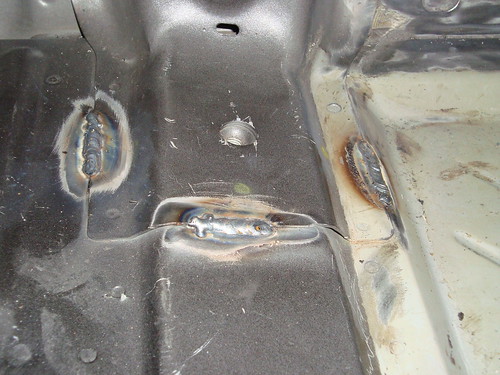
What do you mean by seam welding? Are you talking about the pinch welds or the interior where that funky foam glue stuff is all around?
Take a look at the picture below.

do you still have some of the stuff laying around that you've taken out? I think it would be cool to weigh some of the parts and create a weight reduction thread!
I finally threw away the sound deadening after weighing @ 31+ pounds. That is specifically: All the tar on the foot wells and firewall, and the rubber mat covering the firewall.

I have the door metal and plastics which I'll be weighing. I estimate about 8 pounds off each of the rear doors and about 4 off the front doors with the crash beam removed. Don't ever do this without a roll cage to replace the safety beams you removed. I'll take a separate measurement for just the plastic.


Also, what is the ballsack shaped thing on the ebrake?
Hehe - that's the wire boot for one of the doors. :p I didn't want to lose it, so I popped it there.

I completely agree with this. I'm going the same route with my car as well. Right on target with the wire taps and butt connectors too. I started using those on my cars 4yr ago before I new better. Never again.
Good to hear.
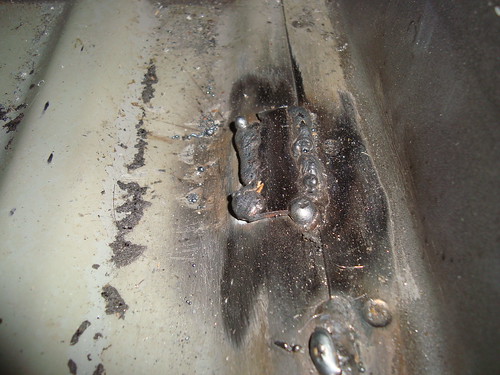
Seam welding or stitch welding is where you join all the seams with 1" long welds every few inches. This adds stiffness and strength to the uni-body and will make the chassis last longer. We did this in the front of our last car and we'll be doing it inside and out of the new car. If you plan to road race your car, or rally your car for more then a few years - this is suggested.

http://www.flickr.com/photos/planetkris ... 804283307/

- Kris
Last edited by webkris on Tue Aug 14, 2012 11:00 pm, edited 1 time in total.

User avatar
webkris
2GN Member
Posts: 71
Joined: Tue Aug 10, 2010 7:23 pm

The Motor is out, now for serious business.

Post by webkris » Fri May 20, 2011 1:13 pm

Image
Last weekend a gathering of rally friends helped take out the 2.0L 420A. This was made easier by taking a Sawzall to the radiator support. :) As we were taking the motor out we discovered some pretty serious damage to the bottom core support and the wiring harness that goes to the lights. This had been ground into by the AC compressor upon hitting whatever bent the metal of the front end. :eek: This explains the melted connector on the back of the headlight switch and the crackle sparking sounds when I turned on the fog lights.

Next is a serious discussion about the roll cage design for the 2GN. When I built the first Rally Neon I was hesitant to put any info of authority on rallynotes. I was new and didn't want to come off like some expert on the rules for roll cage design. This time around I'm still no expert, but I'll show you what we're planning.

Image
This is my proposal for a door bar layout. I think the door bars are one of the most critical areas and it's important to balance safety with the ability to get in and out of the car.

The rules: http://www.nasarallysport.com/rules-for ... ndix-B.pdf - NASA RallySport
http://www.rally-america.com/info/2008_Rollcage.pdf - Rally America
Both sanctioning bodies have a slightly different view of the best method for coming up with a safe roll cage. I could write a book about the complex differences between the two organizations, but I'll summarize what you need to know: Both organizations accept each others log book. NASA Rally Sport requires FIA seats and Rally America as of this writing does not. Which rule-set should you use? YMMV. Find someone who has been building rally roll cages for a few years and has some experience.

The sill bar. Back in 2003 when SCCA was running the show, there was a movement in the rules to get an additional door bar added. Before this, you only needed 1 bar going from the main hoop to the front A-pillar. I can't even imagine sliding sideways at 90MPH with a single 1.5" door bar... Then again, cars used to be made from steel and not hydroformed .0025" thick zinc coated plastic sheets. ;) The solution was to add a straight bar from the main hoop to the A-Pillar close to the floor on the sill. A lot of rallyists started adding the full "X" WITH a sill bar, but the minimum in the rules (as of mid-2011) is only 2 door bars. Sill bar and a diagonal, OR just the "X". After seeing a car take a tree stump in the door with just the "X" - we'll be adding the additional sill bar.

The bar from the corner of the windshield to the floor (along the A-Pillar) is now mandatory and we're considering adding it to our production car. These cars are "jellybeans" and where a 1988 VW makes a 45% bend for the windshield, the Dodge "cab forward" design is this 15% decaying slope that needs to be strengthened if it's to survive a hit there.

If this design looks impossible to get in or out of the car with, consider that the stock dash extends beyond where the A-Pillar diagonal is, and the proposed door bars are no higher then the ones in our Production car. Will the full "X" make it a little harder to get in and out? I'm sure. Will we be going a little faster then in our Production car? Absolutely!

- Kris

sxxxt
2GN Member
Posts: 1667
Joined: Tue Oct 16, 2007 7:43 am

Post by sxxxt » Fri May 20, 2011 1:23 pm

Wow this progress log is my new fav.... I love the idea... You are very lucky to b in the situation ur in... Many of us wish we had a team to work on our cars..... If there was somethin like this in my neck of thr woods I'd deff b tryin to get on there...keeps us posted on every move u make hahaha

User avatar
webkris
2GN Member
Posts: 71
Joined: Tue Aug 10, 2010 7:23 pm

more pics...

Post by webkris » Sun May 22, 2011 11:55 pm

Image
DSC03651 by webkris, on Flickr
Mocking up the dashboard

Image
DSC03679 by webkris, on Flickr
The damage to the front harness by the AC pulley.

Image
DSC03687 by webkris, on Flickr
Relocation of fuse box and ECU.

NEW - New Gallery is up:
http://www.flickr.com/photos/planetkris ... 804283307/

- Kris
Last edited by webkris on Tue Aug 14, 2012 11:11 pm, edited 2 times in total.

User avatar
Canada
Junior Admin
Posts: 4816
Joined: Tue Jun 28, 2005 4:05 pm
Location: Island Grove, Ontario, Canada

Post by Canada » Mon May 23, 2011 9:56 pm

Hi Kris!
Thanks for sharing this! I am going to follow you guys on Facebook too.
You can update as much as you want here! We love seeing project logs like this!!
Can't wait to see all the new updates! Car is looking great!

LilSparkPlug
2GN Veteran
Posts: 12206
Joined: Thu Jan 10, 2008 4:49 pm
Location: RI

Post by LilSparkPlug » Tue May 24, 2011 10:25 am

Amazing work so far, you sir are very impressive :D

neonpla
2GN Member
Posts: 2571
Joined: Tue Aug 03, 2004 2:27 am
Location: Killeen, TX

Post by neonpla » Tue May 24, 2011 11:09 am

nice, thank you for sharing your build with us.
2008 Jeep Wrangler Unlimited
2005 Dodge Neon SRT4

User avatar
webkris
2GN Member
Posts: 71
Joined: Tue Aug 10, 2010 7:23 pm

Post by webkris » Tue May 24, 2011 11:55 am

Thanks guys!

Last night I put the dash wiring back in to test all of my connections. So far so good - all the door controls still work and the headlights came up (plugged in one light to test). The body harness is the last one to clean up and I'm going to add a couple of extra wires for power in the back (backup fuel pump, water spray, cool suit tank, etc.)

QUESTION: How do you "trick" the battery temp sensor?
My guess would be = Resistance

I found this:
The PCM uses the temperature of the battery area
to control the charge system voltage. This temperature,
along with data from monitored line voltage, is
used by the PCM to vary the battery charging rate.
The system voltage is higher at cold temperatures
and is gradually reduced as temperature around the
battery increases.

Cold out = more resistance = charge battery hard
Warm out = less resistance = charge battery light
Anyone know? It might be cool to be able to control that.

- Kris

User avatar
greybox
2GN Member
Posts: 97
Joined: Fri Jan 28, 2011 12:27 pm

Post by greybox » Tue May 31, 2011 6:39 pm

I like the project...I also like the exploded view of the interior...helps me realize where I need to look to get my interior apart. ;)

User avatar
webkris
2GN Member
Posts: 71
Joined: Tue Aug 10, 2010 7:23 pm

Seam Welding - Round 1 - Hand brake strength?

Post by webkris » Wed Jun 01, 2011 3:07 am

My friend came over on Sunday and we seam welded the interior.

We put down some good looking welds...
Image
DSC03695 by webkris, on Flickr

... seam along the foot-well, around the doors, etc.
Image
DSC03696 by webkris, on Flickr

and some "not so good looking" welds. :(
Image
DSC03698 by webkris, on Flickr

But HEY - that's okay, it's how we learn to be better welders!
We burned a hole in the floor (it's REALLY THIN metal!!!) and had to lower the power and get a scrap of steel to fill it in. I later ground this down smooth - but I think it was important to show that we're all human. :D

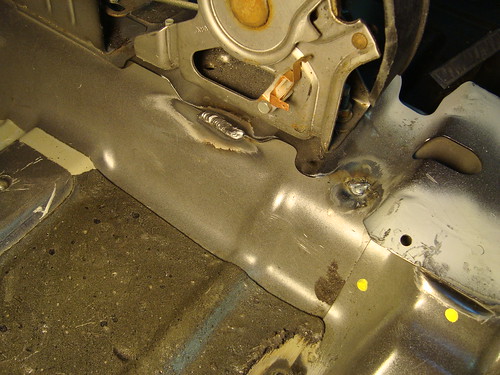
While we were at it - we strengthened up the handbrake bracket. I was surprised at how much this flexes. One of the spot welds had already let go and the metal was able to give a lot - with a medium pressure handbrake pull. We actually won't be putting in a hydraulic handbrake into this car. I know a lot of you have seen the top rally teams with these as 'standard issue' - but WRC cars are built for 100% attack with 100% budget. Plus they're AWD. With a FWD car there are only maybe 2 corners I have EVER driven that could actually benefit from a handbrake pull - and as long as the cable ones work you'll get the desired effect.

If you want to learn how to drive fast in the dirt with a FWD - What you need to learn instead is LEFT FOOT BRAKING! I can rotate the back of a Neon just as fast and WAY more in control with LFB then with the handdbrake. :D Come out to a rallycross - I'll show ya!

Added welds to bracket
Image
DSC03705 by webkris, on Flickr

More pics here - http://rallynotes.com/gallery

I just made a pretty big parts order so I'll tease what's in store over the next couple of weeks:
Kill switch and switch panel.
Battery relocate / Front terminals
Steering wheel "heavy modification" :biggthumpup: *http://www.jegs.com/i/Howe/505/5225/10002/-1

- Kris
Last edited by webkris on Tue Aug 14, 2012 11:08 pm, edited 1 time in total.

User avatar
webkris
2GN Member
Posts: 71
Joined: Tue Aug 10, 2010 7:23 pm

More mock up - and future steering wheel options for 2GN'ers

Post by webkris » Fri Jun 03, 2011 12:16 pm

$500 parts order in an appropriately sized box.
Image
DSC03720 by webkris, on Flickr

Grant steering wheel mock up with 2" extension.
Image
DSC03723 by webkris, on Flickr

After scouring the boards for an aftermarket steering wheel adapter for the 2GN - I came up with only 2. The MOMO the SPARCO - both completely unreasonable at over $70. :| Then I cross checked the adapters and what cars they worked with (Old Chevy pickup trucks) with the GRANT application guide, the "470-3162" kept coming up as a match - so I ordered it and can confirm that this adapter works for the 2GN. Bonus - instead of buying imported brand name goods from Italy - it was $17

Bonus #2 - I'm pretty sure I can get the blinker reset to work with some easy fabrication. I'll need a coil cord for the horn, but that should hide in the extension nicely.

I was excited just to see if it would work, but this weekend I'll document the process and add a reply to the "Steering Wheel" thread with all the pics and a how-to.

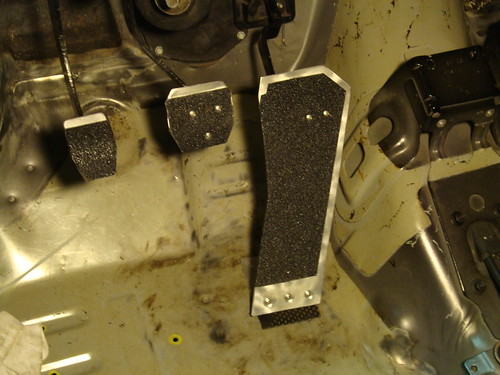
You'll also notice I'm working on a floor mounted gas pedal for my size 12's - The neon is pretty hard to heel toe stock and this should make a huge difference.

Enjoy!
- Kris
Last edited by webkris on Tue Aug 14, 2012 11:09 pm, edited 1 time in total.

User avatar
JeffM
2GN Member
Posts: 3588
Joined: Tue Nov 04, 2008 8:02 pm
Location: Vermont

Post by JeffM » Fri Jun 03, 2011 2:55 pm

:shock: This. Is. Awesome.
Image

Kelevra
2GN Member
Posts: 1399
Joined: Sun Apr 29, 2007 2:31 pm

Post by Kelevra » Fri Jun 03, 2011 2:59 pm

:withstupid: keep us updated!

User avatar
INVUJerry
2GN Veteran
Posts: 6878
Joined: Mon Nov 21, 2005 9:55 pm
Location: Hanover, PA
Contact:

Post by INVUJerry » Fri Jun 03, 2011 6:19 pm

This is going to become my favorite thread here. Amazing work is going on. You are doing something that is rarely seen on this site: Building a legitimate race car.

User avatar
Haganracing
2GN Member
Posts: 4168
Joined: Tue Jan 30, 2007 11:23 pm
Location: Mount Airy, Maryland
Contact:

Post by Haganracing » Fri Jun 03, 2011 6:57 pm

This is pretty neat!! can we sticky this?
occasional demons wrote:So maybe a FuzzyDanteHagan sammich might just beat a FuzzyHagan. :-k
Danteneon wrote:My advice is to fight those urges and enjoy the fact that you have both X and Y chromosomes. And an SRT. And your hand. You don't need a girl.

User avatar
webkris
2GN Member
Posts: 71
Joined: Tue Aug 10, 2010 7:23 pm

Post by webkris » Sun Jun 05, 2011 2:08 am

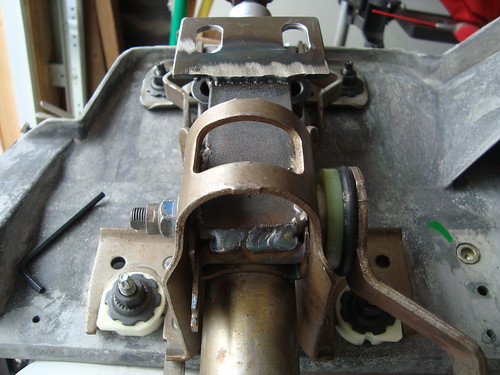
Howe Steering Quickener 1.5:1 fabricated into the tilt wheel steering mount.
Image
DSC03752 by webkris, on Flickr

I was hoping to keep the tilt wheel and it looks like I'll be able to.
Image
DSC03753 by webkris, on Flickr

Floor mounted gas pedal.
Video of the linkage: http://rallynotes.com/vids/MOV03729.MPG
Image
DSC03744 by webkris, on Flickr

Grant Steering wheel adapter.
Video of blinker reset: http://rallynotes.com/vids/MOV03742.MPG
Image
DSC03743 by webkris, on Flickr
Last edited by webkris on Tue Aug 14, 2012 11:15 pm, edited 1 time in total.

User avatar
webkris
2GN Member
Posts: 71
Joined: Tue Aug 10, 2010 7:23 pm

Leftover parts...

Post by webkris » Sun Jun 05, 2011 2:05 pm

Leftover parts...
If anyone has any interest in the leftover parts below - send me a PM.
I'm in SoCal and I'll sell for cheap.

You probably don't want any of the metal I took out of the doors ;) :D
Image
DSC03725 by webkris, on Flickr

- Kris
Last edited by webkris on Tue Aug 14, 2012 11:16 pm, edited 1 time in total.

User avatar
UriahRR
2GN Member
Posts: 2717
Joined: Fri May 29, 2009 6:21 pm
Location: East PA

Post by UriahRR » Sun Jun 05, 2011 4:29 pm

How much for the sxt steering wheel shipped to 18091?


Also, LOVE this project log. My grand plan is very similar to yours with road racing and autocrossing substituting for rally racing - seen way too many rally racers destroy their cars on the first time out because of a miniscule mistake.
Image

ZeroChad
2009 Gold Contributor
Posts: 3165
Joined: Sat Sep 01, 2007 11:08 pm
Location: Austin, Tx
Contact:

Post by ZeroChad » Sun Jun 05, 2011 10:57 pm

After scouring the boards for an aftermarket steering wheel adapter for the 2GN - I came up with only 2. The MOMO the SPARCO - both completely unreasonable at over $70. Then I cross checked the adapters and what cars they worked with (Old Chevy pickup trucks) with the GRANT application guide, the "470-3162" kept coming up as a match - so I ordered it and can confirm that this adapter works for the 2GN. Bonus - instead of buying imported brand name goods from Italy - it was $17
Awesome! So that will fit on our column and let any aftermarket wheel bolt up to it?
Old Neon Log | Feedback

2000 - Corvette Coupe
2002 - Neon SE Fully Built (scrapped)

User avatar
webkris
2GN Member
Posts: 71
Joined: Tue Aug 10, 2010 7:23 pm

Post by webkris » Mon Jun 06, 2011 12:14 am

ZeroChad wrote:Awesome! So that will fit on our column and let any aftermarket wheel bolt up to it?
I wouldn't say "any" aftermarket wheel - Certainly a Grant steering wheel. There may have to be some added research to see if others will fit. Grant had no applications listed for a 2003 Neon, and clearly - the 470-3162 works fine.

User avatar
DroopDaddy408
2GN Member
Posts: 609
Joined: Wed Feb 11, 2009 2:53 pm
Location: Tulare,Ca

Post by DroopDaddy408 » Mon Jun 06, 2011 7:16 am

Now this is hella koo!!
NorCal Homeboy
Image

User avatar
webkris
2GN Member
Posts: 71
Joined: Tue Aug 10, 2010 7:23 pm

Post by webkris » Sun Jun 12, 2011 4:49 am

Finalized the pedal modifications.
I can't wait to line the floors and paint the firewall all one color - cuz it looks pretty ugly right here. :|

Image
DSC03707 by webkris, on Flickr

Here's more detail on the quickener fabrication:
Image

- Kris
Last edited by webkris on Tue Aug 14, 2012 11:18 pm, edited 1 time in total.

User avatar
webkris
2GN Member
Posts: 71
Joined: Tue Aug 10, 2010 7:23 pm

Post by webkris » Wed Jun 22, 2011 11:02 am

Steering quickener is welded and tested.
Check out the video - less then 2 full turns from lock to lock!
http://rallynotes.com/vids/MOV03759.MPG

Bracket holding the quickener to the column. Tilt-wheel still works!
Image
DSC03749 by webkris, on Flickr

.750" dowel pin used to center the column to the adapter.
Image
DSC03751 by webkris, on Flickr

Full test - in place for cage fitment.
Image
DSC03754 by webkris, on Flickr
Last edited by webkris on Tue Aug 14, 2012 11:20 pm, edited 1 time in total.

User avatar
Danteneon
Former Moderator
Posts: 9591
Joined: Thu Dec 20, 2007 5:13 pm
Location: Manassas, VA

Post by Danteneon » Wed Jun 22, 2011 11:53 am

I had not heard of a steering quickener before. That is amazing :shock: Such a clean install for a custom piece too.

Do you know of any problems with using one of those on a street driven car?
If I could just figure out how to meld the Outback and the Neon into one car...

Image

Post Reply

Return to “Progress/Project Log”